I just can’t leave well enough alone! My $80 Trek frame has been fine, so why upgrade? Well, here’s the thing; I have been wanting to build a ‘full-suspension’ e-bike ever since Matt Robertson built his full-suspension e-bike. It’s just something I have to do! And since I built the Rat Bike from the ground up, I’m thinking I can just strip Build #2 down to the bare frame and put all the components on the new frame. So, here’s what I’m starting with:
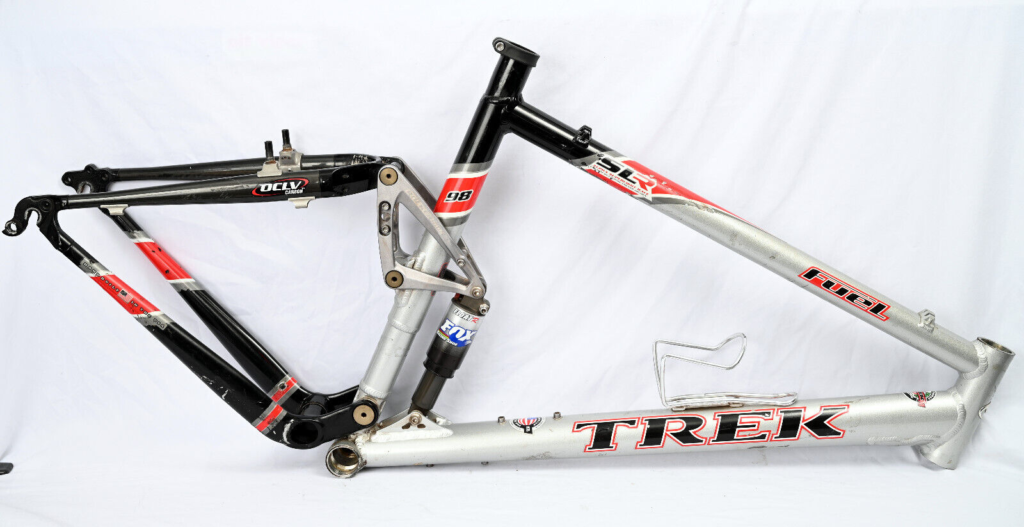
Trek Fuel SLR 98 OCLV Carbon Full Suspension Mountain Bike Frame 26″ Large 19.5″
From the photo, the frame appears I’ll have enough room to mount the battery and Epessa bag. This spacing was a critical decision point when choosing this type of frame. Most full suspension frames leave little room in this area for e-bike components. Once I receive the frame, I’ll need to measure everything to make sure head and crank bearings are transferrable, and verify that the frame is serviceable. It looks great in the picture, but…
This is a big project that will take several weeks to complete, and some will think I’m loony bins for attempting it. But here we go. I hope you’ll accompany me on this next journey!
Monday 11/28/22
In anticipation of the full-suspension frame arriving today, I completely disassembled the Build #2 ‘rat’ e-bike. This was the build using an $80 Trek frame with all new components and the 1000w Voilamart rear hub motor.
Thought process: move all the new components from the old Trek frame to the new (to me) full suspension frame.
Issue: the new frame arrives, but the steering head on the old Trek frame is 3.5″ and the new frame is 5.5″. The fork tube (aka ‘steerer’) is too short. Drat! So I ordered a new front fork, which won’t be here for a few days.
Tuesday 11/29/22
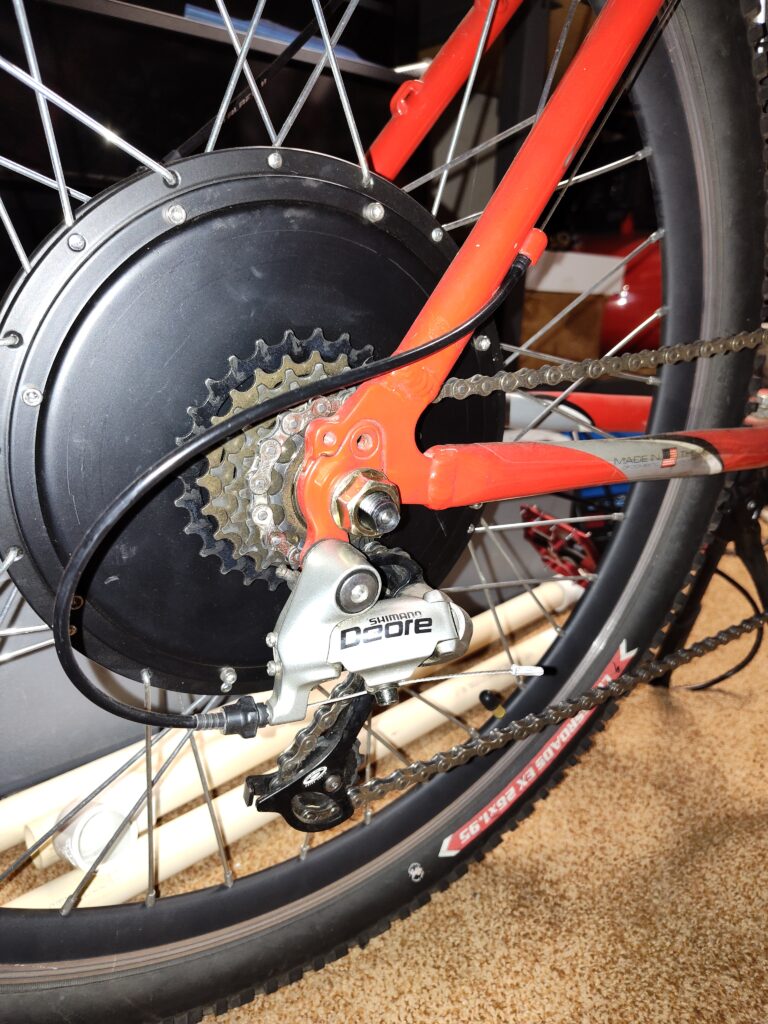
New plan: completely disassemble Build #1, the red rocket, which now has the new 500w Bafang motor, and move all those components over to the new frame. Turns out the fork tube is the right size and everything fit (rear disk brake adapter, cassette clearance, seat tube, etc.). Then move all the rat bike components back to the red rocket.
Build #1 is now completely disassembled. It got to keep its crank bearing, pedals and chainring, but that’s it. For those keeping score, I now have two of my 3 e-bikes completely disassembled and am now in the process of building another from the ashes of the other two. We’ll call this one the ‘Silver Phoenix’.
Wednesday 11/30/22 (rainy day)
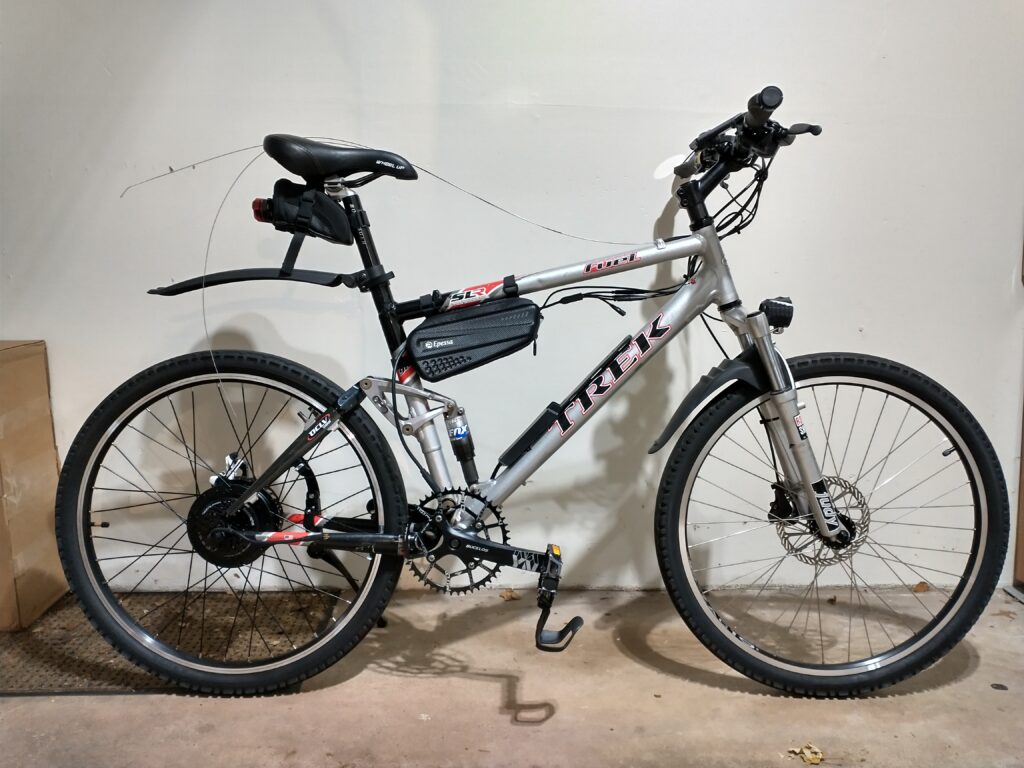
What else to do on a rainy day except build e-bikes? So that’s what I did. Here’s Build #5 about 75% complete. I will replace the front fork with the new one in a could weeks, but otherwise all that’s missing is a chain, plus cable and wire management (oh, and a battery, though the battery mount is installed and tested for clearance). I also needed to build an extension cable that connects the battery to the controller. Otherwise, everything fit up really nicely!
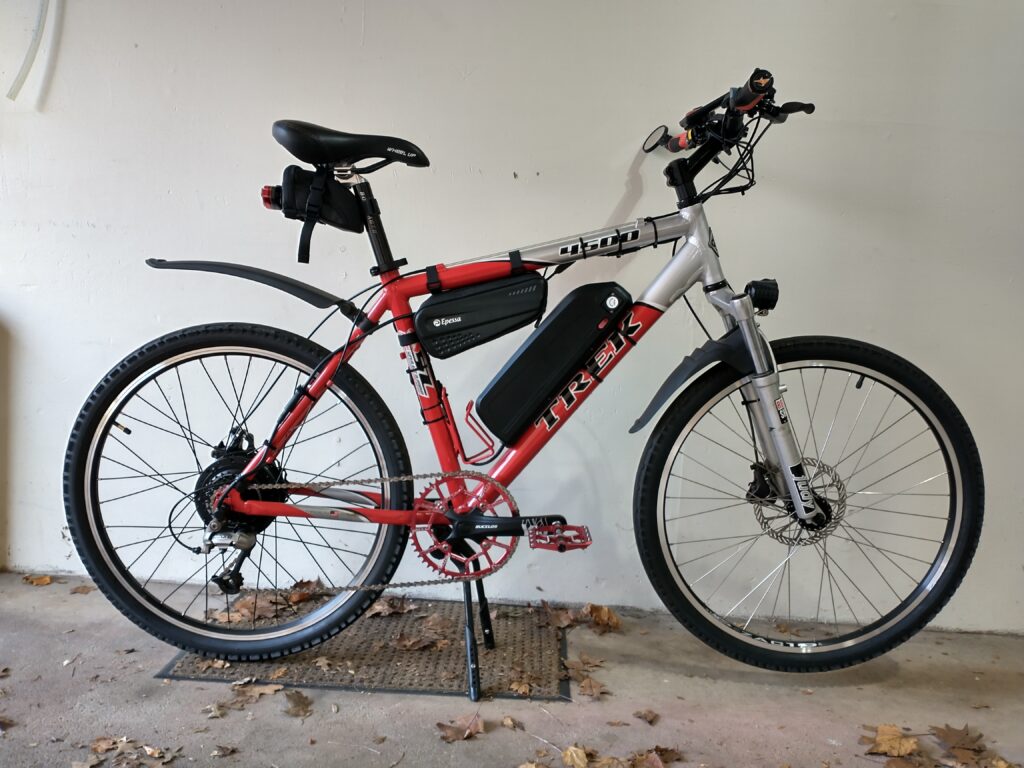
Oh yeah, and there’s a small dent in the top tube I didn’t know about. I might be adding a stiffener there for insurance…might be a good excuse to buy a can of Red Bull after all. The kickstand was borrowed from Build #3.
Next: Cable and wire management, replace the front fork when the new one arrives, rebuild the red rocket with the 1000w Voilamart motor, give Build #3 back her kickstand, etc.
By the way, I think I need to start naming my builds. Here’s a start:
Build #1 – Red Rocket (Voilamart 1000w rear hub)
Build #2 – Rat (Voilamart 1000w rear hub, retired, though the Rat might be reincarnated with spare parts – not currently on the radar)
And the moment you (or at least I) have been waiting for:
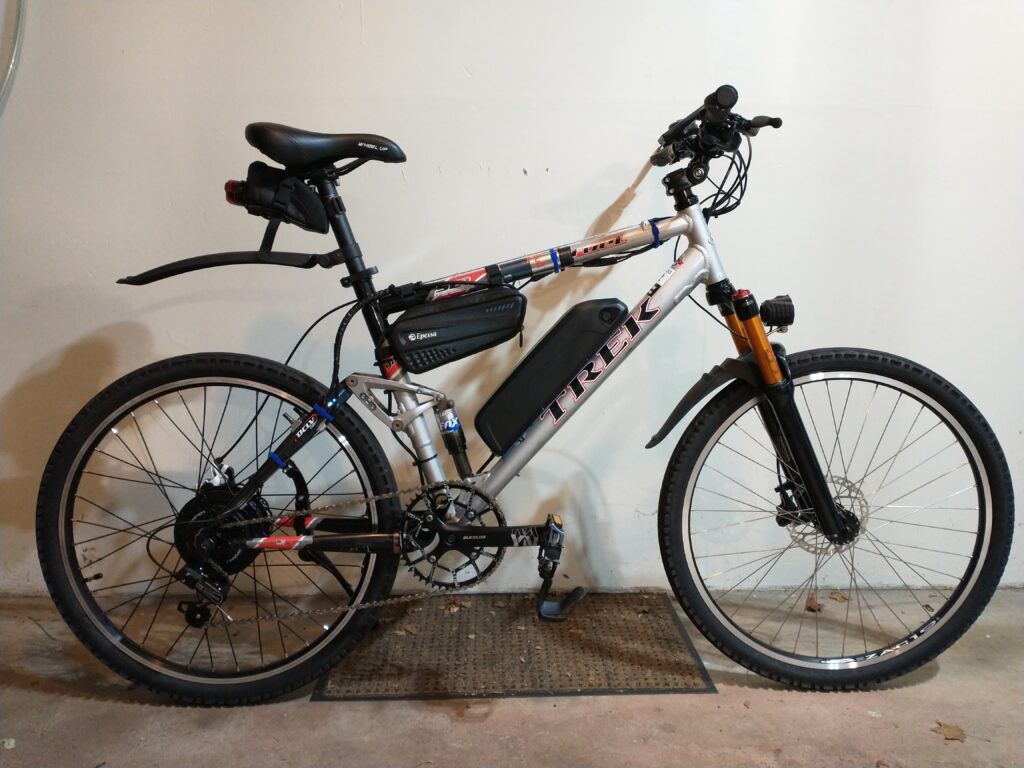
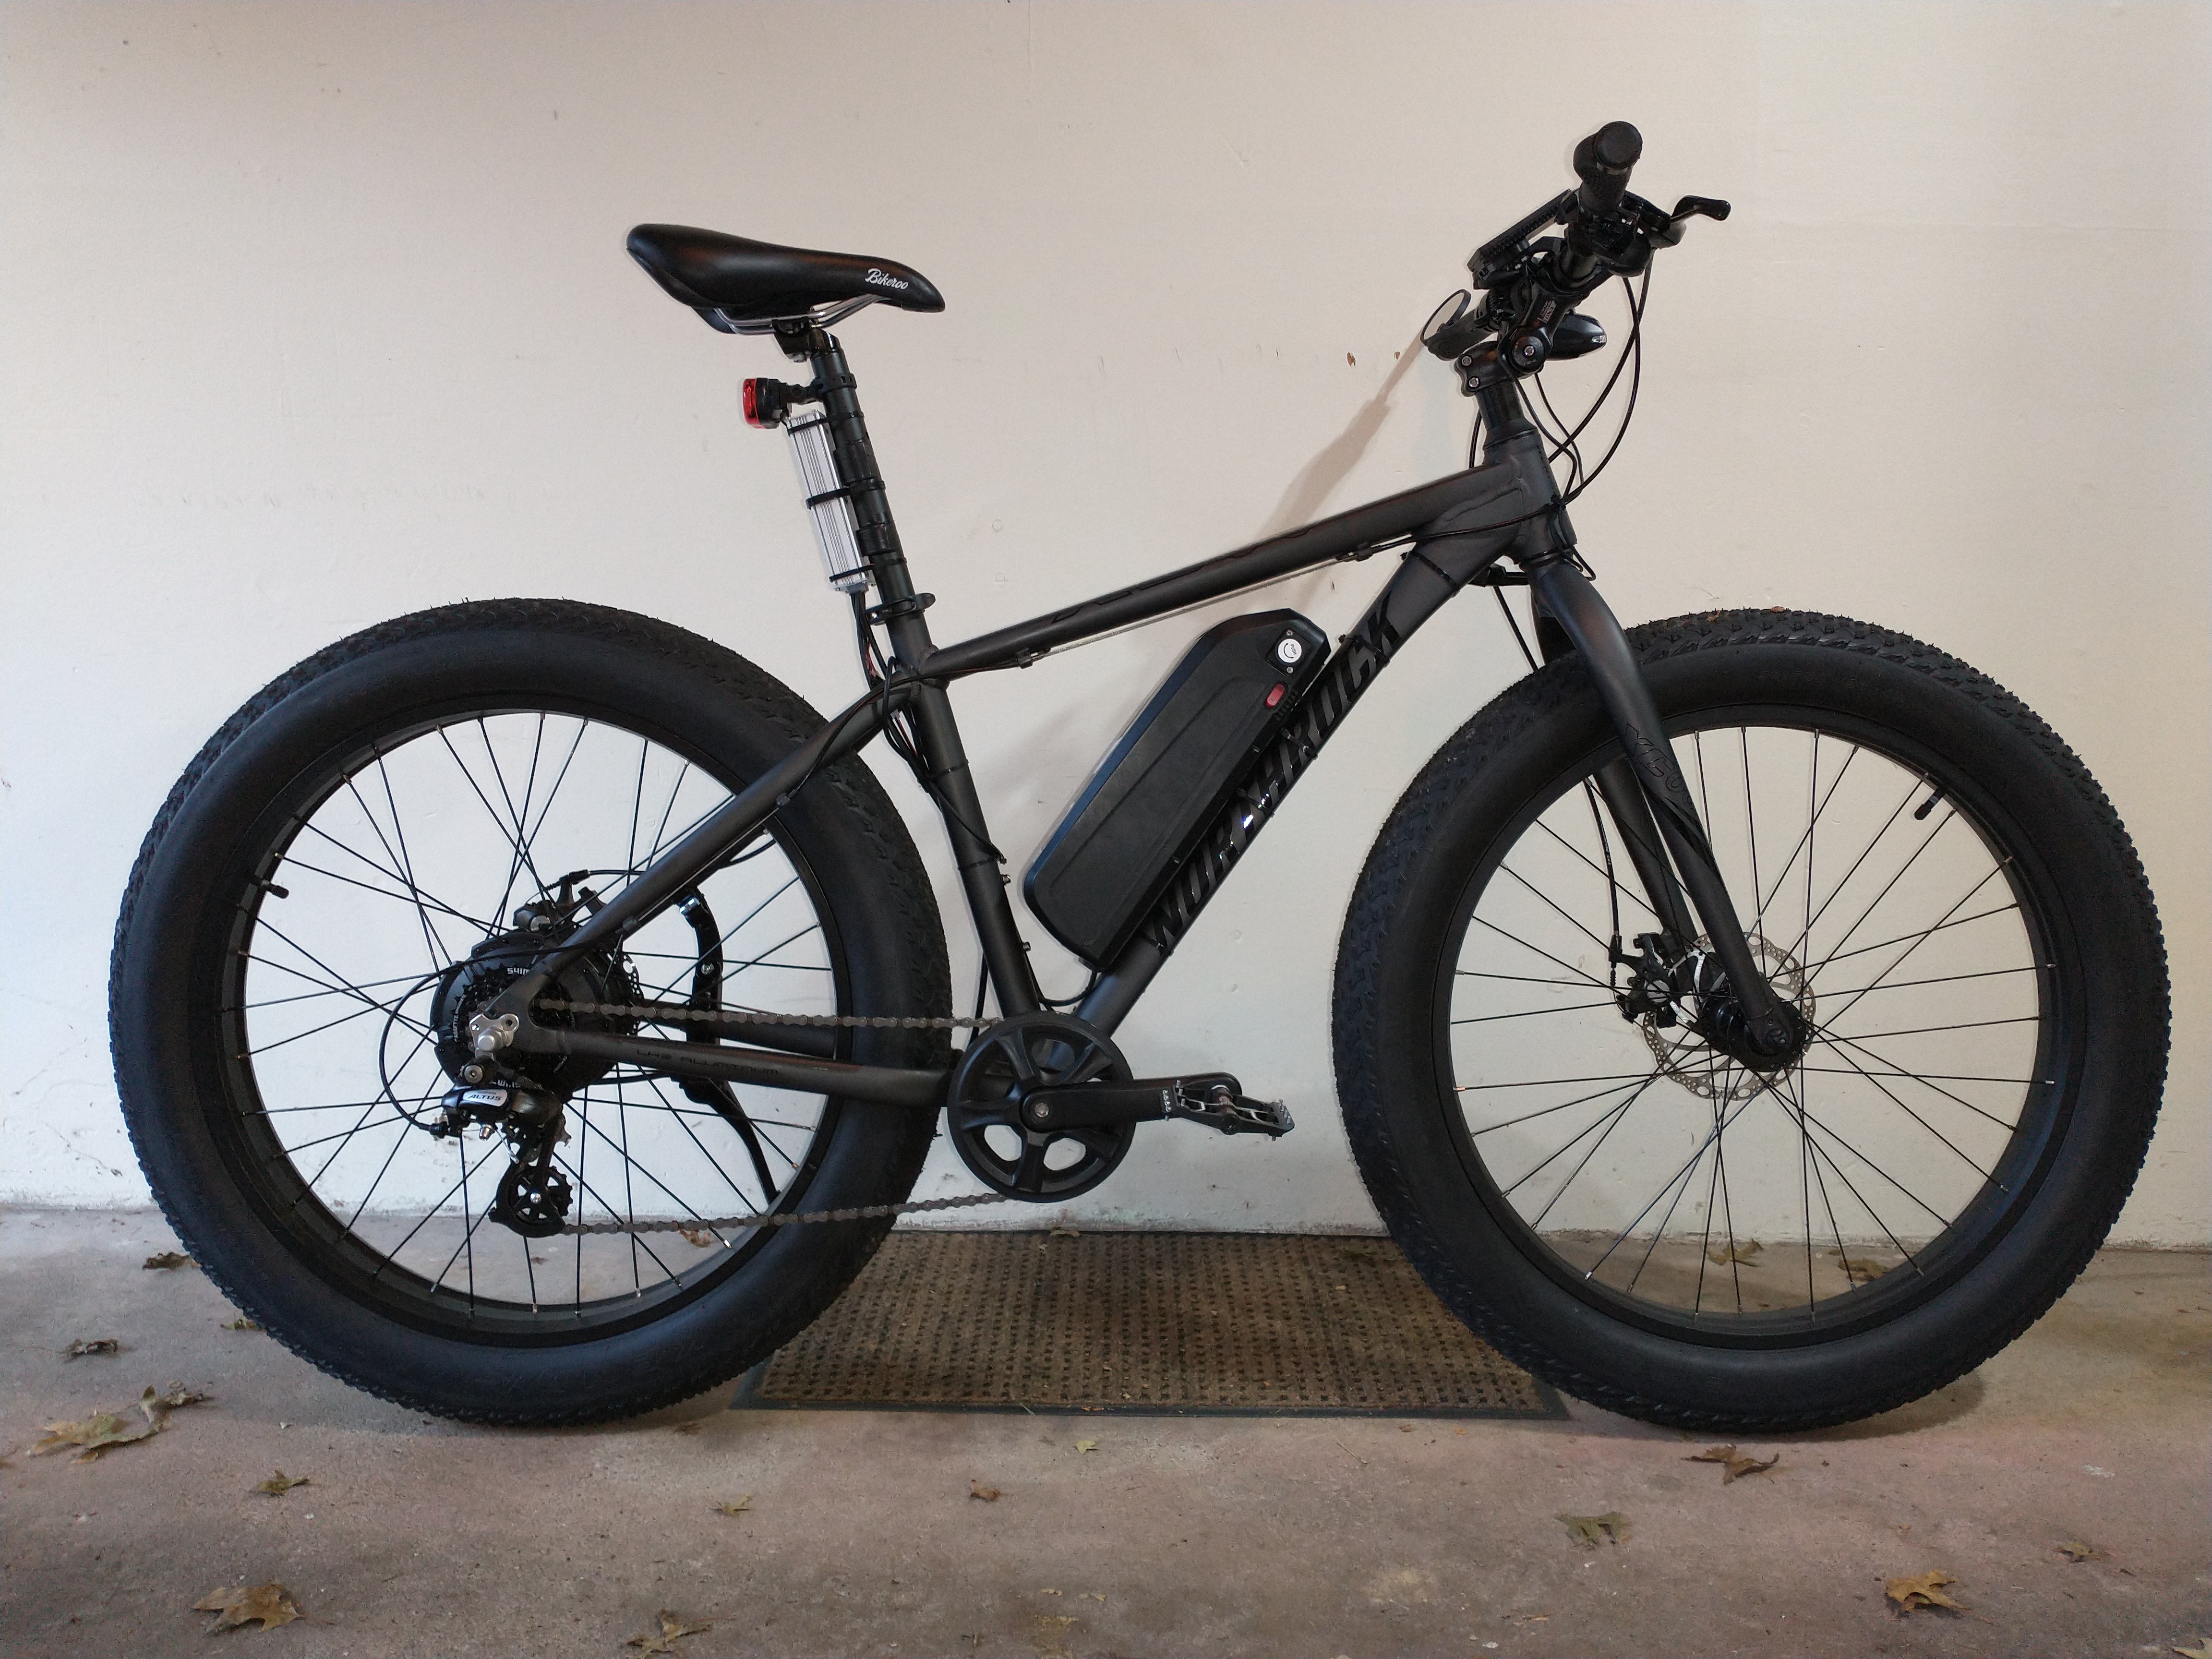
New front fork, handlebar stem, and seat post. Brakes and derailleur still need to be dialed in. Also need to decide if 80psi in the front fork, and 160psi in the rear shock is enough. I’m also especially proud of the Red Bull Zero can cut to fit over the minor dent in the top tube. Pretty cool!
Next, test ride and tweak…
Posted inUncategorized|Comments Off on Build #2 Gets a New Frame
Those that follow my DIY e-bike shenanigans wouldn’t be surprised when I decide one day to replace a perfectly good motor with another, half the original motors power rating. Why, you might ask, would I do such a thing? Good question… And “because I can” probably doesn’t cut it as a reasonable response.
My primary motivation was to compare the 500w Bafang brushless, geared rear hub motor to the 1000w Voilamart direct drive rear hub motor. In theory, the 500w motor should give me the power I need for the type of riding I do, with less weight, and possibly improved range. Besides, I think the Bafang motor looks a lot better:
Before – Voilamart 1000w direct drive motorAfter – Bafang 500w brushless, geared rear hub motor
When replacing a motor with one from a different manufacturer, you’re not just replacing the rear wheel and motor, but also the controller, display and all the wiring. In addition to the motor and wheel, here are the other parts that got replaced:
These might go on another bike some day, but for now they’re just e-bike detritus.
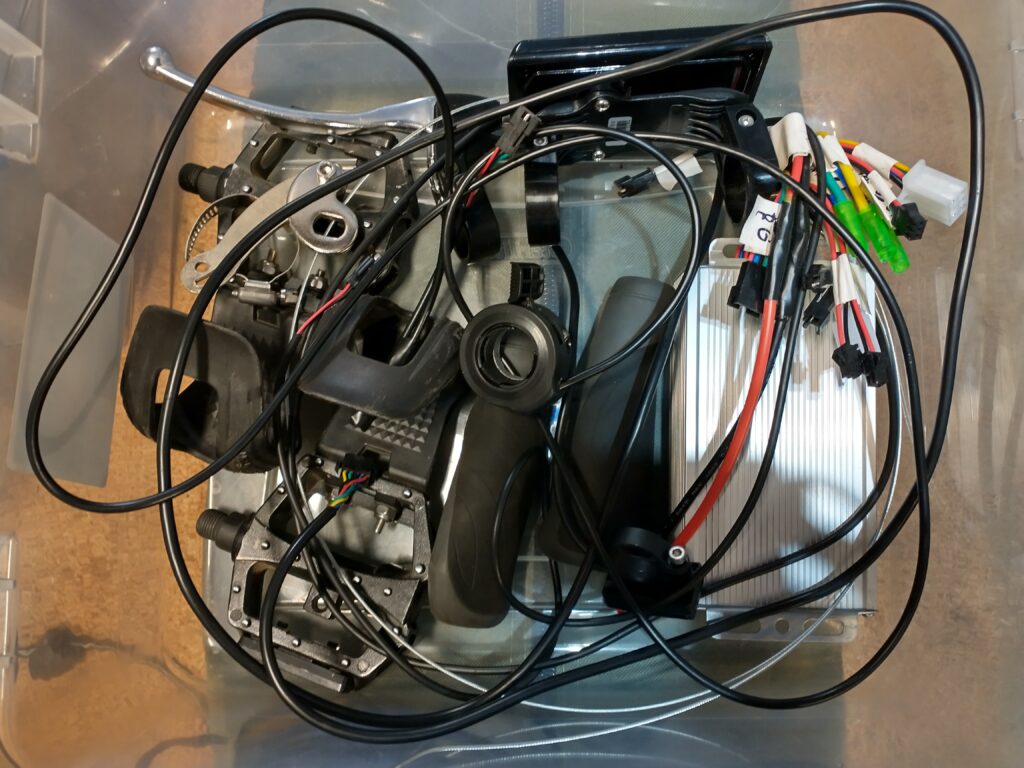
Another fact of life when building (re-building) an e-bike is wire management. After mounting all the necessary hardware, this is the rat’s nest I’m left with to manage/hide/tidy up.
Yikes, that’s a lot of wires!!
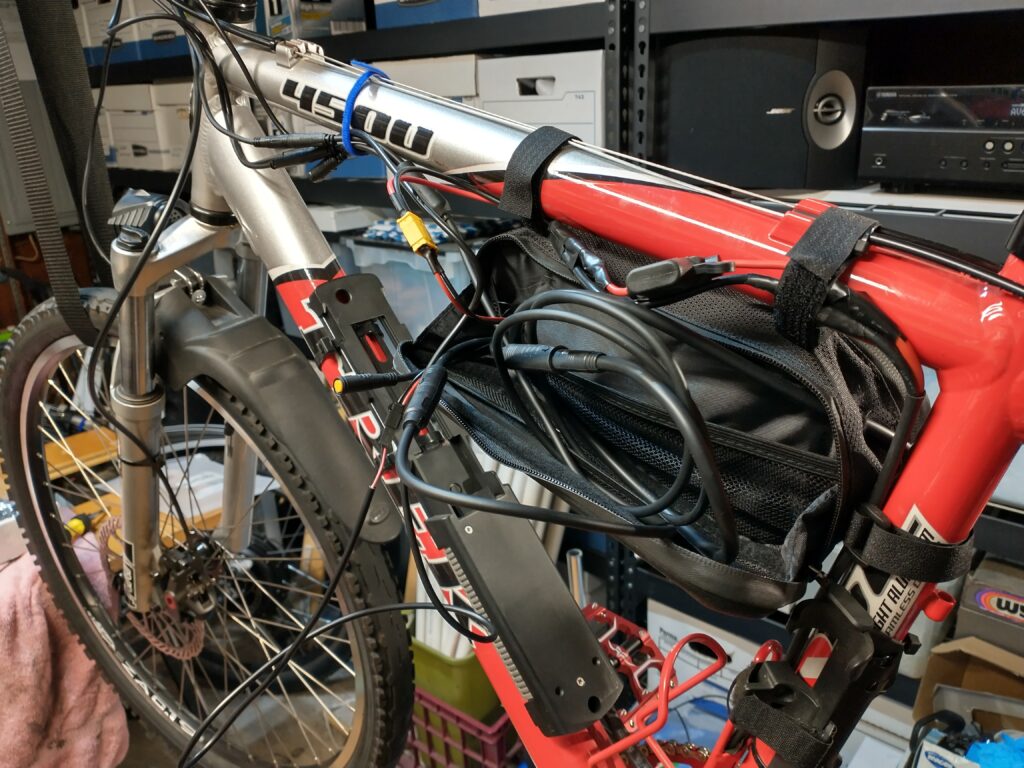
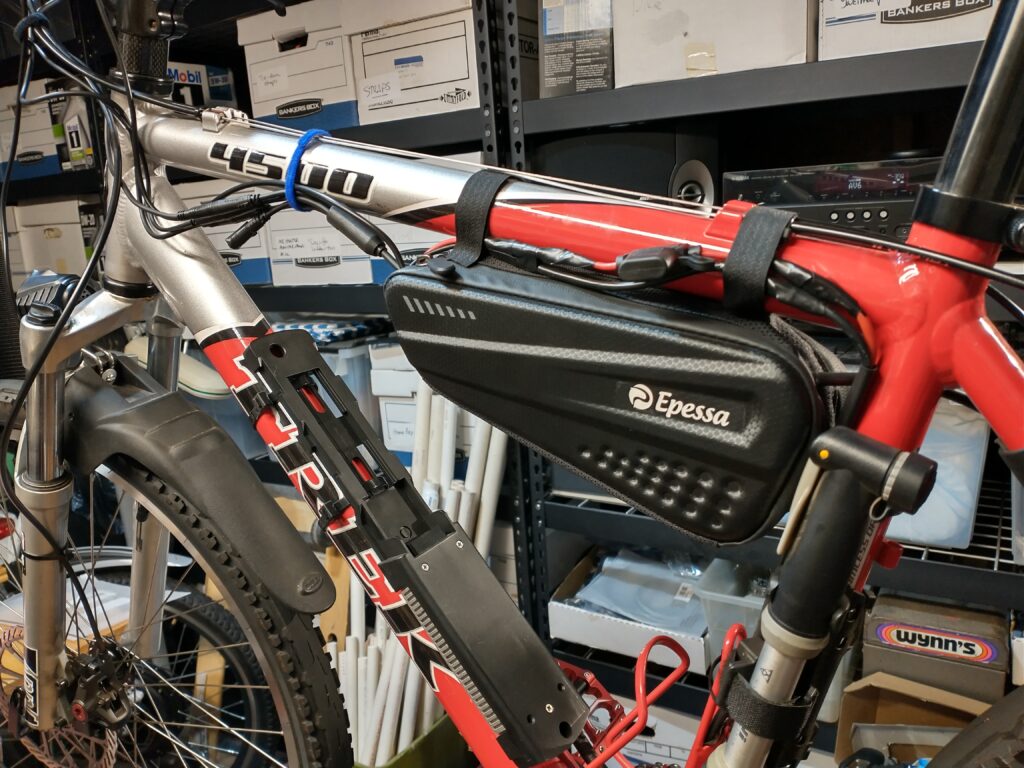
Using my handy Epessa bag I’m able to stash the controller in one side and store wires in the other. And although you might think this is some kind of magic trick, all those rascally wires tucked neatly into the Epessa and the end result looks something like this.
Yeah, I didn’t think it would all fit either…
I need some more seat time before I write an informed opinion about the Bafang 500w motor versus the Voilamart 1000w motor. So far, I like the new motor a lot, and it does everything I ask of it. When I have a moment, I’ll snap a picture of the end result and add it below. I’ll also try to establish a response to the efficiency question. Is a 500w geared motor going to more efficient than a 1000w direct drive motor, or is it a wash?
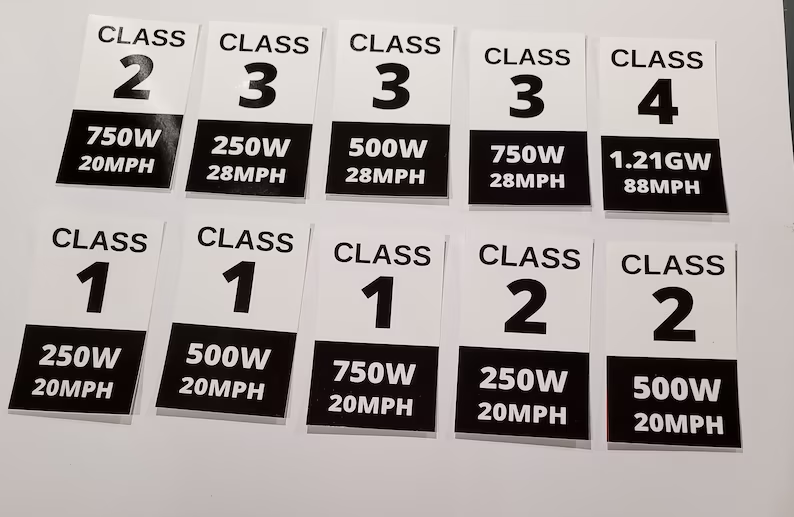
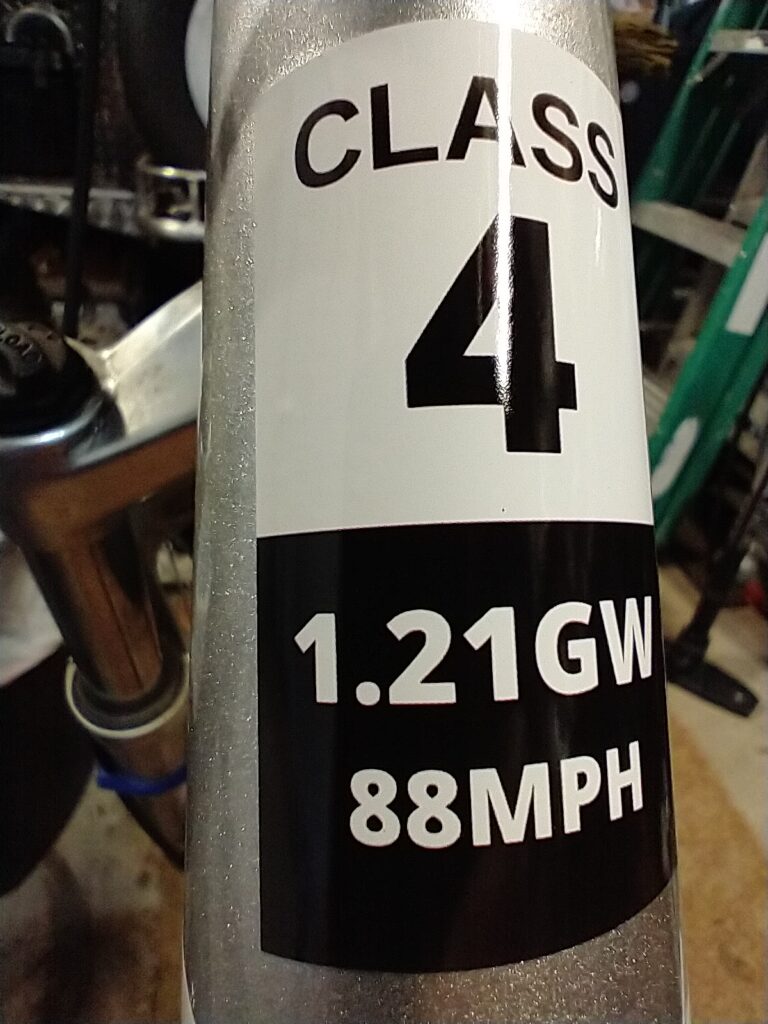
And one last comment. In previous posts I refer to Federal and State laws that restrict where e-bikes that have a power rating in excess of 750 watts can be ridden legally. My 500w e-bike now falls well within these limits so can be used on trails where these laws apply. I’m thinking it’s a good thing to have at least one e-bike in my stable that’s legal. Now I just need to get a ‘Class 2’ sticker and I’ll be golden (just purchased, on sale today at Area 13, plus I just like supporting Kyle at Area 13)!
Check out the Class 4 sticker. That will have to go on my 1000w Rat Bike.
Here’s the final result, with just one more change planned for this week:
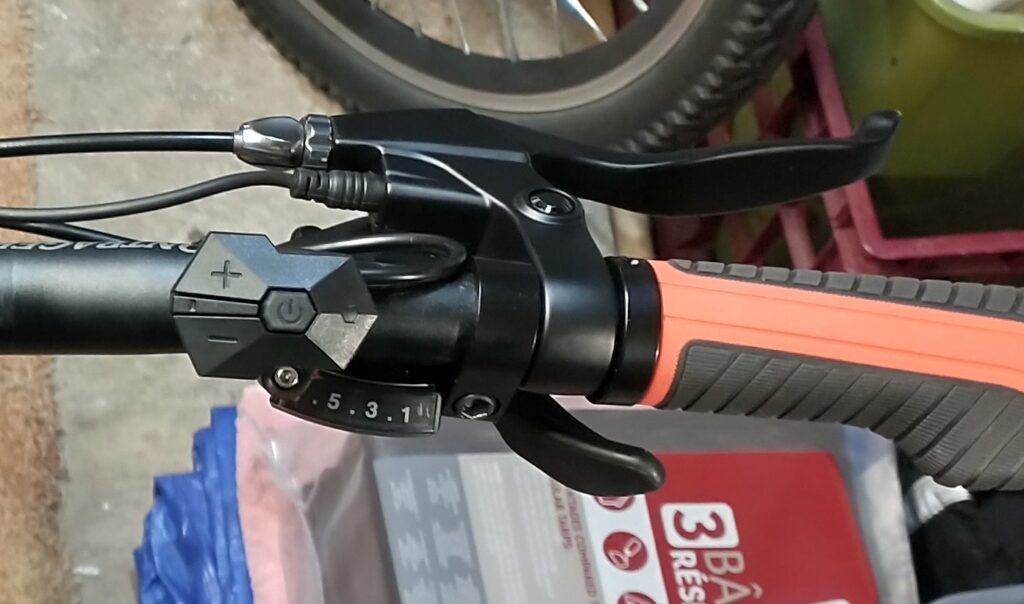
I’m a big fan of the ‘Rapid Fire’ design used on the Altus shifter. It’s easier (and safer) changing gears without losing your grip on the handle bars than the XT30 shifter. Observant readers will also notice that I put the handlebar grips on backwards in the first picture. They’re still comfortable in this position, but installing them backwards is just wrong!
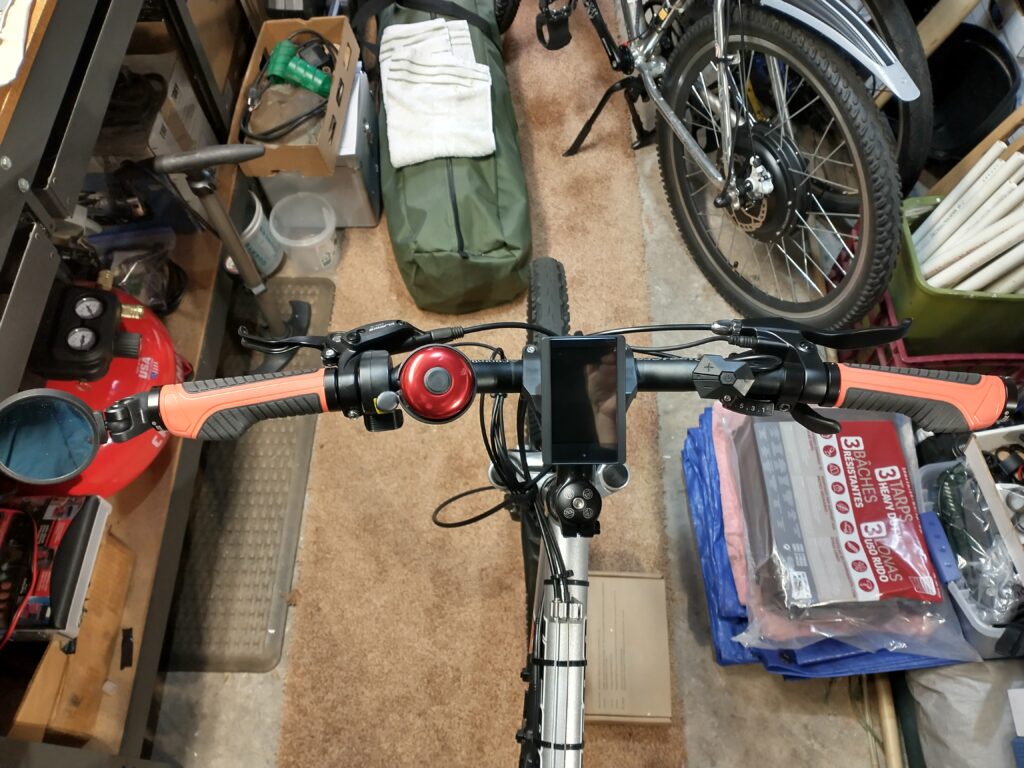
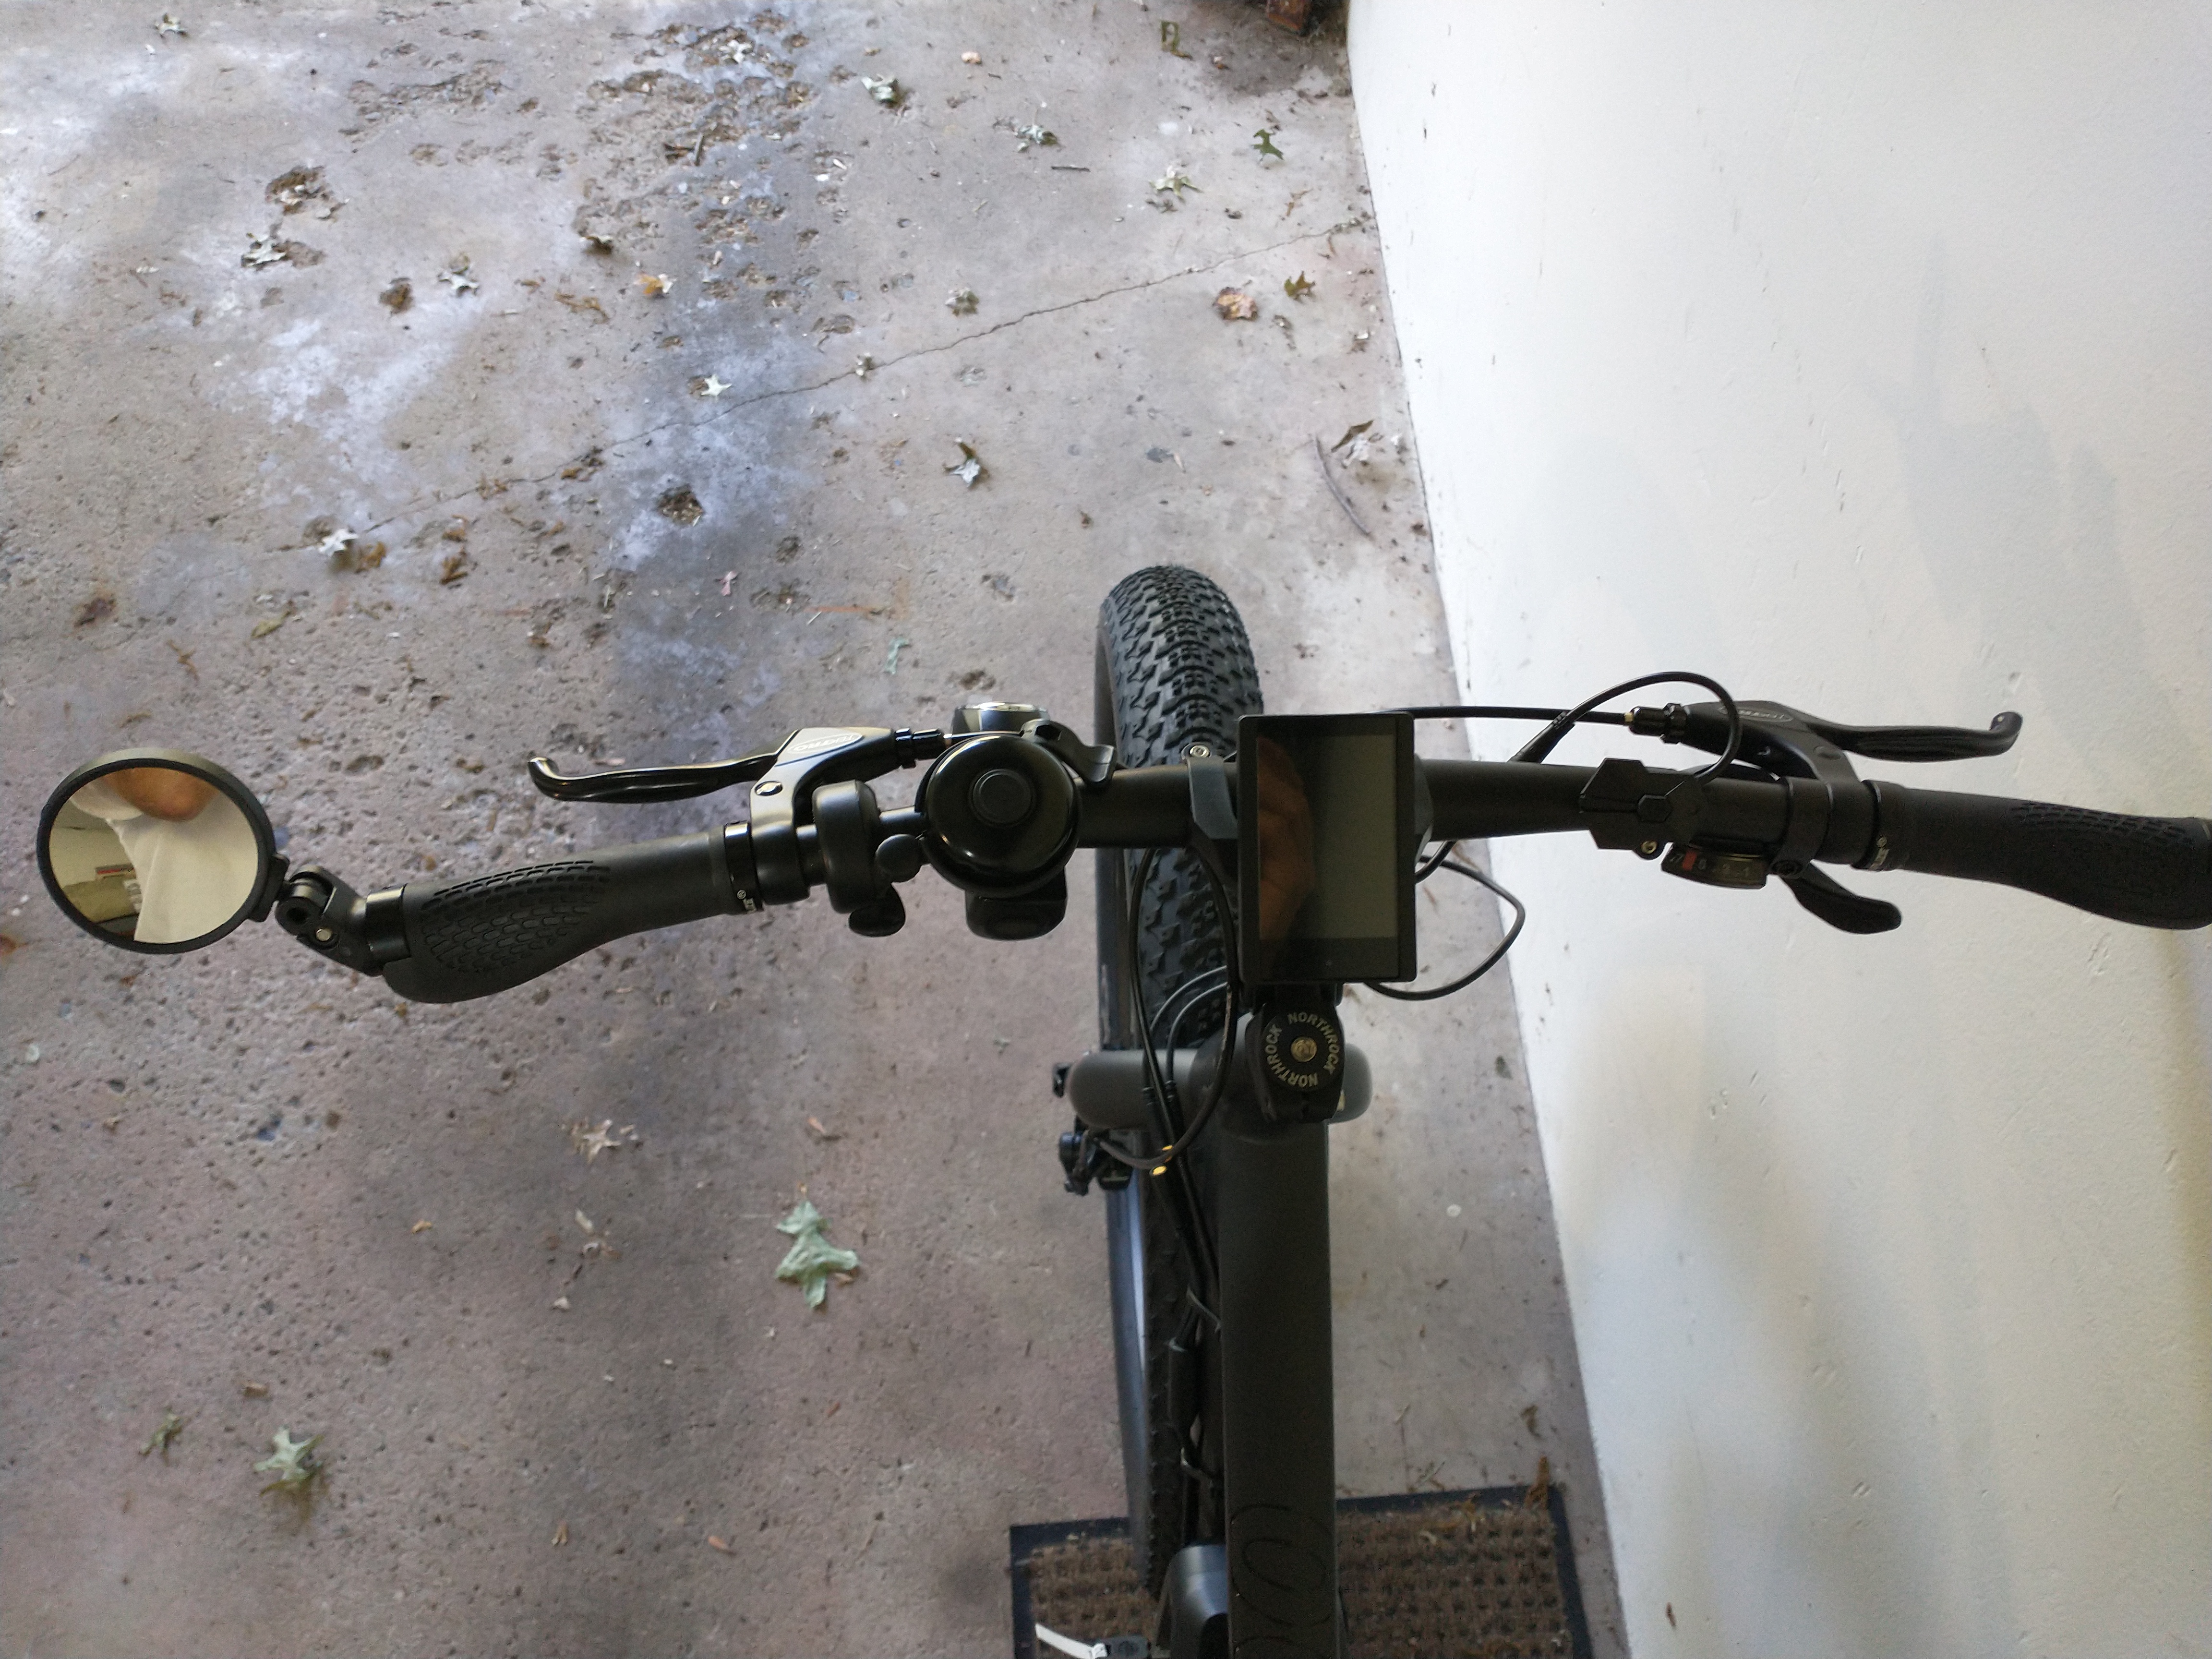
And one final picture of the handlebar layout, with all the necessary accoutrements.
Left to right: mirror, lock-on grips, hydraulic front brake, thumb throttle, bell, display, controller buttons, shifter, mechanical rear brake, grip
** Update **
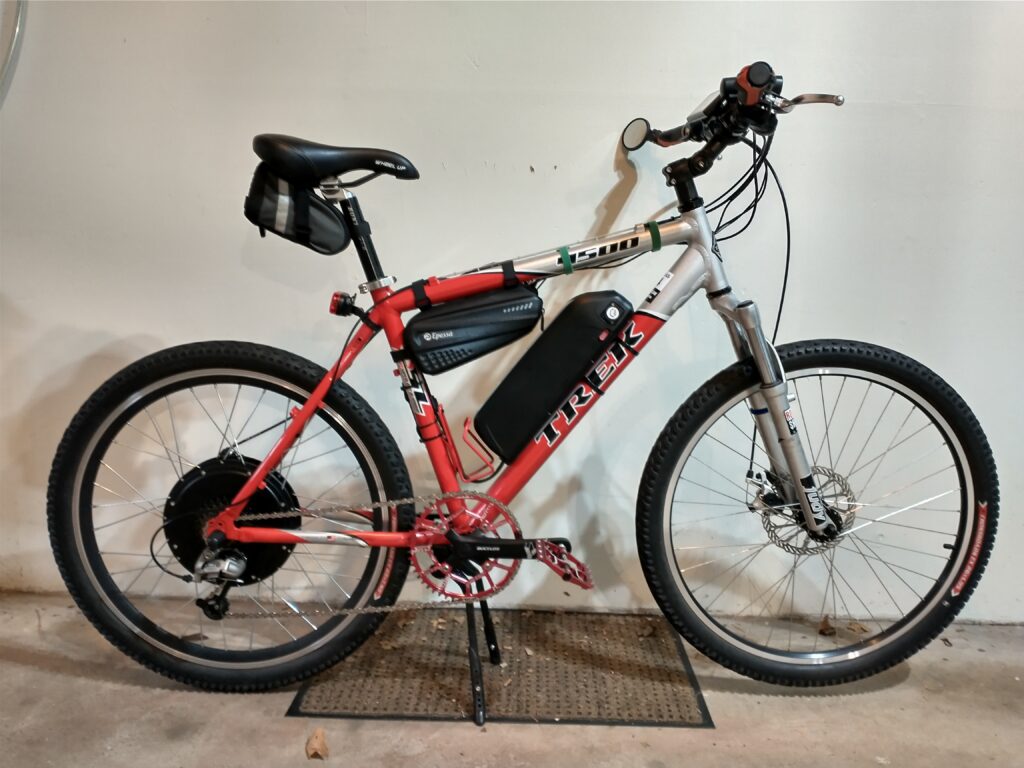
Well, after all that, I decided to put the 500w Bafang motor on the new frame (the whole story can be found here – Build #2 Gets a New Frame | RAT Electric Bikes). Which means Build #1 went back to being a 1000w Voilamart rocket ship. Here’s an image of the fully restored e-bike:
Adorned with its new ‘class’ sticker:
I’m guessing this e-bike will be pushing the legal limits on our local trails!
** pending updates **
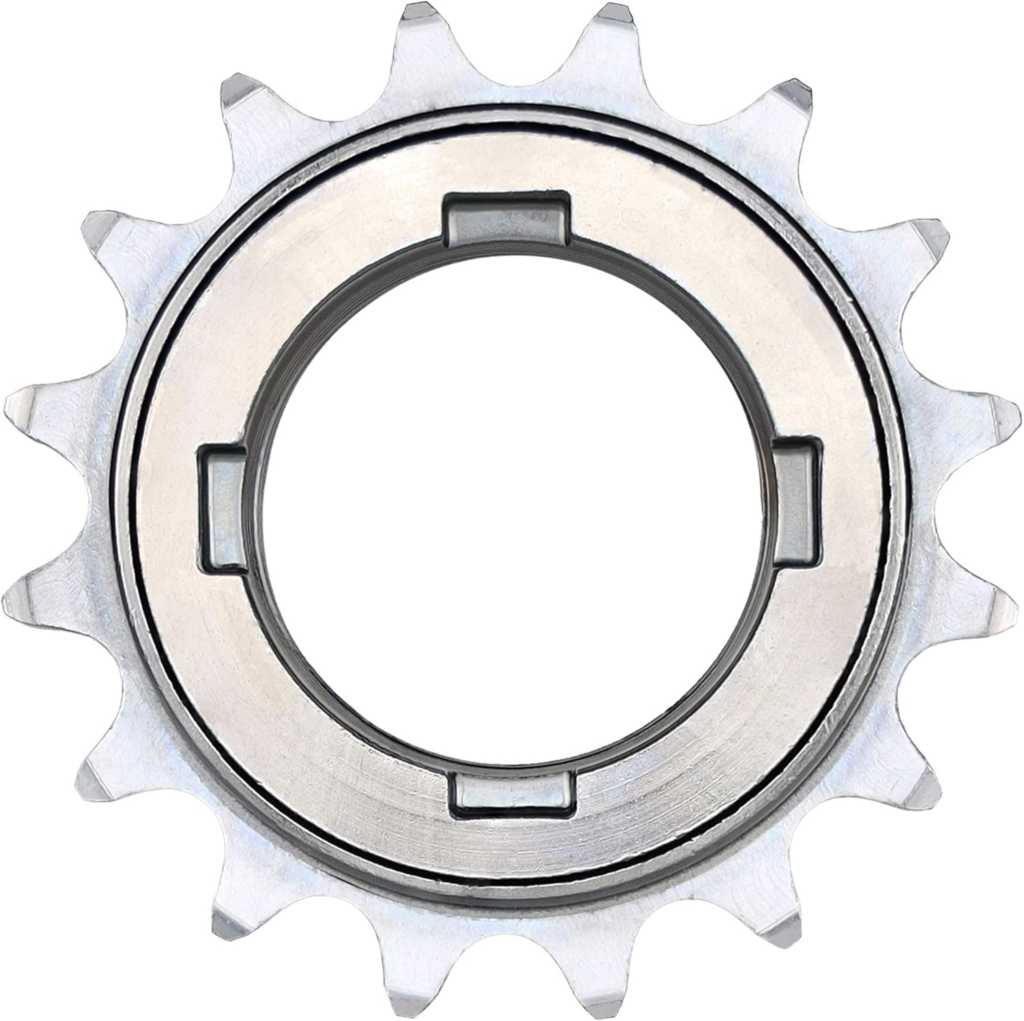
Red Rocket is getting a couple upgrades. First, she’s got so much power, I thought I might just ditch the rear cluster and derailleur all together and go with a 16-tooth single speed freewheel.
The other piece to this puzzle is a ‘chain tensioner’. Since this bike doesn’t have rear suspension, I could probably get by without this part, but I thought the mod would be easier to implement with it. Here’s the part I’m using (which is red, of course).
And before and after pics when the mod is complete…
** update **
As promised, here are the before and after pics of the first pass for this mod.
Before:
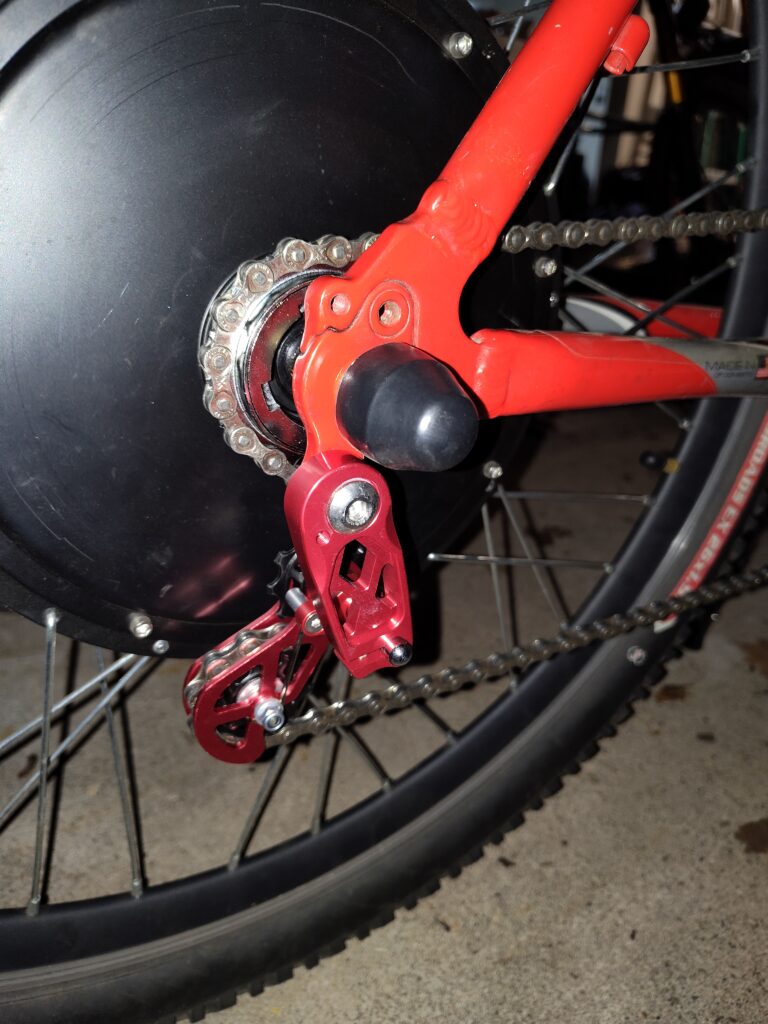
And after (clean, but I’m not happy with how this turned out):
Ask me why I’m not happy. It’s because I used a BMX style freewheel which sits too far inboard and messes with chain alignment. That said, I sorted out the alignment issue by moving the front chainring inboard on its mount, but that’s an unnecessary jerryrig which I think this part will resolve.
In addition to installing this ‘Threaded Freehub’ I’ll replace my 1/2″x3/32″ 7-speed chain with a 1/2”×1/8” ZONKIE single-speed chain.
Once I get all this sorted and it’s working as intended, I’ll report back in a new post highlighting the complete driveline upgrade. For an e-bike with a high-power electric motor, single-speed makes good sense to reduce complexity and improve drivetrain simplicity and reliability.
Posted inUncategorized|Comments Off on Build #1 Gets a New Motor
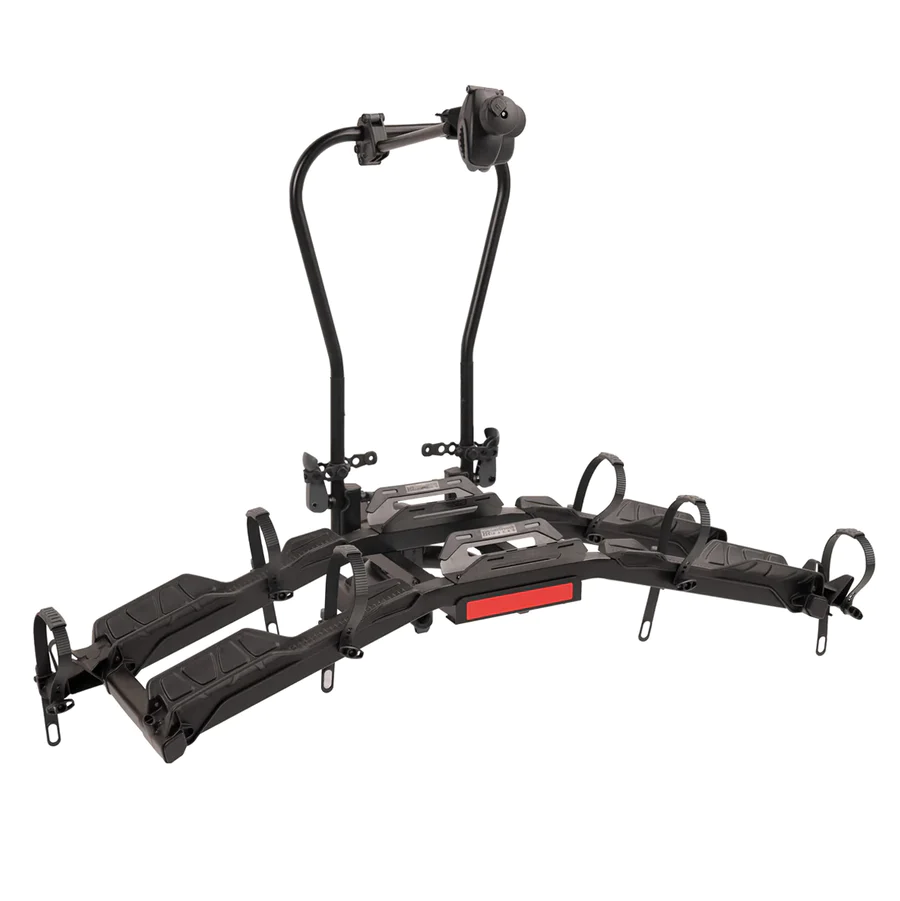
A while back I wrote about various bicycle and e-bike car racks. Since then, I have made up my mind and if I were to buy an e-bike rack today, this is the one I would buy:
Yes, it’s expensive at $700, and there are no deals to be found. Buy from e-Trailer or direct from Hollywood and you’ll pay the same amount. But I think you’ll find this rack exceeds your expectations as an e-bike hauler in every respect!
Specs:
Capacity: Two Bikes (Max. 70 lbs. per bike)
Hitch Size: 2” only (Do not use a 1 ¼” – 2” hitch adapter)
Includes a 46″ long ramp
Maximum bike wheelbase: 50”
Maximum tire width: 4.5”
Includes keyed-alike locking hitch pin and locking frame clamps
“No-Wobble Hitch System” eliminates slack between the receiver and the rack without the use of tools
Folds flat against car when not in use
Feature’s “Balanced Tilting” with the pivot point between the 2 bikes, making tilting down for cargo door access as easy as it gets
The frame grabbers on this rack can hold step through bikes by the seatpost, therefore Bike Adapters are not needed and should not be used.
Space between bikes: 11″
Rack Weight: 46 lbs.
Limited Lifetime Warranty
When using on a seat post requirements: Min. 1″ / Max 2″
For step through bikes: Secure the bicycle by using the racks Frame Grabber around the bikes seat post
In Feb 2021, I purchased a Swagman Current Bike Rack from E-Trailer for my two regular bikes and anticipation of buying an e-bike. In May 2021, I purchased two Scott Sub-Active E-bikes. My Swagman bike rack worked well but I always needed help to lift my 63 lbs. Scott e-bikes onto the rack. In Jan 2022, I had torn a shoulder muscle while lifting my e-bike onto the rack. From that point on, I decided I needed to get an e-bike rack that came with a ramp. Thule, Yakima and Kuat made racks with ramps but none of those three had other features that met my needs. Around May 2022, Hollywood Racks released their “Destination E” bike rack. After much studying, I decided that the Destination E was the rack for me and ordered one from E-Trailer in July 2022.
Assembly was rather easy after viewing video clips from E-Trailer website and Hollywood Racks videos on YouTube. The Destination E bike rack is well constructed and sturdy. My two conventional bikes were easy to load and mount on the Destination E without any problems. On my two Scott E-bikes which have the “step-thru” frames, the first one loaded easy but on my second one, I needed to use a “frame adapter bar” to mount my bike. To make sure that my bikes were securely mounted on, I used two bungee cords to keep my two bikes secured together.
The best part of my Destination E bike rack was the ramp. It could adjust to any length and is very sturdy. Some reviews I seen cited that there was no way to store the ramp on the outside of the rack and that was a possible reason for customers not to buy the Destination E. Without anywhere to store the ramp on the outside is fine with me. First, the ramp does not weigh much and shrinks into a small compact size. It can be stored anywhere safely inside the vehicle. If stored outside, it might be easily stolen or lost during transportation.
In summary, there are not too many e-bike racks on the market that will accommodate a 63 lb e-bike or two that have fenders and come with an adjustable ramp like the Hollywood Destination E Bike Rack. I highly recommend to anyone in buying this bike rack.
If you’re still not convinced, here’s a YouTube video that might help:
If you built your own e-bike, you’ll probably be fine getting support from most local bike shops for everything EXCEPT the battery, controller and motor. You’ll be on your own for those things, which is probably OK since you can order and install the parts you need to make your e-bike function again. But if you’re like everyone else, you probably saw a deal you couldn’t pass up and ordered your e-bike from a store on the internet. Ride1UP, Gen 3, RAD (not RAT), Aventon, Magnum, and MANY others offer great products, sometimes even at affordable prices.
The issue is many of these e-bikes use proprietary components and non-standard specs. For example, does your e-bike, assuming it has a rear-hub motor, use a standard crank bearing set? Probably not. Some things will be standard and easily replaced with off-the-shelf parts, but some will not. This is the conundrum your local bike shop faces. Lacking standards that they’re trained to support, and lacking access to parts used on many e-bikes, they’re unable to provide adequate support. So it’s likely they’ll turn you away if it’s not a product they sell and support. And this could be a problem!
Your local bicycle shops, and what support you can expect for your e-bike:
Comments: They’ll service your e-bike, “except for the motor”. I expect that proprietary battery systems might be excluded also, otherwise you should be in good hands.
Comments: Closed Monday and Tuesday. They’ll do basic bicycle repairs, but won’t work on motors, batteries, or other e-bike components on e-bikes not sold in their shop.
Comments: Closed Monday and Tuesday. Same as the Doylestown location, except I took my new Sutto hub motor and wheel to the Newtown shop and they were very willing to dish the wheel for me (I explain the reason for this in my Build #4 post). Excellent work and very reasonable charge. This shop is on my ‘preferred’ list now!
Comments: They sell and support Pedego (which includes a 5-year warranty), and will service other e-bikes but not motors, controllers, batteries, electrical cables, etc. that are specific to that e-bike.
Comments: Princeton eBikes services the brands that they sell (currently Aventon, Gazelle, Magnum, & Bintelli). If you contact the shop for service on another brand, you will likely be referred to RoadMaestro Bicycle Service. RoadMaestro is an independent mobile bike repair service. Brian Clissold serves as both the mechanic for Princeton eBikes and the owner/operator of RoadMaestro.
So this is what I have come up with so far. If you know other ‘local’ repair resources for e-bikes please let me know in the comments section below.
** Update **
I recently discovered another local e-bike resource I’d like to tell you about. This appears to be something similar to what Princeton E-Bikes is doing – offering people new to e-bikes an opportunity to try various models out before purchasing their first e-bike, and a place to purchase and get support for their e-bike. This new shop is Redline E-bikes in Chalfont, located at 3169 County Line Rd., Chalfont, PA. Their website says:
Open by Appointment 7 Days a Week
We welcome walk-ins also but please call or text 267-576-2545before visiting us to see if our showroom is open (or visit their website to be sure).
This is a great local resource for new e-bikers, so check them out!
Posted inUncategorized|Comments Off on Local Support for Your E-Bike?
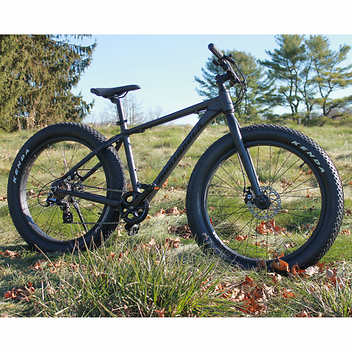
In the e-bike world, there are such things as ‘plus‘ and ‘fat‘ tire bikes. Many of the factory-built e-bikes now use the plus-size tire format for better contact with the road/trail surface (larger ‘contact patch’ for you motorcycle riders out there). And now you’re starting to see even wider tires on some factory e-bikes, presumably to improve your ride over loose gravel, sand, etc. For the most part though, fat tire bikes just look cool, and that’s probably enough justification to own one. So now I do…
The XC00 has no front or rear shocks, so no additional suspension components, but with the large tires I really don’t think it needs them. The tires seem to absorb bumps in the road much better than narrower tires would. Also, note that this bike comes with disc brakes (albeit mechanical) so I’m thinking that there’s very little that needs changing to turn this into a full-fledged e-bike. So that’s what I’m going to do.
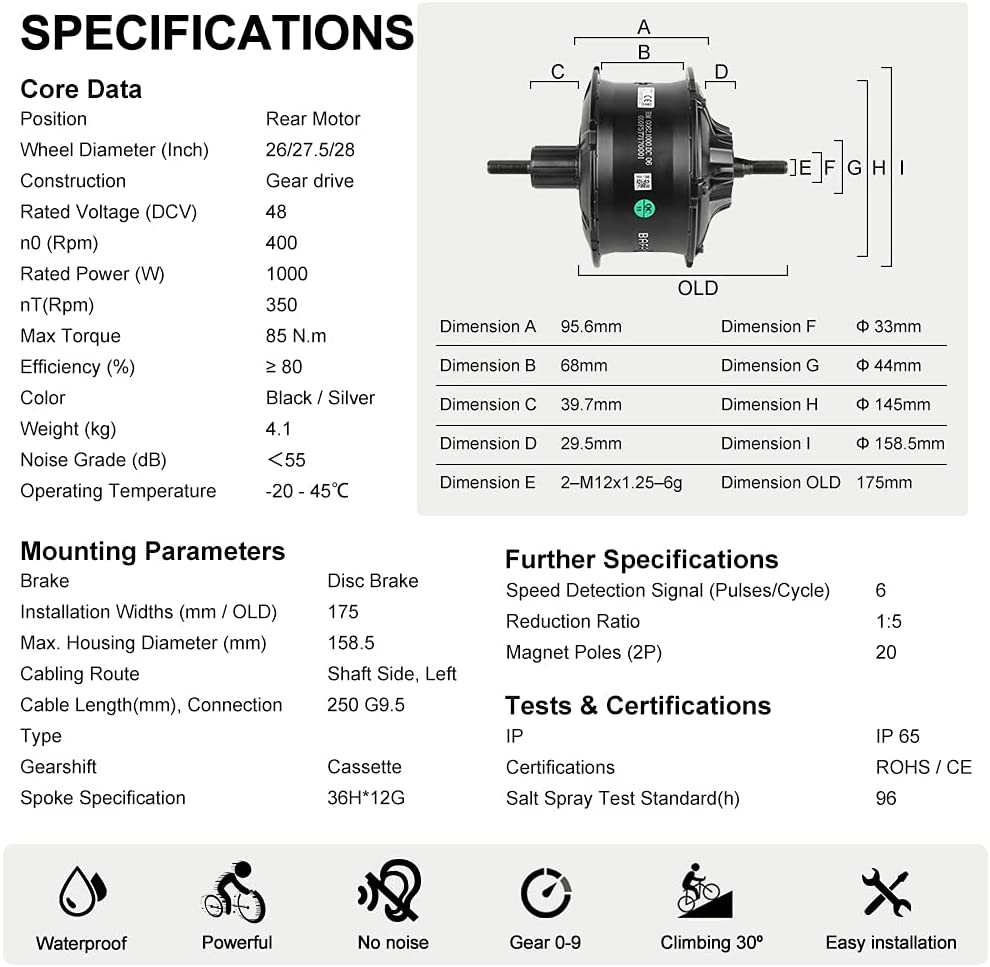
Originally, I had decided to go with the Bafang BBSHD 1000w mid-drive motor for this build. I ordered the motor from China, but it didn’t arrive after 1 month so my money was refunded by PayPal (thank you PayPal!). Then I have decided to go with the Bafang 48v 1000w rear-hub motor (the G062,1000.DC motor) designed for a 26″ fat tire bike with a 175-180mm dropout and rear disc brake. This seemed like the perfect motor for my XC00. The only gotcha is that this too will be coming from China and shipping is expected to take 2 months (here by Sept. 27). The order was through Amazon, so I have their purchase protection. Plus the final price was a LOT less than the mid-drive conversion ($560 incl. tax and shipping versus $790). Before adding the cost of the battery (which I already have), this will be a $1000 build. I think this is going to be a pretty spectacular build for $1300 when all is said and done.
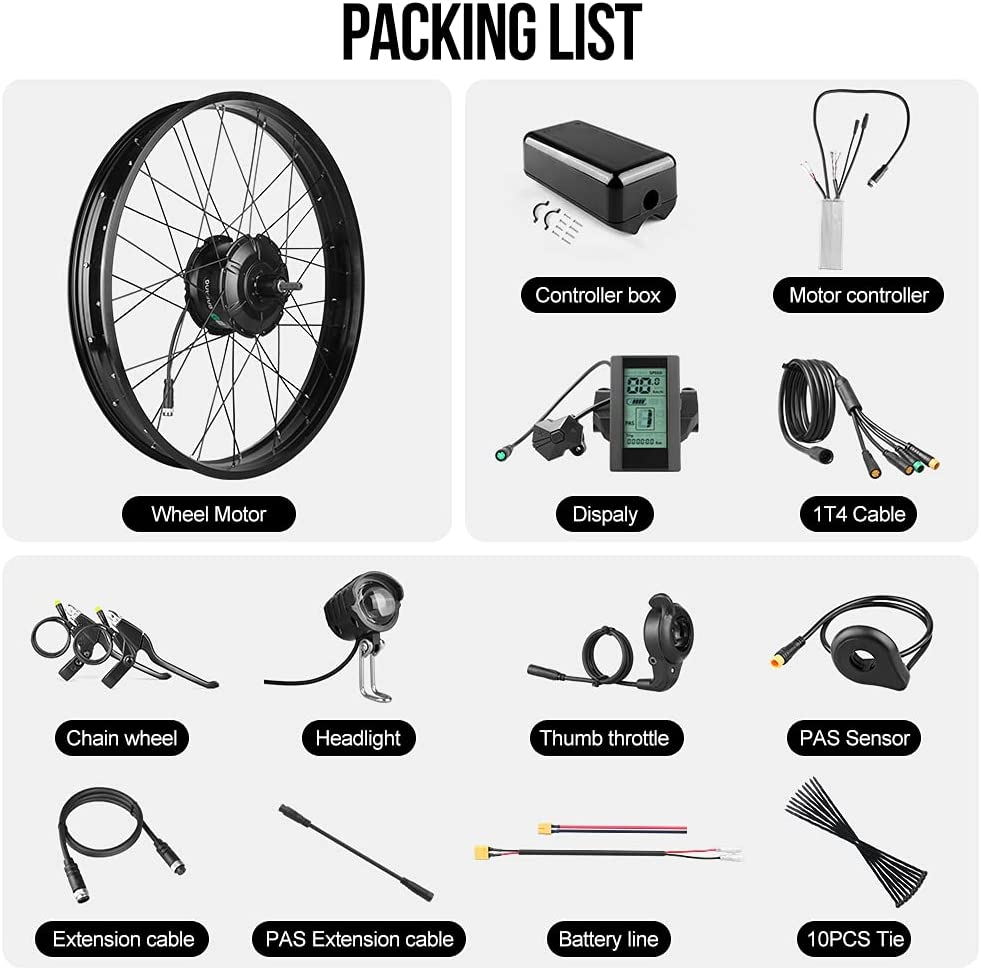
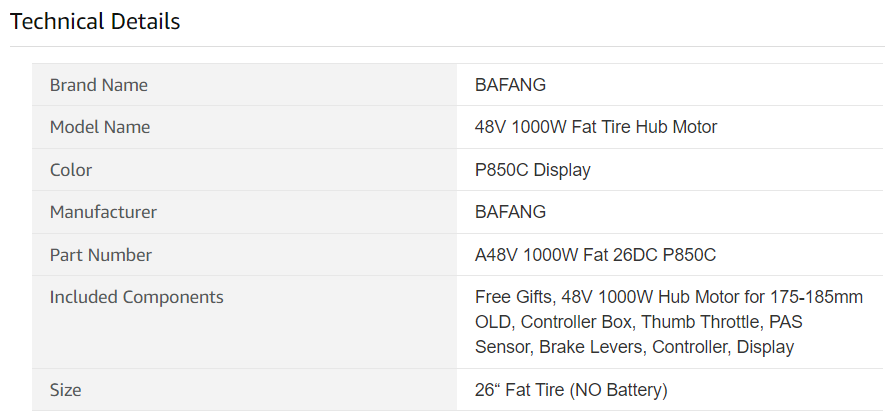
Here’s the specific motor and display I ordered from Accolmile via Amazon:
Well, that didn’t go exactly as planned. It’s possible that the order I placed on Amazon for the Bafang motor was a ‘bait and switch’ deal. The vendor said the Bafang was out of stock and I could wait until sometime in September “when it might be in stock again”, OR accept a substitute motor they claim is the same as the Bafang 1000w motor and they would refund shipping charges. I opted for the latter just because I want to see how the replacement unit performs – consider this an experiment.
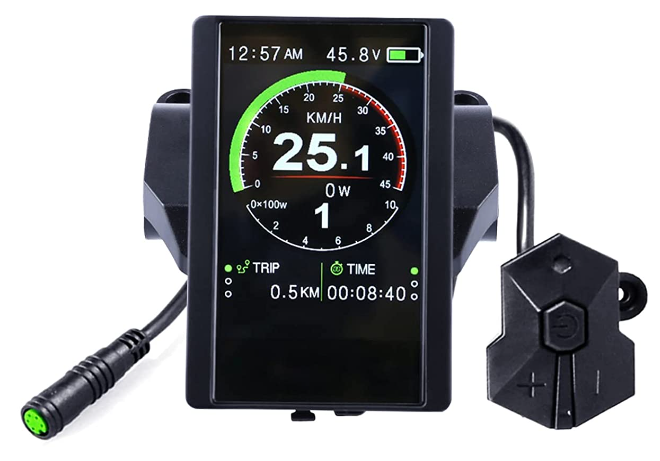
The label on the replacement unit is ‘Sutto’. The first thing I noticed was how rough the spoke nipples were. I had to dress them so they wouldn’t puncture the tube. Next, the wheel has a 10-12mm offset when installed on the XC00 bike, so that was taken care of by Bike Works in Newtown. Otherwise, everything fit up nicely and performed well on my 10 mile test ride this afternoon.
Summary of issues and pleasant surprises:
Concern #1: The spoke nipples (the ends on the tube side of the rim) are VERY rough and would cause a flat if not filed and protected with a rim strip, so that’s job #1. Done…
Concern #2: The wheel mounted on the Sutto hub motor requires adjustment of 10 to 12 mm toward the brake side, called dishing. The charge to do this adjustment was $25 plus tax at Bike Works, Newtown, which I think is very reasonable and they did a great job!
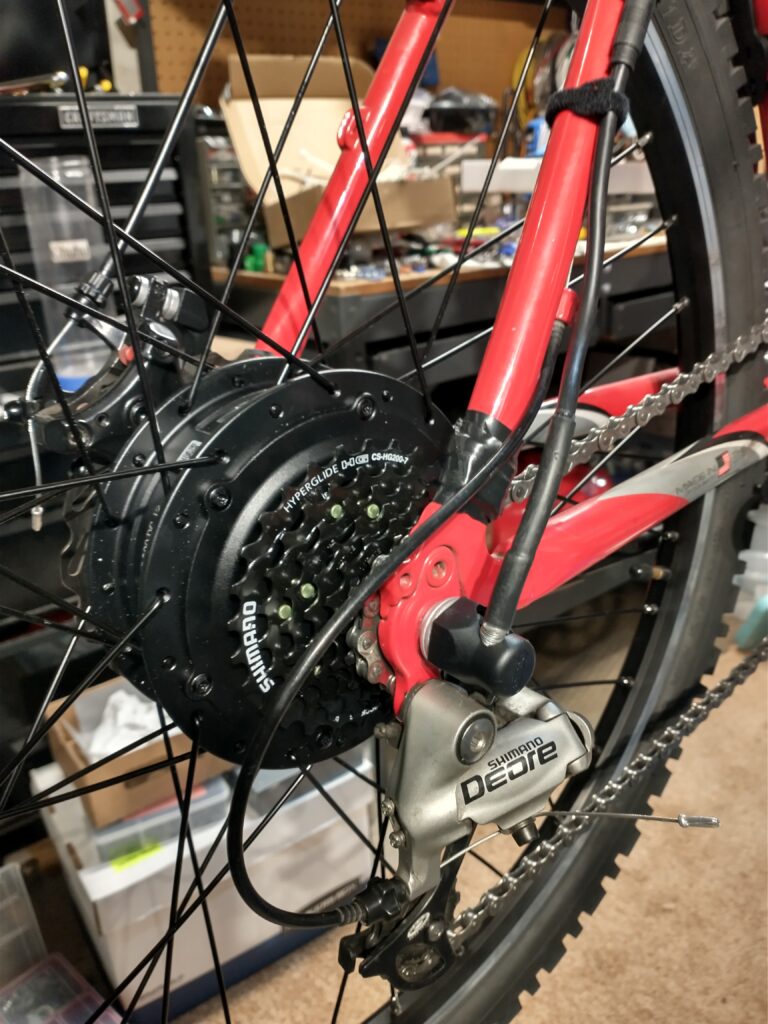
Pleasant surprise #1: This hub motor comes with a quick disconnect fitting about 8 inches from the hub that will make rear wheel removal and repair MUCH simpler than my Voilamart rear hub motors! This is a big deal and it appears Bafang/Sutto figured this out.
Pleasant surprise #2: The motor says Sutto, but all the other parts (esp. the controller and display) are labeled ‘Bafang’. This is a good sign.
Pictures:
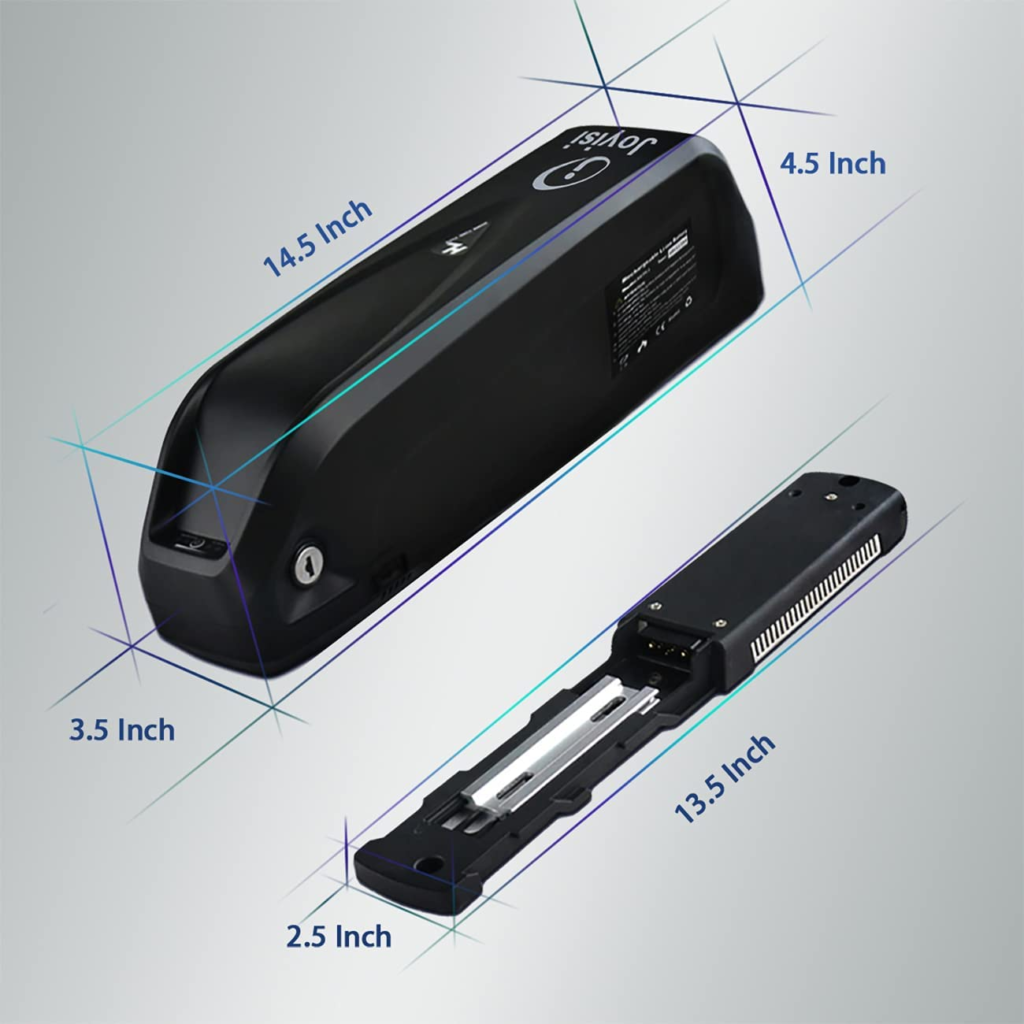
The Sutto hub motor and wheel does not come with a seven-speed cassette, so the Shimano Alivio CS-HG200 7-Speed 12-28 Cassette (and shim) was added for $23. I was able to use the stock derailleur and chain.I used the stock disc brake and rotor, but added a new BV Alloy Kickstand ($18) and Universal Torque Arm ($10) for a little added insurance. Note the quick-release connector behind the kickstand. Handlebar view. From left to right: mirror, brake, throttle, bell, light, display, power/PAS switch, shifter, brake. Note: This build does not include PAS or motor cut-out switches on the brake levers. It is ‘throttle-only’.The battery fit fine, but I decided to mount the controller on the seat post for simplicity. Other parts I replaced from the stock XC00 include a Bikeroo Seat ($15), Lock-on Handlebar Grips ($8), Adjustable Handlebar Stem ($20), Mountain Bike Pedals ($24), Rim Strip Tape ($13), and 8oz. FlatOut Tire Sealant per tire. The Joyisi battery and mount I already had ($290 value)
As mentioned above, the e-bike doesn’t have PAS or motor cutout switches on the brake levers. Considering the way I ride my rear-hub e-bikes, this throttle-only configuration is perfect. I pedal most of the time, then augment forward motion with throttle as needed. With this setup, the PAS settings determine how much power is applied with the throttle. I’ll usually run this bike between 3 and 4, on a 9 point scale.
If I were to do this build again, I would try to find a reliable source for the Bafang G062 motor, and now I know I would have to dish the wheel for this particular Costco bike, which is not a big deal. Otherwise, this was the easiest and most cost-effective e-bike build to date, and it’s an absolute joy to ride.
Final stats:
Final build cost if I had to buy everything new ($1445)
Final curb weight, including a full tank of gas (59 lbs)
**Update**
This week a friend asked if he could buy this e-bike. I set the price at my final build cost and he agreed. The only issue is, he’s quite a bit shorter than I am, so I would need to move the controller box to a different location. No problem! This is one of the things I really like about DIY e-bikes: I can change anything I want, and use off-the-shelf parts for every component.
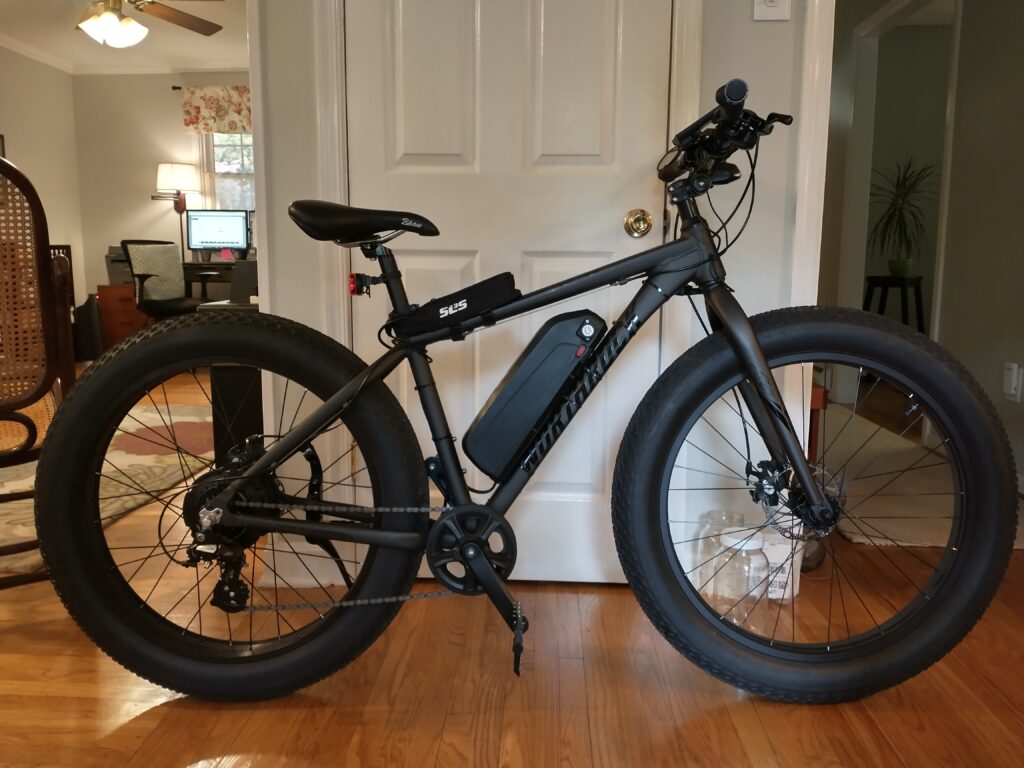
So, 1 Amazon order, 1 day, and $19 incl. tax, and the problem is solved:
SLS3 Top Tube Bike Bag added and cables rerouted. Now the seat can be adjusted to any height. And I think it looks even better than before!
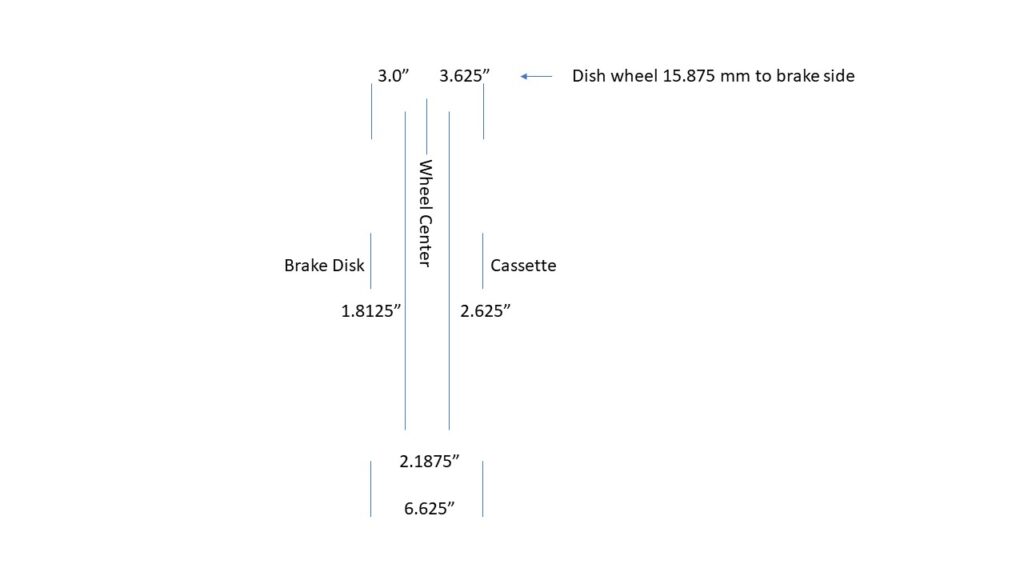
PS – I plan to build another one of these with the original Bafang motor when the XC00 goes on sale again ($400 is a great price for this bike!). Also, I created an image of the rear wheel offset that’s required when mating the Bafang 1000w geared hub kit to this frame:
The hub needs to be dished 15.875mm toward the brake side for proper centering.
Posted inUncategorized|Comments Off on Build #4 – A ‘Fat Tire’ E-bike
In my e-bike class I discuss the ubiquitous 18650 lithium-ion cell used in most e-bike batteries today. These batteries have been around for a while and are used in many laptop computers, cordless power tools, some electric cars, electric kick scooters, most e-bikes, portable powerbanks, electronic cigarettes, and some LED flashlights. This broad acceptance usually translates into lower cost and improved quality/reliability.
So, the question is, if the 18650 cell is working so well, why change? And what’s next for e-bikes? Good question! I’m glad you asked…
Having done some research, there are a few factors to consider when selecting certain types of batteries for your e-bike. One factor is ‘space’. It’s likely that you be using a 18650 cell pack if you’re cramped on space. The cells are slightly smaller than the next cell configuration, the 21700 cells that are also fairly common these days, but are a bit more expensive than the 18650s, and tend to be used in applications that require more energy and can tolerate greater weight and space than a battery pack using the 18650 cells.
Here’s a short thread that discusses the differences between the 18650 and 21700 cells:
“21700 cells use the same tech as 18650 cells meaning it delivers the same power per weight, but just by size comparison the 21700 cell is 46% more bigger.
Both have same voltage, but 21700 cells can deliver 40% more power via capacity and amperage.
If you want power, slim build, and less capacity for cheap, get 18650
If you want the same power, bulkier build, and travel 40% farther, worry less about overheating at a premium, get 21700s”
And summarized from a recent e-mail exchange with Matt Robertson (Tales On Two Wheels):
Matt has been using both battery configurations in his builds. His Bullitt (ebike) uses a custom 32ah Samsung 35E cell pack, which are 21700 cells. And the Luna V2 (used for his Apostate build) is using 18650’s. The pack on the Apostate was chosen primarily because it was a perfect fit for the frame. Everything else was secondary… you can get more details about his rationale for using the Luna V2 battery for this build in his recent Day 3 article.
Matt continues:
“At this point in time, 21700 cells are superior but not hugely so. Its not enough of an improvement to be the sole decision maker. As you can see above, that one pack had a number of things going for it and cell content was secondary. Those cells have been available for some time but have not taken over the world. Primarily due to cost.
It really depends on what you are looking to do with the battery, how big it is. How expensive the cells are when making your buy decision.”
Which brings us to a relatively recent development in battery tech that could find its way into the e-bike market, and that’s LiFePo4. LiFeP04 (lithium iron phosphate) tends to be less energy dense and heavier, but a pack can be charged up to 100% and left there for extended periods, and those packs are good for 2000-3000 cycles whereas a li-nmc/18650/21700 pack is going to live about 400 cycles (worse case). Also there is no explosion or fire risk. BTR Power is selling them on Amazon for e-bike batteries although they really are better suited for ‘cargo’ bike apps where you can live with a bigger battery.
Well that’s all I know about e-bike batteries for the moment, and my head hurts from thinking about this topic. Many thanks to Matt Robertson for steering me in the right direction to help y’all learn a bit about battery tech. And for the moment, I have a lot invested in 18650 battery packs, so I guess I’m just going to use those up before I switch to any of the newer battery tech. And maybe by then there will be something better and cheaper on the market anyway. With all the innovation happening in the EV automotive space, there’s likely to be trickle-down into the e-bike segment, especially for the ‘performance’ e-bike market. I was viewing a YouTube video recently (Future E Bike Technology Part 3) where a comment was made that most ‘serious’ mountain bikes in the future will have some ‘e’ components. To get there though, battery weight needs to decrease, range needs to increase, and e-mountain bike (eMTB) systems need to improve.
Exciting stuff for sure!
Posted inUncategorized|Comments Off on E-Bike Battery Tech – What’s Next?
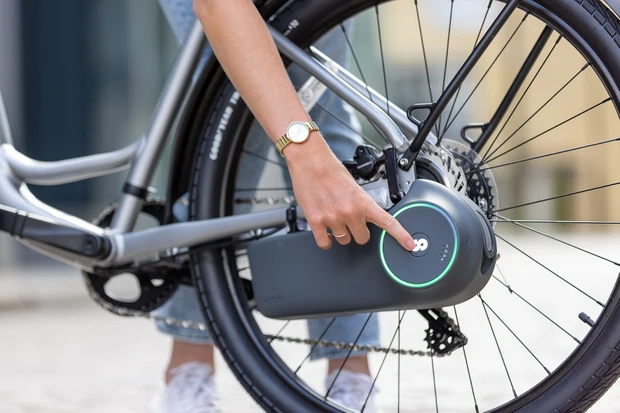
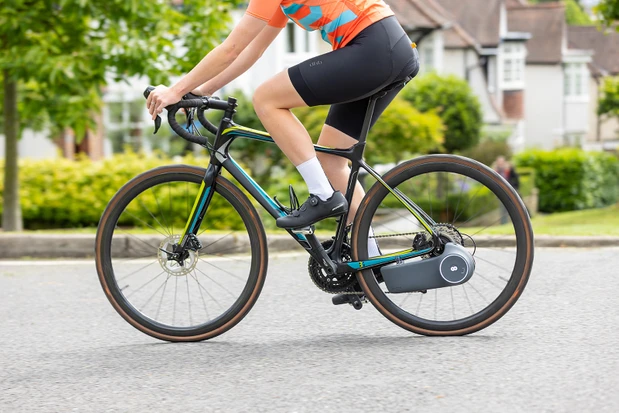
British start-up Skarper has unveiled a new e-bike conversion kit that uses a specially designed disc brake rotor to provide power to your bike.
Most electric bike conversion kits are not easily removable because of the effort involved in switching out a wheel, cables, batteries and fittings.
However, the new Skarper system eliminates that issue by containing everything within a compact single unit that has a unique and patent-protected design to drive your bike’s rear wheel.
We’ve spent an afternoon using the system for an exclusive first-ride review and, so far, we’re impressed.
What you need to know about Skarper
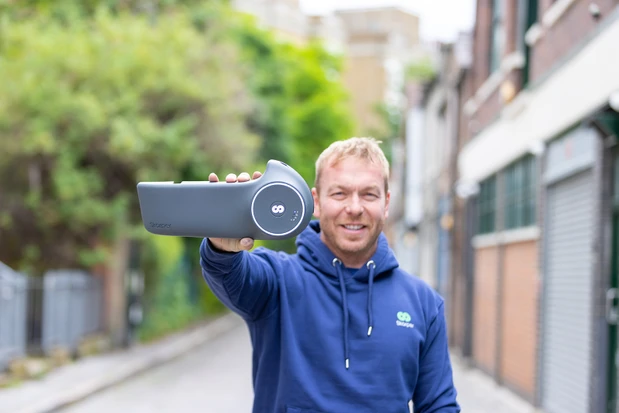
The Skarper unit requires you to replace the rear disc rotor with its rotor/drive unit
It weighs in at a claimed 3kg
Skarper’s rotor works as both brake and drive, and adds just 300g to your bike
Once the disc is installed, fitting/removing takes seconds
Claimed range of up to 60km
Charge time of 2.5 hours
What is it?
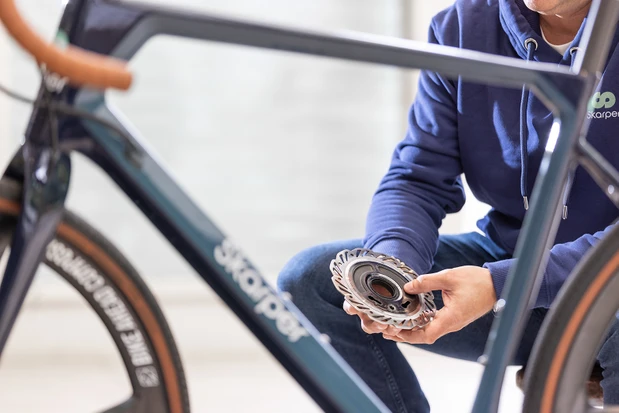
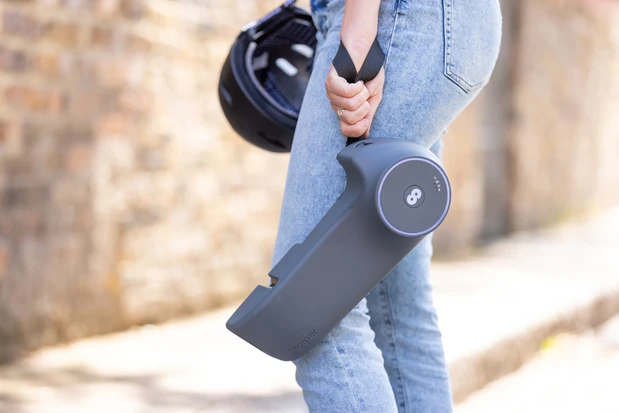
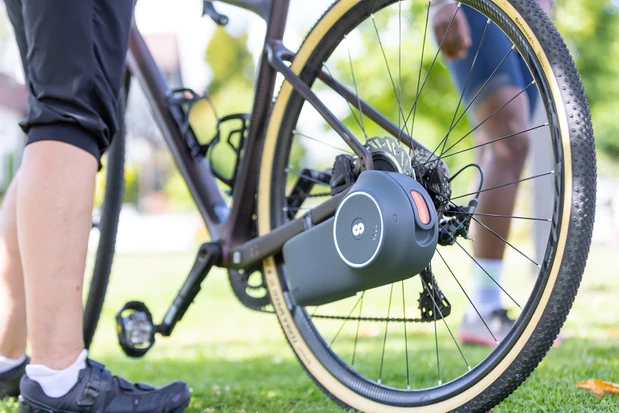
Skarper’s patented DiskDrive rotor replaces the stock rotor on your bike. Skarper
Skarper’s electric bike conversion kit is housed inside a one-piece drive and battery unit. The unit clips onto specially designed tabs that you fit to your non-driveside chainstay.
The motor then drives a purpose-built rotor, which the brand has dubbed the DiskDrive. Most electric bike conversion kits use a front-hub motor, a bolt-on mid-drive unit or rear-wheel motor to provide propulsion.
Like most ebike conversion kits, on Skarper’s system, a cadence sensor attaches to the cranks to control power output.
A simple fitting on the chainstay stabilises the Skarper. Skarper
Who is behind the Skarper ebike conversion kit?
Sensors and the control system’s algorithm combine to deliver power when you need it. Skarper
Skarper says it has a team of more than a dozen engineers and designers working out of its London base. Leading development is inventor Dr Alastair Darwood.
Dr Darwood already has plenty of innovations under his belt associated with his medical training. These include orthopaedic and anaesthetic medical devices developed while working in the NHS.
Supporting Darwood’s innovative electric bike conversion kit is a group of cyclists who’ve all backed the company privately.
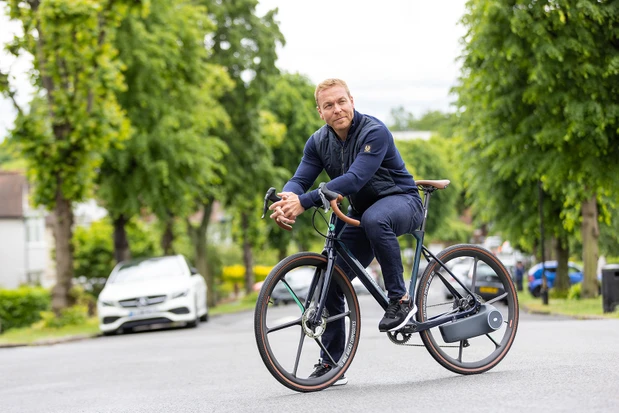
Sir Chris Hoy helped with the R&D of the Skarper and invested in the project. Skarper
The Skarper’s investors include six-time Olympic and 11-time world champion Sir Chris Hoy, who has also been heavily involved in the testing and development of the unit.
He explains: “I’ve always been an advocate of getting more people on bikes, regardless of their fitness, ability or age, and I’ve discovered that ebikes can play a huge role in making cycling more accessible to anyone.
“It opens up opportunities – whether it’s making a commute possible which would otherwise have been too difficult, keeping pace with a fitter friend for a challenging bike ride, returning to riding after an injury or illness, or just going further on your rides and seeing more for the same effort.”
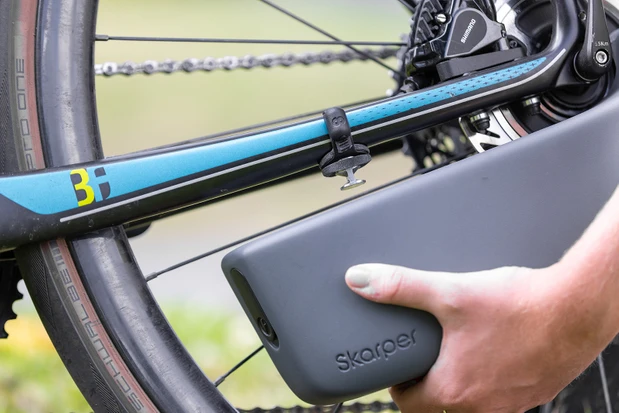
The self-contained motor, battery and ‘brain’ of the system is remarkably compact and weighs in at just 3kg. Skarper
What’s next?
Simple fitting and its compact dimensions could make the Skarper a true game changer. Skarper
Skarper is remaining tight-lipped on the full details, but alongside the road/urban unit seen here, the brand has also been working with Red Bull Advanced Technologies on an off-road version.
Skarper claims this unit has “huge amounts of power and plenty of torque. It means you can clip-on the system to carry you to the top of the mountain, unhook it and stow it in your pack and then you’re free to ride the trails on your / without the added weight and expense of an e-mountain bike“.
When will it be available?
Skarper promises to make turning any bike into an ebike a straightforward process. Skarper
Skarper has now committed to full production, with delivery intended for 2023.
No fixed price has been set as yet, but Skarper tells us that the target price is £1,000.
Skarper also claims it’s in discussions with major bike brands about the opportunity to fit the DiskDrive disc brake rotor as standard.
Skarper electric bike conversion kit first-ride impressions
Warren Rossiter, senior technical editor
At just 3kg, the Skarper unit makes your bike much lighter than most electric bikes. Skarper
While at Skarper’s office, I fitted a prototype system to a modest Merida hybrid. This involved a switch of the centre-lock disc rotor for Skarper’s DiskDrive, attaching the Bluetooth cadence sensor to the cranks and then hooking the unit onto the rear chainstay, with its driveshaft plugging into the keyed slot on the rotor.
Taking the unit out of the box and getting it powered up and ready to ride took a matter of minutes.
I headed out onto the streets of Camden, in London, to try out the system.
The system provides assistance quickly from a standing start, progressively increasing the power smoothly and making for quick getaways from traffic lights.
We headed to Highgate hill, which rises around 60m in elevation. I came away impressed by how easily the Skarper coped with this short urban climb.
Unlike most electric bikes, the Skarper uses a combination of sensors and control algorithms to respond to the terrain and your input. Power delivery was smooth and predictable.
It’s akin to the level of assistance you get from lighter ebike systems, such as Mahle’s ebikemotion or Fazua’s mid-drive system. However, this self-contained unit, without a separate high-capacity battery, won’t have the same range as either of those systems.
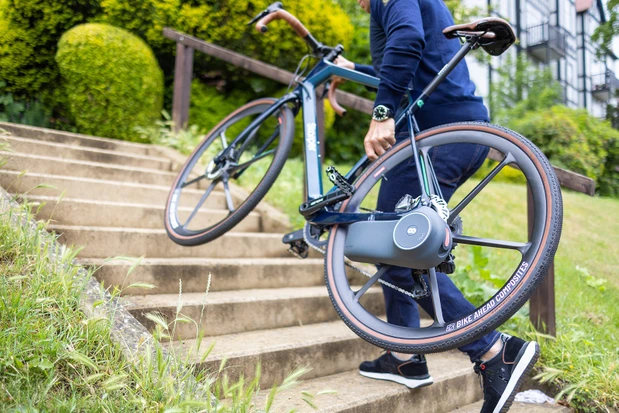
The Skarper isn’t just for commuter bikes – you can fit it to your road bike, gravel bike, mountain bike or anything with a disc brake. Skarper
While the Skarper is pretty much self-contained and self-controlled, the brand is also working on a smartphone app to allow the owner to tune the system and perform firmware updates and upgrades.
I asked about long-term concerns on driving the rear wheel via the brake rotor. Darwood explains that the force a rotor experiences under braking far exceeds any amount of power the Skarper system delivers. This, he says, means the system is said to operate well within existing standards.
With removal in seconds, compact dimensions and a 2.5-hour recharge time, the Skarper can truly be charged at your desk. Skarper
Having spent 45 minutes riding the Skarper, and in prototype guise with a fabricated casing around the patented internals, I’m not ready to commit to a full-test opinion yet.
I was, however, impressed by just how good the system feels.
The unit even integrates a rear light into its locking lever. Skarper
There’s enough power for urban hills and the power curve is smooth, progressive and instant in both turning on and off. The system also feels essentially drag-free when it’s not running (above the 25kph EU limit).
Skarper’s COO, Uri Meirovich, was quick to point out after my short test ride that the aim of the system is not to take on existing conversion kits, but to offer a viable alternative to expensive mid-drive and hub motor systems without the need to purchase a full-on electric bike.
The goal of producing a credible alternative to existing ebikes, while you can still use your own bike is potentially game-changing, but we’ll have to reserve judgement until we can get the Skarper on long-term test.
Warren Rossiter is BikeRadar and Cycling Plus magazine’s senior technical editor for road and gravel. Having been testing bikes for more than 20 years, Warren has an encyclopedic knowledge of road cycling and has been the mastermind behind our Road Bike of the Year test for more than a decade. He’s also a regular presenter on the BikeRadar Podcast and on BikeRadar’s YouTube channel. In his time as a cycling journalist, Warren has written for Mountain Biking UK, What Mountain Bike, Urban Cyclist, Procycling, Cyclingnews, Total Bike, Total Mountain Bike and T3. Over the years, Warren has written about thousands of bikes and tested more than 2,500 – from budget road bikes to five-figure superbikes. He has covered all the major innovations in cycling this century, and reported from launches, trade shows and industry events in Europe, Asia, Australia, North American and Africa. While Warren loves fast road bikes and the latest gravel bikes, he also believes electric bikes are the future of transport. You’ll regularly find him commuting on an ebike and he longs for the day when everyone else follows suit. You will find snaps of Warren’s daily rides on the Instagram account of our sister publication, Cycling Plus (@cyclingplus).
Posted inUncategorized|Comments Off on E-Bike Tech – Introducing Skarper
A friend from my distant past contacted me a few days ago to let me know he had electrified a Schwinn trike. He used the Swytch kit which powers the front hub, but every time I have researched this kit it’s out of stock. So, after I show you what he did, I’ll show you the kit I would use, which is just a little less money than Swytch. So here’s what Glen (coincidence?) did:
The Swytch install took him about 1.5-2 hours. In his own words…
The kit comes with a new front wheel, with motor pre-installed. Get a tire on the new rim and it’s ready to install. Then you mount the battery to your handle bars, and run a connecting wire down to the motor. Then, run a second wire to a stationary sensor that you mount on the frame adjacent to the pedals. Then, you mount a ring with small round imbedded magnets to the pedals. Once you turn the battery on and set your desired power, you get on and start pedaling. The engine immediately responds. Stop pedaling and you stop the power…pedal faster and motor increases speed. The power setting controls the amount of assist that is generated in response to pedal speed. I’ve found the mid setting gives me adequate power and speed and excellent range.
The big benefit for me, I just turned 77, is that you are forced to pedal to activate the power assist, no pedal, no motor, pure and simple. Also, with the battery turned off, I sense very little difference in pedal power required from the standard wheel being installed. I’ve included pictures below, that I think will give you an idea of the simplicity of the setup.
The lights on the left show battery charge and the light on the right is the power setting.
The wires I’m not using are customizing the setup. They do have a optional throttle kit, where you don’t have to pedal, but that would defeat the exercise factor I was looking for.
So, a single connecting cable to the motor.
And, a single cable to the sensor. You can see the ring that mounts on the pedal and the sensor reacts to the rotation of the magnets.
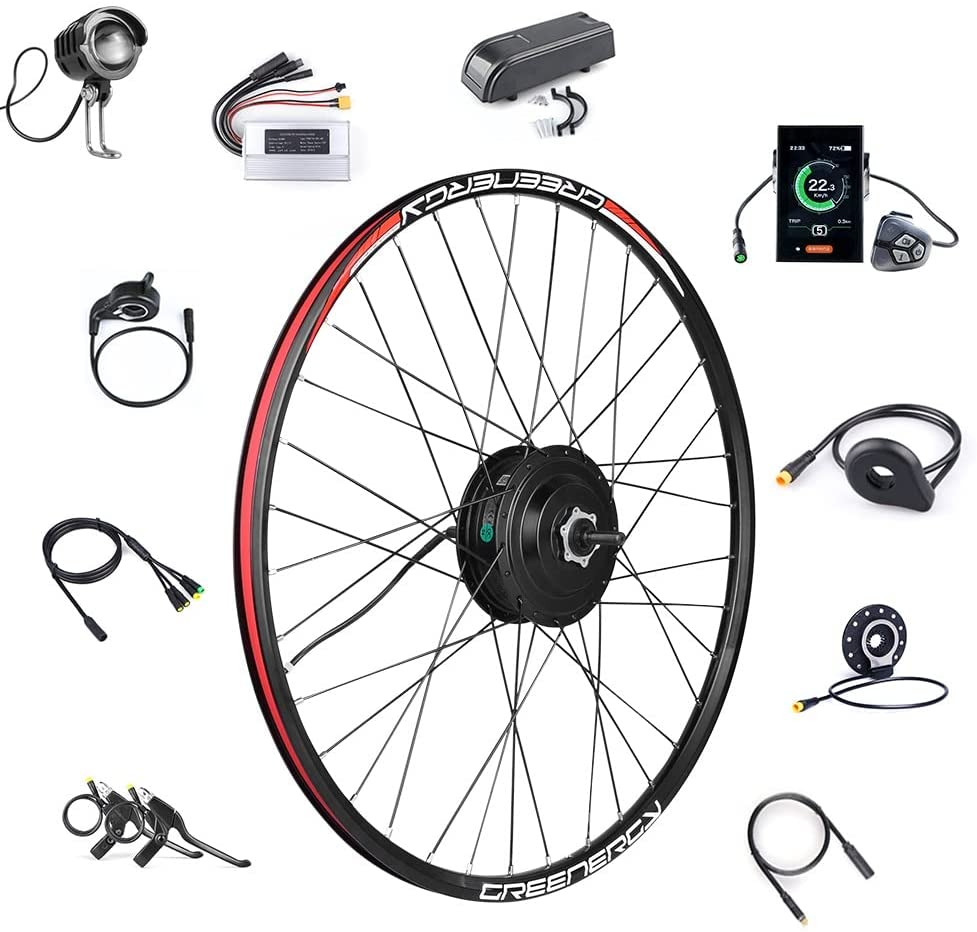
OK, so that’s how Glen did it. Seems pretty straightforward. But instead, I would go with this Bafang kit and Joyisi battery:
Glen says the price he paid is similar to the prices shown above. There will be a bit more installation work to be done with the Bafang kit since you’ll need to find a place to put the controller and battery, and then connect everything up. Swytch appears to simplify this aspect of the conversion.
Posted inUncategorized|Comments Off on Electrify my trike!
Just kidding! I think I can continue to provide a valuable service to e-bike DIYers and those interested in buying factory e-bikes in our area. However, I recently discovered a resource that is about one light year (roughly 5.879e+12 miles for those interested in this sort of stuff) ahead of me in this space. Let me introduce Matt Robertson (no, not this one), but this one. Matt’s blog is ‘Tales On Two Wheels‘ where he writes about things like “How To Build An Ebike From Scratch“. The difference between Matt’s approach and mine is that Matt is MUCH more organized and informative than I have been. Therefore, if you’re thinking about building your own e-bike (from scratch), DEFINITELY consult Matt’s site BEFORE starting your project.
I’m just thinking of all the mistakes I could have avoided had I discovered this resource before I started…
Other helpful advice you’ll get from Matt’s site includes (but is in no way limited to):
Matt’s ‘Building an E-Bike from Scratch‘ is a work in progress which I plan to follow through to the end. Completed to date (May 2022) are Planning, Hunting, Tinkering, and Buying. Next up is Assembling (can’t wait!), followed by Perfecting. As has been the case with each of my builds, ‘Perfecting’ is a continuous process. Your completed build will mostly work, but then there’s a slight chain alignment issue, or brake adjustment, or you finally decide to ditch your front derailleur because you never use it and you want to go to a larger single narrow-wide chainring anyway, etc.
This matter of ‘Perfecting’ is one of the real benefits of building your own e-bike. You own it, you built it, and you can change it any way you want to without paying a premium for ‘factory’ parts or voiding your warranty. It gives you complete freedom to dial your e-bike in to address your specific needs and abilities.
So again, kudos to Matt for providing this excellent resource to e-bike DIYers – thanks! You’re providing a great resource for those just starting out…
Posted inUncategorized|Comments Off on My job is done here!
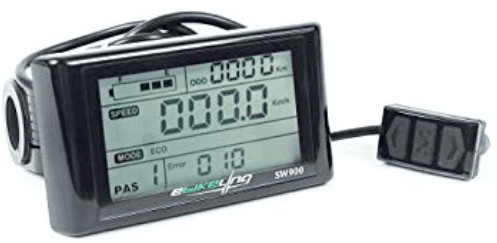
Having recently upgraded the display on my Bafang mid-drive e-bike, I’m now an advocate of displays that provide actual battery voltage, rather than just a relative indication of charge via bars. Here’s what I’m talking about. Here’s the display I’m using on my two rear hub e-bikes. It’s the SW900 LCD display:
It’s not a bad display. It just doesn’t give me all the information I would like to have about my battery.
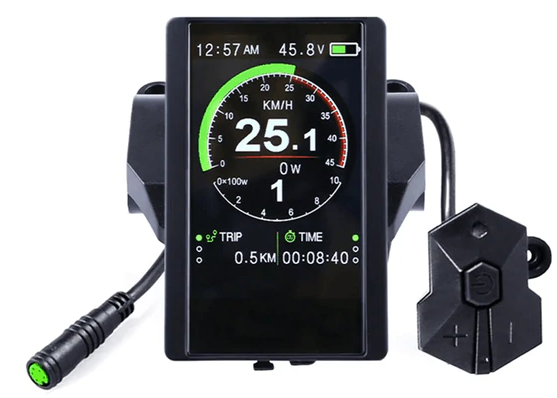
Better is this display I recently purchased for the mid-drive e-bike. It’s the Bafang 850C/DPC14 LCD color display.
You’ll notice next to the battery indicator, there’s a an indication of the actual voltage remaining in the battery. Why is this important you might ask?
Glad you asked! In previous posts I made the point that you can potentially improve the longevity of your battery by not letting the charge level get below 20%, and when recharging, charge to 80% most of the time. I only do full (100%) charges about every 5th charge to re-balance my battery’s cells.
Now, since I said 20% for the lowest discharge, and 80% for the highest charge, how many volts does that relate to when charging a 48 volt battery? Good question! After much digging, I this excellent resource which answers the question: https://talesontwowheels.com/2019/10/02/li-ion-ebike-battery-charge-charts/ (thanks to Matt Robertson for doing the heavy lifting to make this information available to us all!)
From this ’48 volt’ chart, I conclude that I should not let my 48 volt battery discharge below about 42 volts, nor charge more than about 51.5 volts with an 80% charge. To manage this charge level, I have been using the Luna Charger 48V Advanced 300W Ebike Charger (currently out of stock), though this charger works just as well, is in stock, and costs less – 48v 3amp Luna Mini Charger.
And just to add a little more weight to my claim that charging your battery to 80% rather than 100% as a routine thing, here’s yet another chart (source):
That’s all for now. Thanks for listening!
Posted inUncategorized|Comments Off on Some display and battery advice
This new site has two primary purposes. First, it’s an exercise designed to help others develop their own WordPress websites. And second, it’s to communicate to aspiring DIY e-bike builders my best practices and resources that can help them successfully build an e-bike without spending a fortune.