For e-bikes, that is. After converting my first Trek to a rear hub e-bike, I have not once used my front derailleur. The chain remains on the highest chainring, and any gear changes happen on the rear 7-speed cluster. All my riding is on roads, not single-track trails, though our part of Pennsylvania is fairly hilly, so some shifting is required – not really single-speed territory.
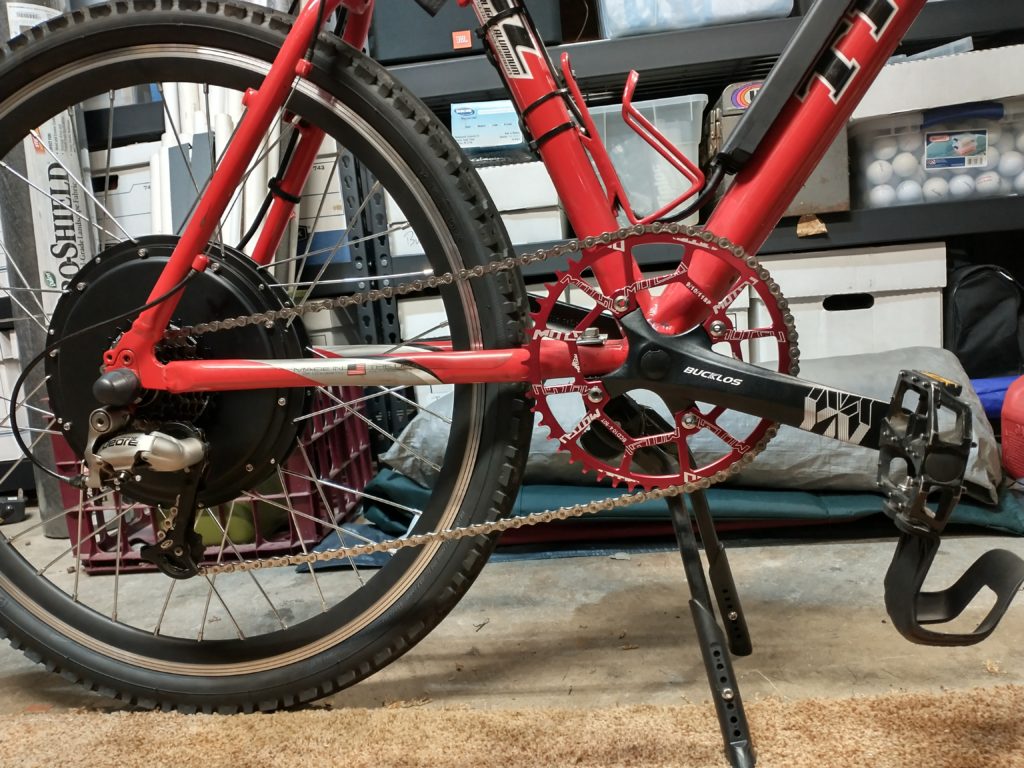
I’m also finding that I can run a larger single chainring than I would normally use on a non-electric bike. My second build, also a Trek, is running a 48-tooth narrow-wide chainring, and my first build will soon be running a 50-tooth chainring. I’ll provide a few pictures below when the swap is complete.
Bottom line: There really doesn’t seem to be any need to use a front derailleur on any e-bike, rear hub or mid-drive. It’s just adds unnecessary cost and complexity.
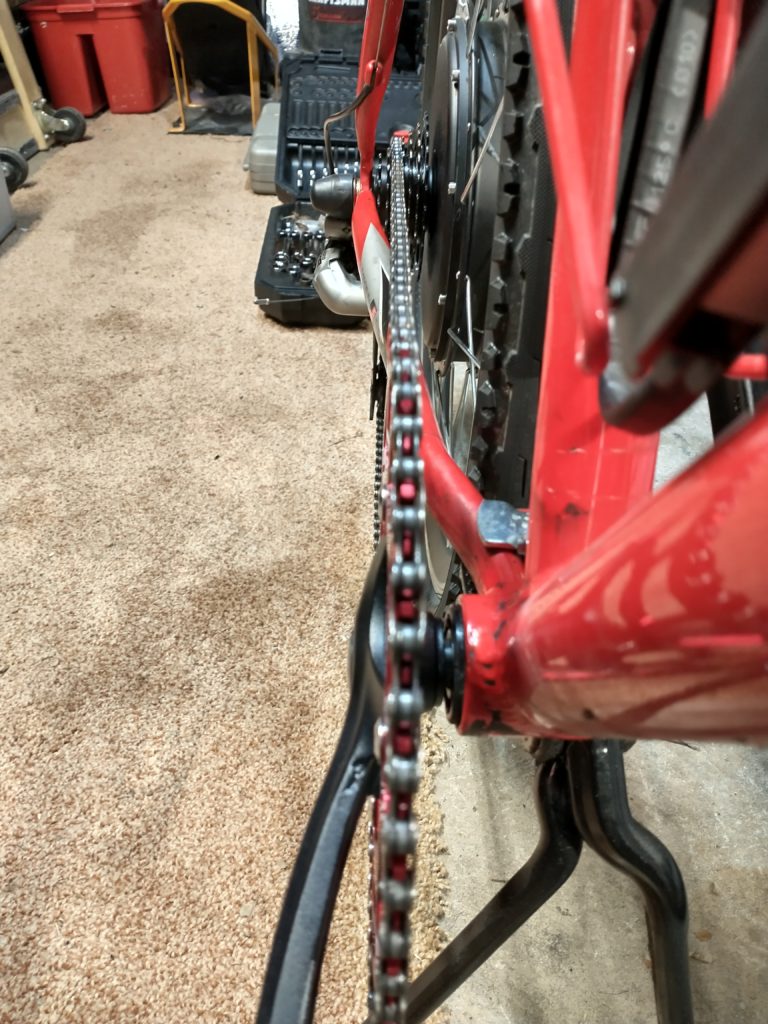
Sure is pretty, and SO much simpler than the 3 chainring setup it replaced!And the chainline looks spot-on…
And a ‘before‘ picture so we know where we came from:
That was the original Shimano triple chairing and derailleur – don’t think I’ll miss it.
PS – I rode 12 miles this afternoon and really like the change. With this new gear ratio (50×12 in the highest gear) I can still pedal at 35mph. 20mph cruise in the middle gears is perfect. Build #2 is running a 48-tooth chainring which is probably more appropriate for group and trail rides. Having a few bikes, each with its own unique characteristics, I find myself selecting the bike that best fits a planned ride.
Posted inUncategorized|Comments Off on I’m done with front derailleurs
As important as tires and wheels are for e-bike safety, brakes might be even more critical. Not being able to stop effectively will eventually be an issue. Better to deal with your brake issues sooner than later. Brakes are all about ‘stopping power’. In fact, if you’re riding your e-bike correctly, you’ll use your front brake about 90% of the time where 70 to 80% of your effective braking occurs. This is not to say that rear brakes aren’t important, they are. But your best stopping power is coming from the front brake.
In the old days, ‘caliper brakes’ were the thing. Mountain bikes tended to have brakes that provided more leverage, hence greater braking force, while road bikes had smaller calipers which exerted less force, but were sufficient for the job at hand. Today, only inexpensive bicycles have caliper brakes, and no ‘factory’ e-bike I have seen recently has calipers. Yet, if you’re contemplating converting an old bicycle to an e-bike, you might well decide to keep the caliper brakes rather than upgrading to disc brakes. That’s fine as long as the brakes your keeping have ample stopping power.
For example, my mid-drive e-bike has caliper brakes that are very effective. I see no need to upgrade. I replaced the brake pads with pads that have good stopping power and will stay with that. As mentioned a moment ago, most of the stopping power is being done on the front wheel. With that in mind, my first DIY e-bike has a ‘hydraulic’ disc on the front (major stopping power) and a caliper on the back. This configuration is working really well for that bike.
Then when it came time to build my second DIY e-bike, I decided to try out ‘mechanical’ disc brakes fore and aft and I’m very happy with the results. I was also surprised with this build how inexpensive a good set of mechanical disc brakes could be. This is the set I chose and I’m delighted with their performance: RUJOI Mechanical Disc Brake Kit, Aluminum Front and Rear Caliper, 160mm Rotors ($23)
Yet the adapter alone for the rear brake on this build cost more than the complete brake set. Oh, and one other thing, when you’re building an e-bike, and especially when you’re upgrading your brakes, be sure to buy a new set of cables (incl. a cable cutter tool if you don’t have one).
So let’s talk a bit more about brake tech. Above, I introduced caliper brakes, and hydraulic and mechanical disc brakes. As you can imagine, there are many price points and designs to consider when you’re shopping for brake parts. There are also different disc diameters to consider. I went with 160mm discs front and rear, but on many e-bikes you’ll find a larger diameter disc on the front for more braking power. These discs can be 180 or 203mm in size. Larger discs require different spacers to move the brakes farther away from the hub. Just something to consider.
In theory, hydraulic disc brakes provide better stopping power with less effort at the brake lever. This is true, but you’ll need to decide if the upgrade to hydraulic disc brakes is worth the extra cost. In addition, hydraulic disc brakes come with their own brake levers and brake fluid reservoirs, and they’ll likely need more maintenance than mechanical brake systems. And e-bike brake levers usually have a motor cut-out switch built into the brake lever. The levers that come with your hydraulic brake kit won’t have this feature. I was able to add a switch to my hydraulic brake lever with some effort, but this is not optimal.
One last thought on disc brake systems is that you’ll need to think about replacement brake pads at some point. The mechanical brakes I bought say they use a “Universal Brake Pad compatible with Shimano Deore M515/M525/M475…”. So when you’re shopping for new pads, be sure the pads you buy are compatible, and have a good rating. In all honesty, when I bought my first hydraulic brake system, I didn’t even think about brake pad compatibility, so now I’m curious what pad that brake uses. Hopefully, having read this, you’ll be better informed.
** Update **
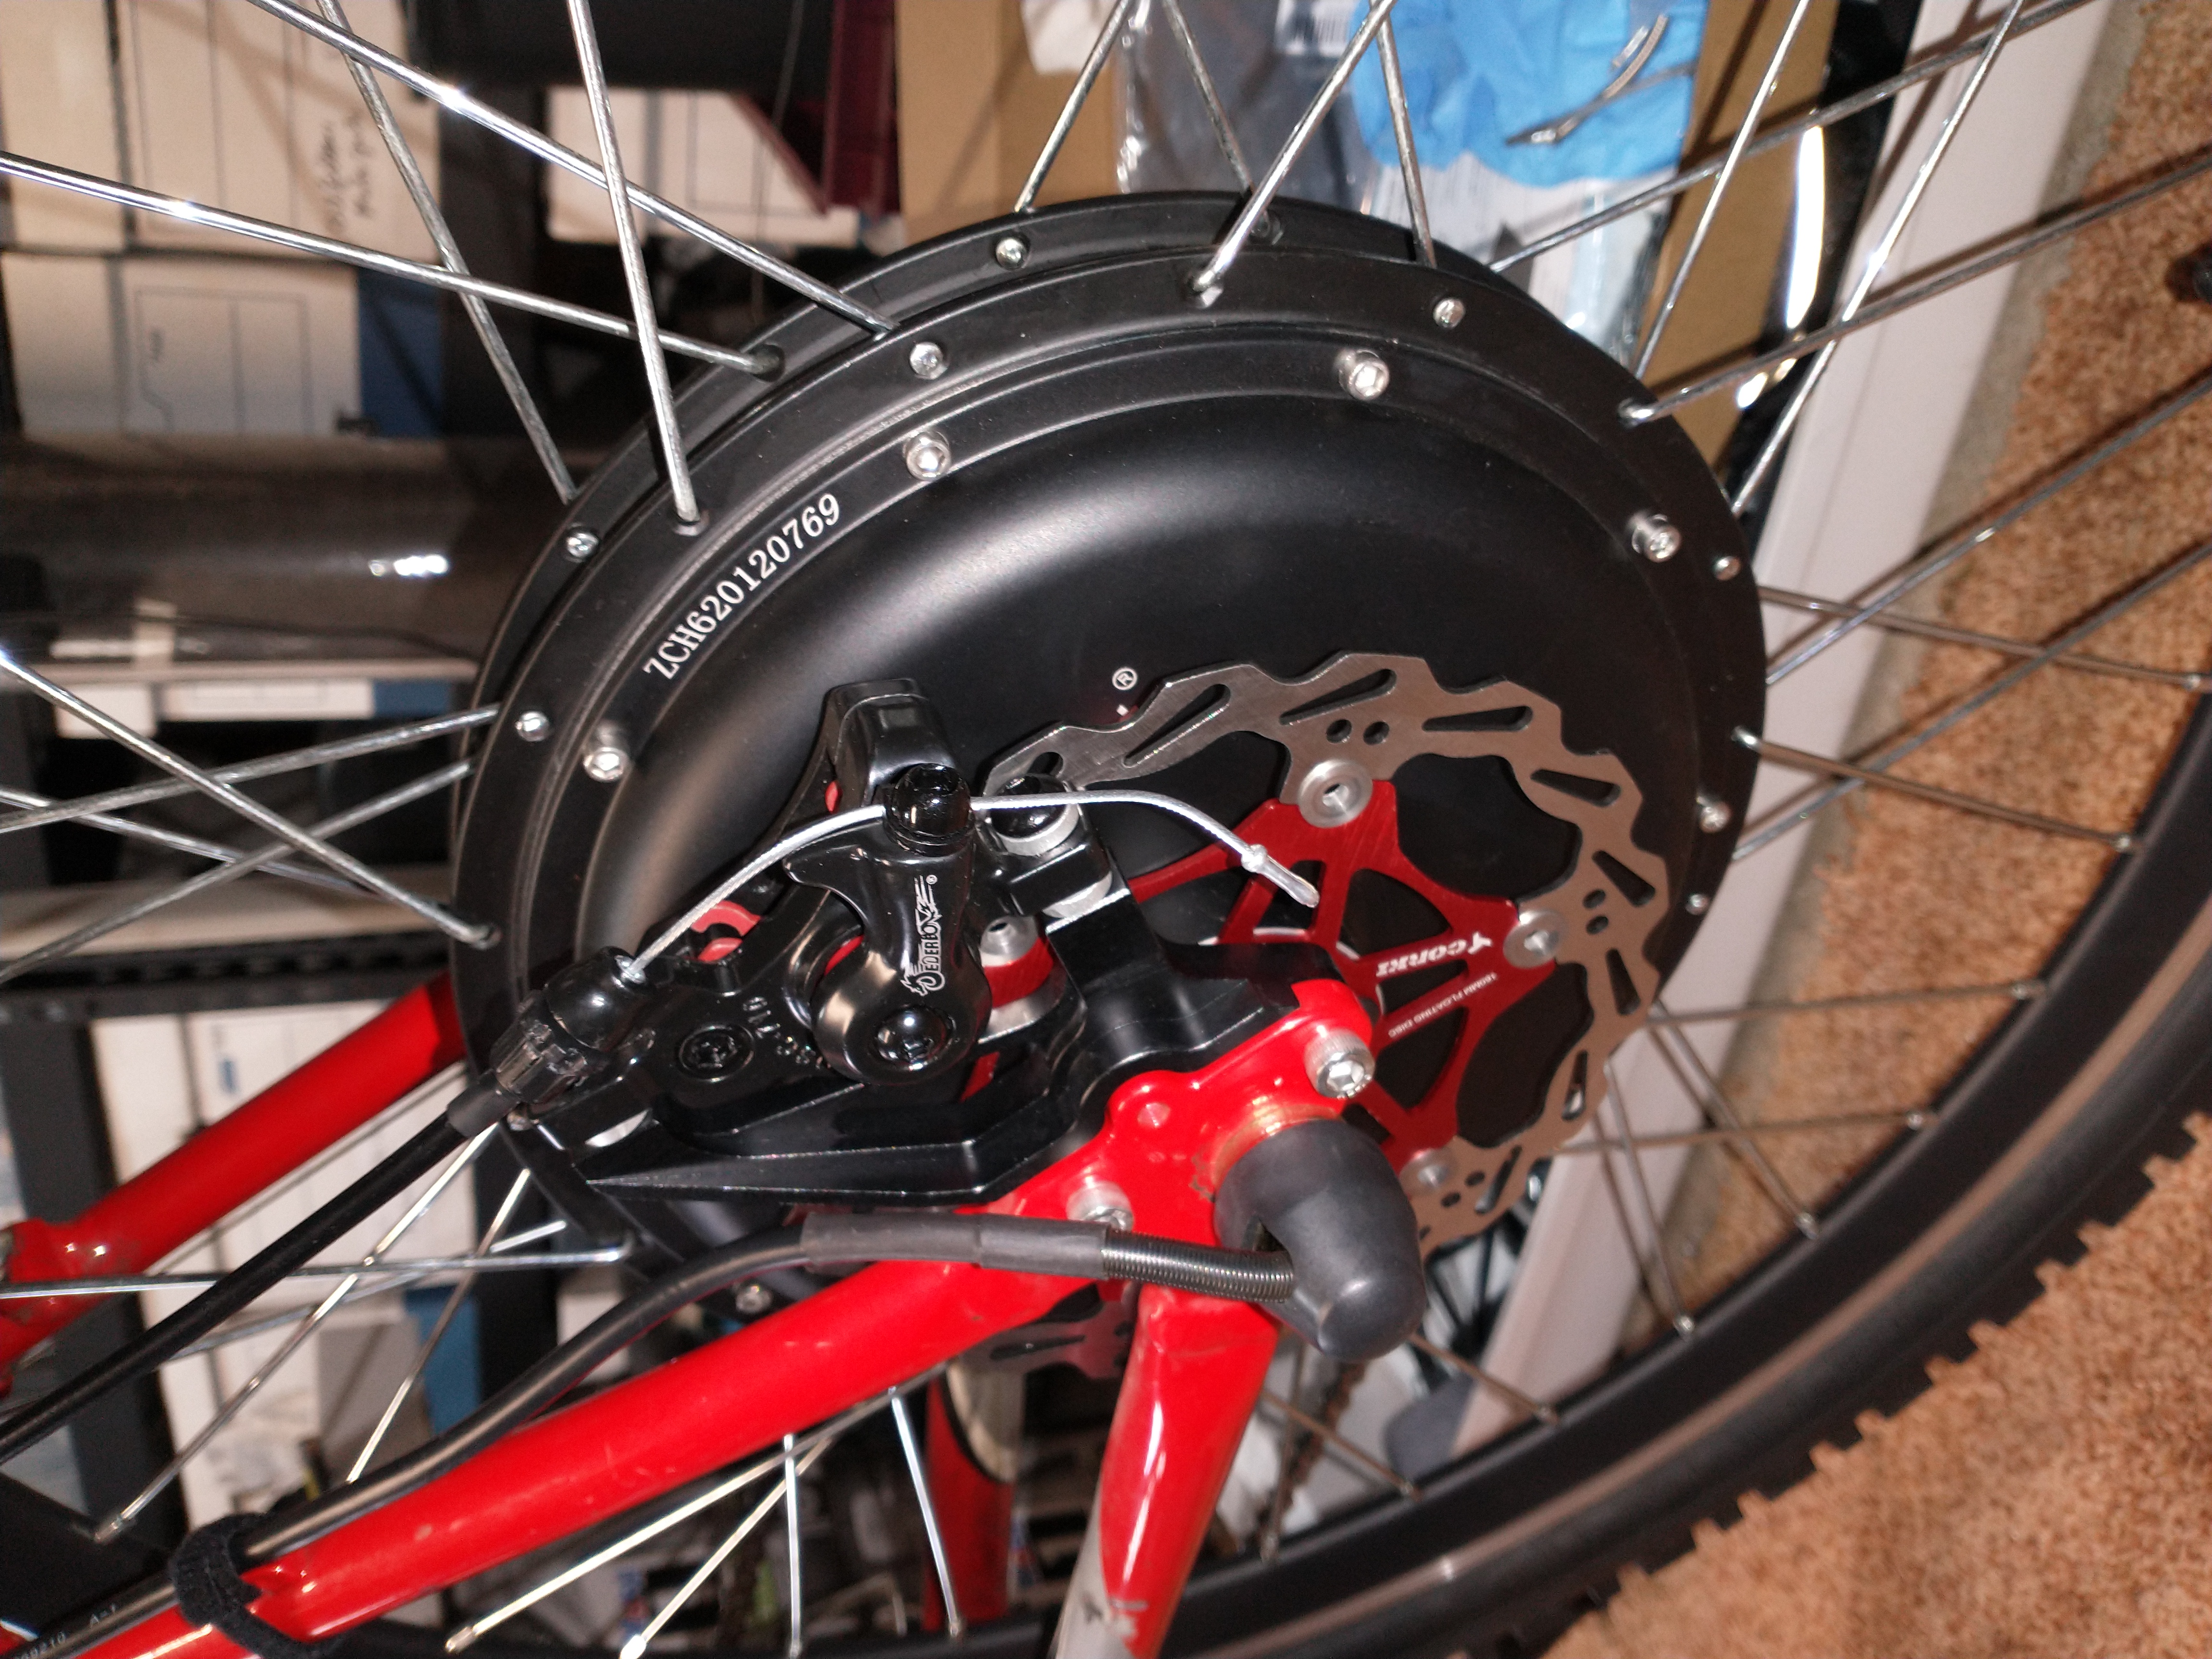
My first DIY e-bike is working great EXCEPT for one thing – the rear caliper brake stinks! There seems to be a bit of metal caught in the rim that makes a weird sound each revolution of the rear wheel when the rear brake is applied. As you might recall, I had converted the front brake on this bike to a hydraulic disc which I absolutely love. The rear brake I left with the original caliper since most of the braking is done with the front brake. Anyway, something needs to change regarding the rear brake, so this is what I’m doing.
I ordered a mechanical disc brake and floating 160mm disc for the rear. Here are the parts and images. I’ll provide a picture below of the completed modification and my first impressions once the upgrade is complete.
SENQI Bike Disc Brake Mechanical – Rear ($25) corki 160mm 180mm Bicycle Disc Brake Rotor with 6 Bolts ($13)
Total outlay for this mod is $38+tax. I think this will be a significant improvement to my rear braking performance (and it’s red – that’s important!).
** Update **
Having received both the disc and brake, I realized I also needed a disc brake adapter for the Trek frame. Add $25 for that. Then I needed some new brake cable housing (plus $9). SO, now my brake mod adds up to $72+ tax. And yes, it’ll be worth it (picture to be provided when the mod is complete – tomorrow).
And I learned something new today – from YouTube of course! This video covers disc brake adjustment procedures. Interestingly, I sort of figured this out myself, but if you’re new at this, I think this video is a great place to start.
Talking about bicycle/e-bike wheels, tires and tubes might not sound so interesting in the scheme of things, especially since I have yet to talk about brakes (equally as important as tires, and the topic of my next post). But I think tires, and their supporting cast, wheels and tubes, are extremely important! And here’s why…
Electric bicycles are heavier than regular bicycles, tend to go a bit faster than a bicycle under pedal power only, and in some cases (to be explained), the rear tire might be considerably harder to change ‘in the field’ than a standard bicycle tire. But we’re getting ahead of ourselves.
Let’s start with wheels. Wheels come in many sizes. My current e-bikes all have spoked 26″ wheels with a 1.5″ width rims. This wheel size has been around a while, so it’s likely you’ll find 26″ wheels if you’re hunting for an older frame to build out an e-bike with. More modern mountain bike wheel sizes include 27.5″ and 29″.
As far as wheel widths are concerned, for mountain bikes and for my DIY e-bikes, 1.95″ to 2.5″ wide tires are the norm. I tend to stick with 1.95″ tires since most of my riding is on paved trails and roads. This tire provides less weight and rolling resistance, but is wide enough to provide a good contact patch on the road surface. I also tend to go with a Slick Wire Bead tire like this one, rather than a traditional knobby mountain bike tire.
Slicks make less road noise and stay planted on a paved road surface better than knobbies. I’m also not a fan of fat-tire e-bikes which can have tire widths up to 4″. For better handling and control, there’s a category called ‘plus-size’ tires which fall into the 2.4″ to 3.25″ range. The popular Rad City 4 Commuter runs the Kenda K-Rad 26″ x 2.3″ which I would consider a plus-size tire on the lower end of the scale, and is an excellent choice for this type of e-bike!
Getting back to wheels for a moment, it should be obvious that your wheel size is going to dictate your tire size and choices available to you. Fitting the wrong size tire to your wheel will have unfortunate consequences!
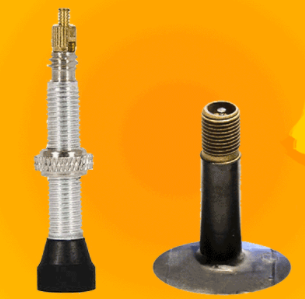
Once you have settled on a tire size, you’ll need to find tubes that work for your given wheel and tire. Here’s where things can get interesting. First, some wheels are designed for Presta valve stems and some for Shrader value stems. Presta (on the left) is slightly less common on mountain bikes these days than Shrader (on the right, and what you’ll find on your car as well). But still, you have to know which valve type your bike requires before ordering new tubes.
Second, when talking about Shrader valve stems, you’ll need to know if your wheels are single or double-wall (very common on the rear wheel of a rear hub e-bike). As it turns out, rear-hub e-bikes can create a lot of torque, so e-bike manufacturers will use double-wall rims for added strength and durability. But why does this matter you might ask when shopping for tubes? Because you’ll need to buy a tube that has a longer valve stem for a double-wall rim than you would for a single wall rim, resulting in a valve stem that’s too short to connect your air pump to. Here’s a typical tube that works with a single wall rim:
The description doesn’t say how long the valve stem is so it’s likely about 34mm long and won’t work with your double-wall rim – too short. So with a little more searching, you’ll find something like this:
This tube has 48mm Shrader valve stem and will work great with your double-wall wheel(s).
On my DIY bikes, I’m running single-wall wheels on the front so a 34mm stem works fine. However, if you’re in the habit of carrying a spare tube with you on your rides, be sure to carry a tube that will work for either wheel.
As a parting thought, I’m not sure I would actually be able to change the tube on the rear tire of my rear hub e-bikes when I’m out and about. This is because the axle bolts are torqued down and require a wrench (that I don’t carry with me) to remove, AND disconnecting the wires necessary to remove the rear wheel is very cumbersome. I learned all this because I actually got a flat on the rear tire on DIY Build #1, just not while I was riding, thankfully. So what to do?
I carry a charged cell phone to call home for a lift if necessary (or for other emergencies).
PS – When riding the mid-drive e-bike, I carry a standard tire repair kit since the front and rear wheels are easily removed so tires and tubes can be repaired. The essential ingredients of this repair kit include:
3 tire levers
1 tube (Presta in this case)
air pump
** Update **
A couple good videos concerning tires and tubes (specifically about how to prevent flats):
As I was writing the previous post about car racks suitable for e-bikes, it occurred to me that I need to also talk about the best ways to secure your e-bikes when mounted on a car rack, as well as when you’re out and about. It’s a fact that e-bikes have a habit of disappearing when you’re not watching (and sometimes when you are). So what to do…
This discussion will include six recommendations, each of which will help you secure your investment, but when used in combination will require the would-be thief to be ever more determined in their quest to separate you from your e-bike(s).
Whenever we talk about security, we have to separate potential thieves into two categories. The first category is the ‘opportunistic thief’. This is the person(s) who see an unlocked/unattended e-bike and walk off with it hoping nobody noticed. In this case, the trusting e-bike owner lost their treasure by not taking proper precautions. Bottom line: If you’re going to be out of sight of your e-bike, at least lock it to something so you have some assurance it’ll be there when you get back. Please!
The second category is the ‘determined thief’. This person has some skills, equipment and experience to defeat just about any security measure you want to throw at them. So let’s not make it too easy for them. The recommendations provided below will hopefully not only deter the opportunistic thief, but also encourage the determined thief to move on to seek easier prey.
Recommendation 1 (assumes you’re using a hitch-mounted e-bike rack):
The description says it has ‘Integrated SKS (Same Key System) locks included to secure bikes to rack and rack to vehicle receiver’. You can see how this security feature works at 4:30 in this video – Yakima OnRamp Hitch Mount Platform Bike Rack with Ramp Overview. FYI – This video also covers the ramp option available with this rack starting at 5:55 here.
The expensive chain lock is used when the bikes are on the car rack, and the el cheapo U-Lock is used when I stop by the library for 5 minutes. The chain lock is heavy but deters the determined thief while the cheap, lightweight U-lock deters the opportunistic one.
My last three recommended security devices have their place in certain situations. Here they are: cameras, motion detectors, and bicycle locators.
First, cameras. If I owned an RV, which I don’t, I could use something like this to monitor my e-bikes: Garmin Dash Cam Mini 2, Tiny Size, 1080p and 140-degree FOV, Monitor Your Vehicle While Away. It’s small and discreet, though it does require a power source and a Wifi connection to do it’s job. Still, I can see this being a very handy device for RV campers in places where e-bikes are known to disappear.
Second, motion detectors. The camera just mentioned does capture video when motion is detected. This is a great feature! But there are also times when you just want to park your e-bike and don’t want anyone to mess with it. I like this gizmo: Juiced Horn/Alarm. When the ‘alarm’ function is armed, the horn will beep whenever someone moves your e-bike. Here’s a video that shows how it works: Demo of the Juiced E-Bike Horn/Alarm. And if you want to save a little money, this one available on Amazon appears to be the same unit for less.
And third, bicycle locators. I’m sure you have heard about Apple’s AirTag. Perhaps you even have you doubts about this product due the AirTag ‘stalking‘ claims that have appeared recently. Still, I think this is the way to go if you’re thinking about putting a ‘tracking’ device on your precious e-bike. Once you have purchased your AirTag here, go here to get a $10 bicycle mount that will secure your tracker to your bike. With this setup you will have a better chance of recovering your wayward e-bike than without it. But note, AirTags are designed to work with Apple iPhones. What about us Android users?
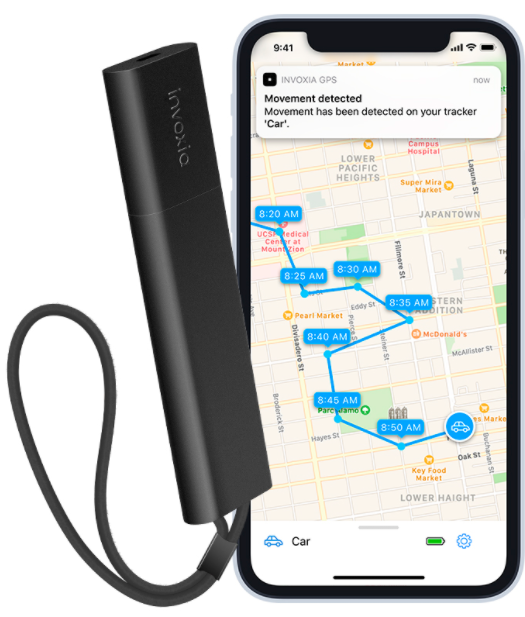
I’m going to say for Android users, consider buying a GPS tracker like this one: Invoxia Cellular GPS Tracker. The upfront cost is $129 which seems a little high, but the recurring monthly subscription cost is quite reasonable at $2.49/mth ($29.90/yr) for 4G-LTE Cat-M1 cellular access. Other features of the Invoxia Tracker include ’tilt detect’ and ‘movement detect’ alerts. If you want to learn more about this cool device, check out this video. Now to figure out where to put this nifty gadget. I’m guessing it’ll go inside my tool bag with Velcro strips. Then I can move it from one bike to the next as needed…
Well, that’s it for this post. But if you’re interested in some more information on this topic, feel free to check out these videos:
PS – And another data point. Did you know “over 2 million bikes get stolen each year in North America” and “eBikes being three times more likely to be stolen than a standard bicycle“? (source) Yikes!
Posted inUncategorized|Comments Off on Securing Your E-Bike
With the added weight of a motor and a battery, plus beefier frames found on some e-bikes, it makes sense that one should consider purchasing a bicycle rack designed for this additional weight. Then there’s the matter of tire size. The e-bikes I build have a minimum tire width of 1.95″ to 2.25″, though many factory-built e-bikes now have ‘fat’ or ‘plus-size’ tires that can be 3.5″ or wider. All this is to say that you need to carefully consider what type of rack is necessary to carry your beloved e-bike(s) safely and securely.
Some time ago I purchased this rack for my regular bicycles:
If I’m carrying a single e-bike with battery off, I load the bike onto the inner rack and I’m OK with this. Two e-bikes, no way! This rack cost $110 and is has worked well for years, but is designed for lighter weights and WILL fail if one were to load two e-bikes onto it.
Having researched this topic recently, here are the options I found that appear to be suitable for carrying e-bikes:
Perhaps you noticed that these racks can get pretty darn pricy. I think that’s because the manufacturers figure you’re spending so much for your e-bike that these prices won’t be considered outrageous. Well, I’d like to go on record to say I think these prices are exorbitant. OK, I said it, but I’ll still probably pay their price because I want a rack that can do the job…
So here are a couple images of the two racks I’d consider buying:
Pretty nifty. The description says it has a removable loading ramp. Also, I can’t tell if it has locks built in to secure your e-bikes like the Yakima rack has.
And this one, which is the one I would probably actually buy:
This rack includes a ramp and Yakima’s “SKS (Same Key System) locks included to secure bikes to rack and rack to vehicle receiver”. I have always liked Yakima’s products from roof mounting systems for kayaks and bicycles to hitch-mounted bicycle racks. I’m sure this rack is no exception to Yakima quality and would be a good rack for the job at hand.
In closing, there is one other rack I was recently asked about. That is, one that carries only a single e-bike. As mentioned, I use my old bicycle rack for this purpose, but it has no ramp AND it’s a pain to load the heavy e-bike onto the inner rack. The question then, “is there an e-bike rack designed for a single bike that’s easy to load?” And this is what I found:
Bottom line: Your e-bike is likely to be a fairly significant investment. I think it makes good sense to spend the money necessary to protect that investment. Buying a good rack designed for e-bikes and a security system (next post) that keeps it from disappearing when you’re not watching is the right thing to do.
Thanks for listening…
** Update **
I just watched this YouTube video from boltonebikes.com (aka Area 13) that covers four more e-bike racks you might want to consider. Here’s the link:
I know, you’re thinking “I have ridden bicycles all my life, and once you learn to ride a bicycle, you never forget.” Well I’m here to tell you, depending on how your e-bike is configured, you might need to learn a few new tricks. In this post I’m going to talk about PAS (pedal assist system) and throttles. Let’s start with pedal-assist.
Pedal Assist
Pedal assist on an e-bike means when you start pedaling, the electric motor starts adding power to the rear wheel. However, this added power might be instantaneous or delayed. This matters because you need to anticipate this additional power or the lack thereof when starting out. Add to this reality the PAS level you have set (if you even have the ability to set it). Let’s say I have a 5-level PAS system and I’m at level 1. In this case, you are going to add more pedal power to get going from a stop. Or, let’s say I have been riding along at level 5 for a bit and come to a stop. In this case, if you forgot you were at level 5 and start out, you might be in for a shock as your bicycle launches itself across the intersection.
I’m being a bit dramatic in this example, but suffice to say that when riding an e-bike you need to know how your system works, stay alert, and use the setting(s) appropriate for a given situation. I have also resorted to walking, not riding, my e-bike across crosswalks. Too many times I tried to start out by pedaling and the motor takes over and I end up careening across the intersection. It’s MUCH safer and predictable to just walk across, then get back on your bike on the other side (after dialing in the correct PAS setting).
That’s all I’m going to say about PAS. I’m getting used to how PAS works and I like the concept, but it has taken a while to learn how to set it so it’s more of an assist than a nuisance (or danger).
Throttles
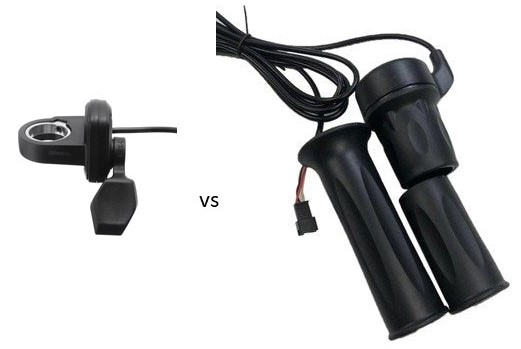
Next, let’s talk about throttles. I’m a left-hand thumb throttle, versus a right-hand wrist throttle kind of guy. Granted, as an ex-motorcycle rider, you would think traditional wrist throttles would be preferred. But with bicycles, I put more of my weight on my wrists and hand-grips and having a wrist throttle can be problematic. I’d rather rest my hands on the hand-grips and use my thumb to increase or decrease power as needed. However, if you tend to sit more upright when pedaling your bicycle, then the right-hand twist throttle just might be your cat’s meow.
As mentioned in a previous post, one might ride a rear hub e-bike a little more like a motorcycle (more throttle, less pedal power), and a mid drive e-bike more like a bicycle (more pedal, less throttle power). At least that’s exactly what I’m finding when I ride either bike. On the mid drive e-bike, I rarely use the throttle and tend to adjust the PAS system for a given riding condition and plan to pedal more. Yet on the rear hub e-bike, I do less gear changing and supplement my pedal power with power from the electric motor.
Neither throttle design is better or worse than the other, just different, but it’s something to consider when renting, buying, or building an e-bike.
Posted inUncategorized|Comments Off on PAS & Throttles – What you need to know
Living in Bucks County is wonderful! We have Fall colors, rivers and steams, covered bridges, canals, historic barns, and so much more. We also have lots of trails for hiking and biking. As mentioned previously, not all trails welcome electric bicycles (or even bicycles at all in some cases). And the problem is, you won’t really know which do and which don’t allow e-bikes. To reiterate what I said before, as long as your e-bike is a Class 1 or 2, assume you have all the rights and privileges of a regular pedal bicycle and you should be fine.
After doing a bit of research, I have come up with a list of resources to help you discover that new trail in your area. I’ll provide the list first, then highlight some of the trails I’m either familiar with or I’m interested in learning more about.
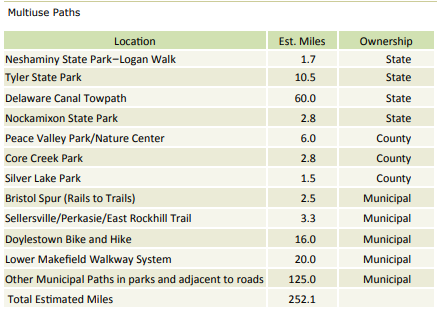
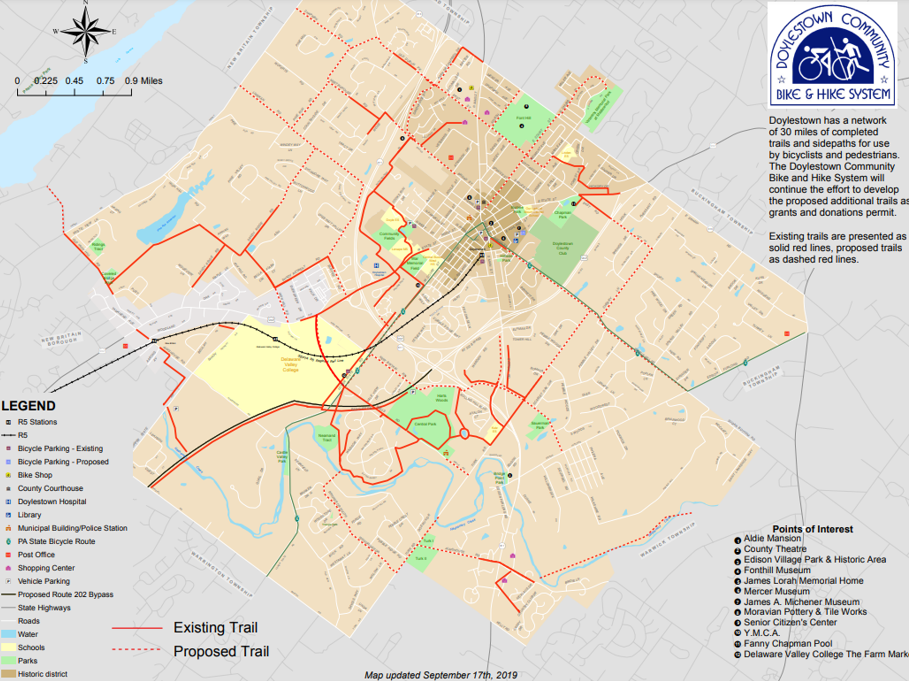
Trails where bicycles (and legal e-bikes) are allowed are usually classified as multi-use paths. Multi-use paths are typically flat, wide trails with improved surfaces that appeal both to walkers and joggers, as well as users on wheels such as cyclists and skaters. Most multi-use pathways are physically separated from motor vehicle traffic, and can be within the road right -of-way, such as those in the Doylestown Bike and Hike. Another example of a multi-use path is the Delaware Canal Towpath, towpath trails run along the banks of a river or canal. Bucks County is estimated to have over 250 miles of multi-use paths.
Source: Bucks County Open Space and Greenways Plan – 2011
The other place electric bicycles are allowed to ride is On-Road Bike Lanes and Routes. Bicycle routes and on-road bicycle lanes in the County are currently fairly limited. On-road bicycle lanes are lanes dedicated to bicyclists and marked accordingly. This is an area I can see great room for improvement in our area as we explore ways to reduce vehicle emissions and traffic on our urban centers and communities.
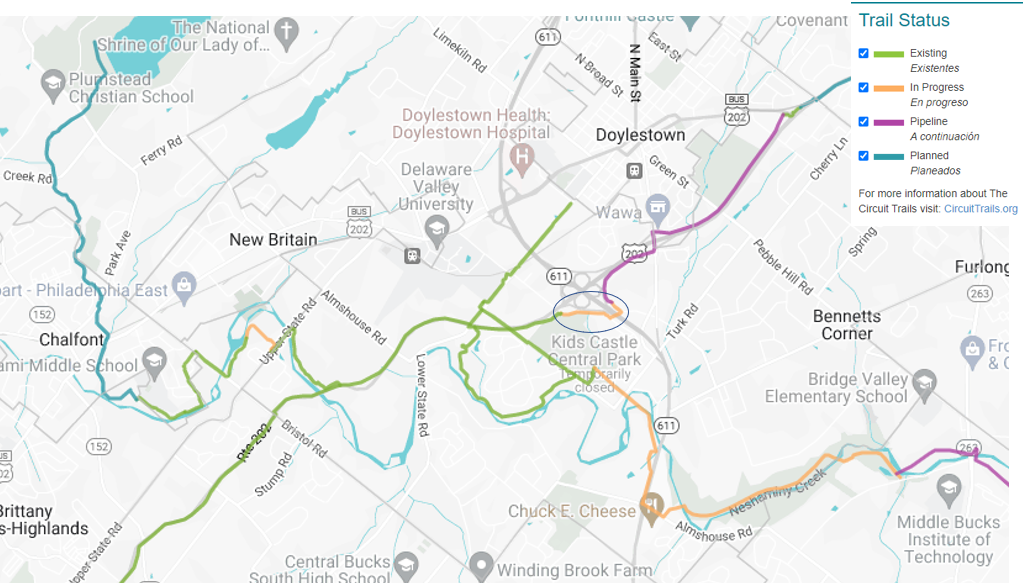
Lately, I have been exploring the Doylestown Hike & Bike System, and for the most part find it easy to navigate from my home in Buckingham Township all the way to 309 via the 202 Parkway Trail. I’m on lightly traveled streets through Doylestown, but then have various choices for connecting to the system to get to Del Val University, New Britain via the Neshaminy Greenway Trail, Central Park, etc.
One trail improvement I hope to see really soon is a connecting bike trail between Central Park and S Easton Road via New Britain Rd. The surface condition of New Britain Rd. is horrendous (for cars or bicycles) and it would be easy to add a bike lane in the area. This connector appears to be planned (actually says ‘in progress’), but has yet to be done. In the meantime, to get to Central Park I’ll come in the back way from Lower State Rd.
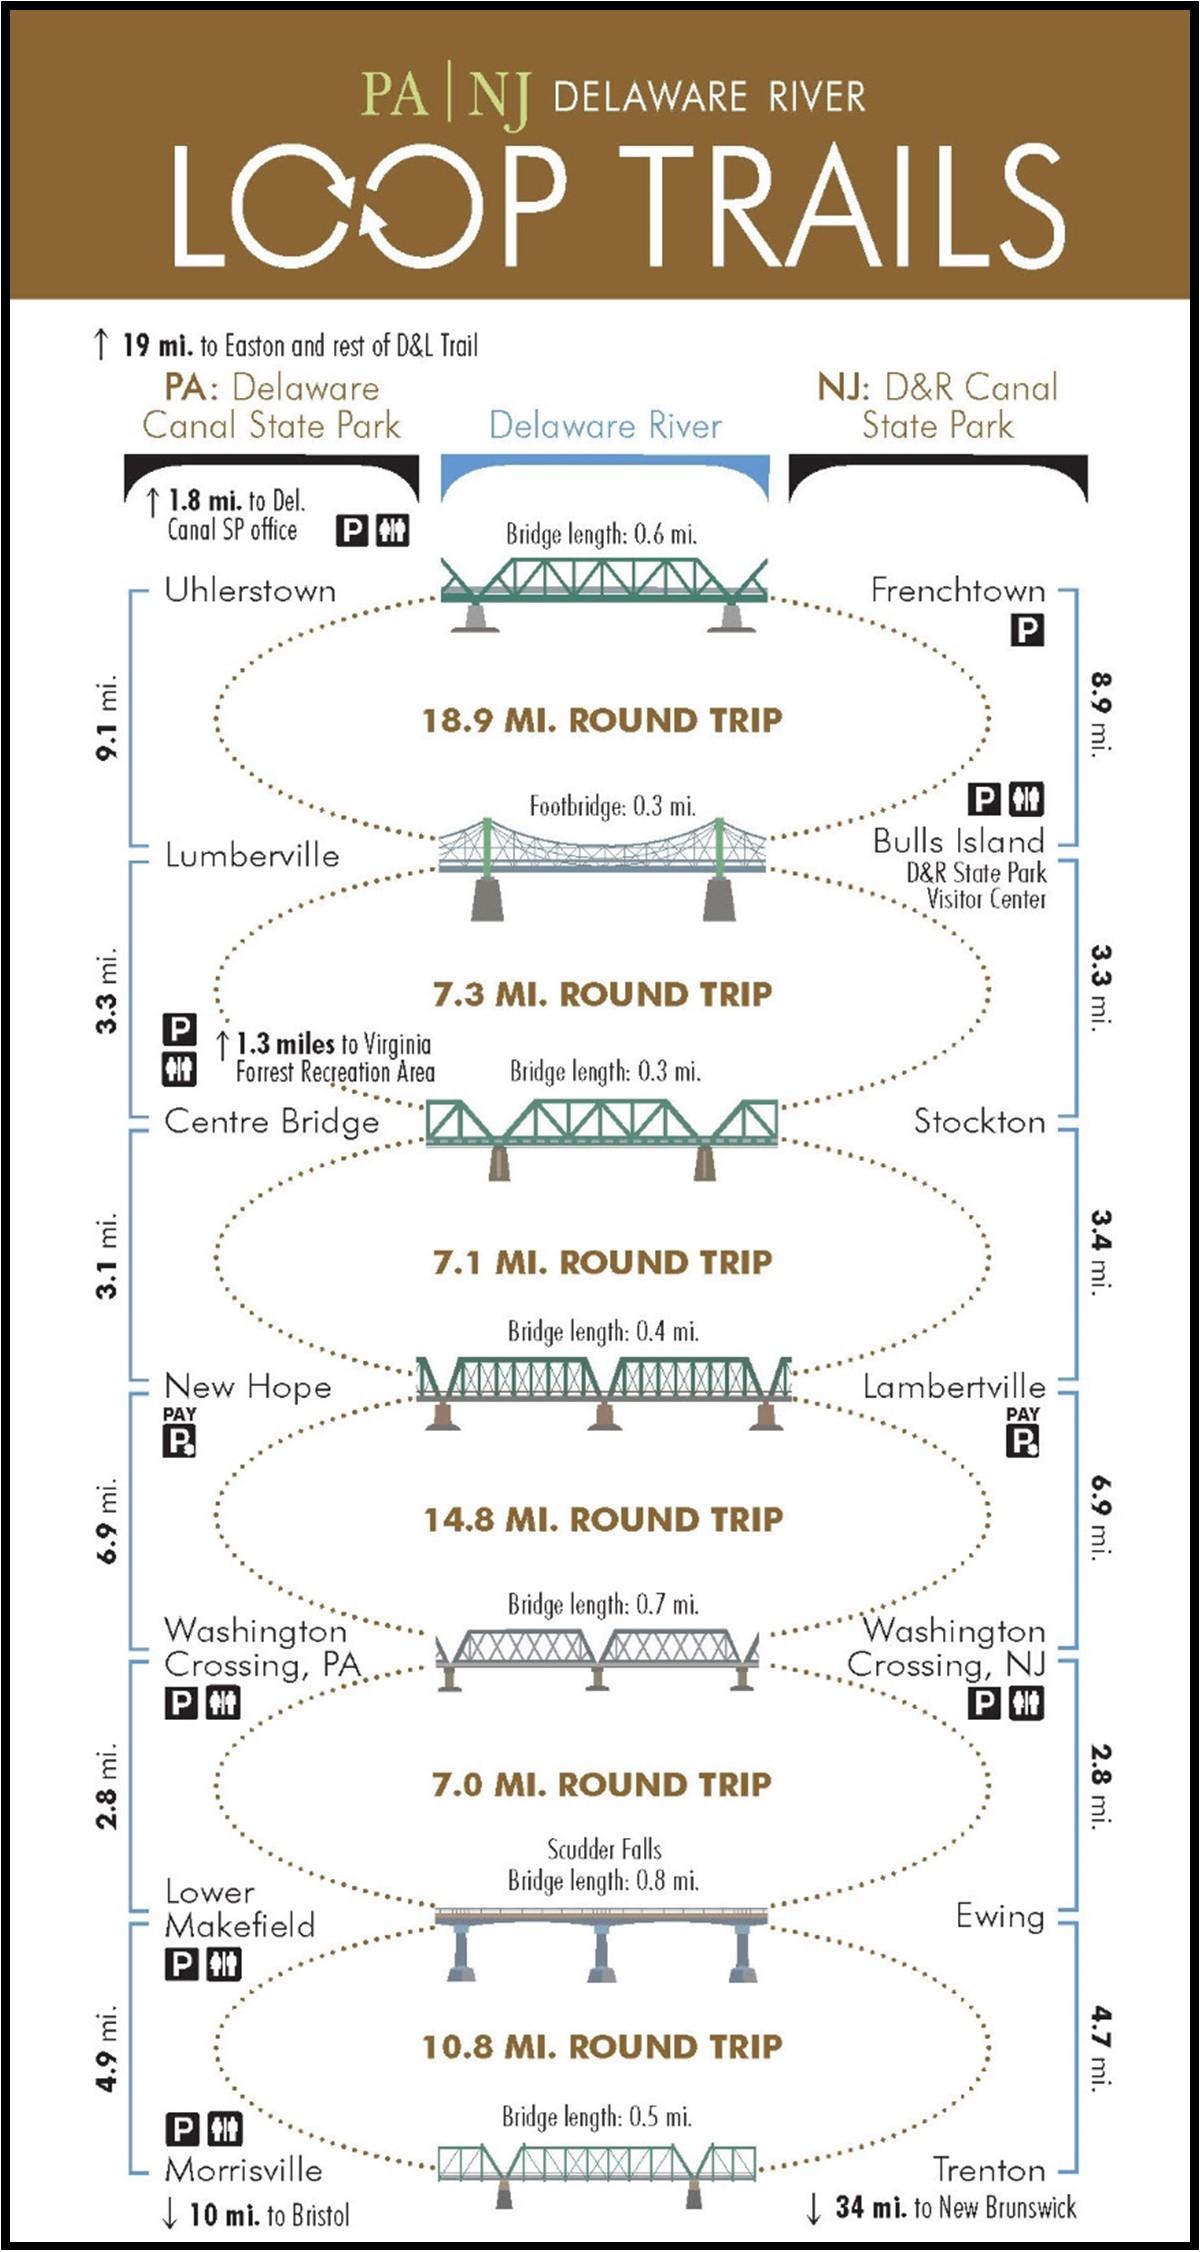
Five trails from 7.1 miles to 18.9 miles round trip
11 Lodi Hill Road, Upper Black Eddy, PA
There are five loop trails that make up the 165-mile D&L Trail, which is part of the National Heritage Corridor. The trails meander through towns and parks, where you can get exercise and a history lesson. On the trail is Washington Crossing Historic Park, where riders can view graves that date from the Revolutionary War as well as the Thompson Neely House that served as a field hospital during the war.
2) Tyler State Park
10.5 miles
101 Swamp Road, Newtown, PA
The trails at this state park are wide and paved for easy travel throughout the picturesque park. Picnic tables dot the paths for breaks, and the trails are clearly market at intersections. The park also offers horseback riding trails, a disc golf course, boating, and fishing.
3) Peace Valley Park
6 miles
264 Creek Road, New Britain, PA
This path winds through woods and over a reservoir around the man-made Lake Galena. Benches, picnic areas, restrooms, and playgrounds are available around the lake as well as a nature center. The park also has boating rentals and fishing docks. It is a popular spot for bird watching. Be on the lookout for some of the 250 bird species that have been spotted there.
4) Nockamixon State Park
2-mile paved path, 10-mile mountain bike trail
1542 Mountain View Dr., Quakertown, PA
A paved bike path begins at the Lake Nockamixon marina, but it’s not a loop, so save some energy for the return trip! A more adventurous 10-mile trail system for mountain bikes winds around the east side of Haycock Cove. The trail heads can be found off Tower and South Park roads and PA 563. The park also has camping, swimming, hiking, picnicking, fishing, wildlife watching, horseback riding, and hunting.
5) Doylestown Central Park
8.5 miles
425 Wells Road, Doylestown, PA
The park is the end point of the US 202 Parkway Trail that extends to Welsh Road in Montgomeryville with additional connections to the Doylestown Hike and Bike System. The paved path can be accessed at the parking lot at the New Britain Road entrance to the park, which also boasts Kids Castle play area, an amphitheater for outdoor performances, a fitness trail, a sensory trail, and nature areas where park goers can observe native plant and animal species.
When the weather warms up a bit, there’s no excuse keeping me from getting out and riding my e-bike. I find drivers in the area to be respectful of bicyclists when passing and at intersections and crosswalks. And ALWAYS wear a helmet ‘just in case’, and obey ALL traffic laws…
**
Here’s some additional light reading for those interested in future plans for bicycle enthusiasts in our community:
You wouldn’t think of leaving home in your car without a spare tire, jack, lug wrench, roadside emergency kit with flashlight, blanket, screwdrivers, plyers, duct tape, air pump, jumper cables, etc. would you? Oh, you have AAA roadside service so you don’t need this stuff. Got it… Yet I do carry all this and more in my cars ‘just in case’, and in some cases I’m prepared to help someone else out who didn’t think all this was necessary. Besides, how often do our modern cars break down or blow a tire. Not often, but still.
Try getting roadside service for your e-bike. I don’t believe it exists (yet). So you’re on your own and you might just as well a) learn how to fix things that break, and b) carry the necessary tools and supplies when you ride. It doesn’t cost much, doesn’t weigh much, and is easy to carry. You just need to think through what you’re going to need and how to use it. Hopefully this post will help with that.
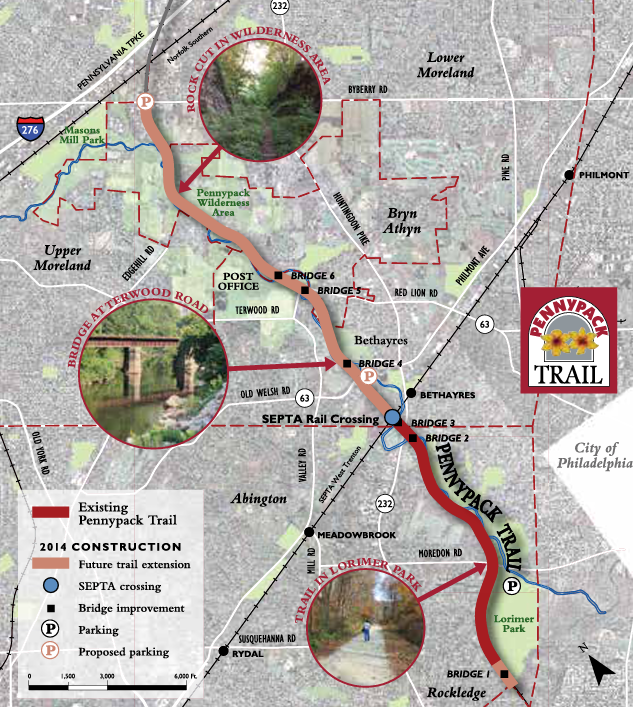
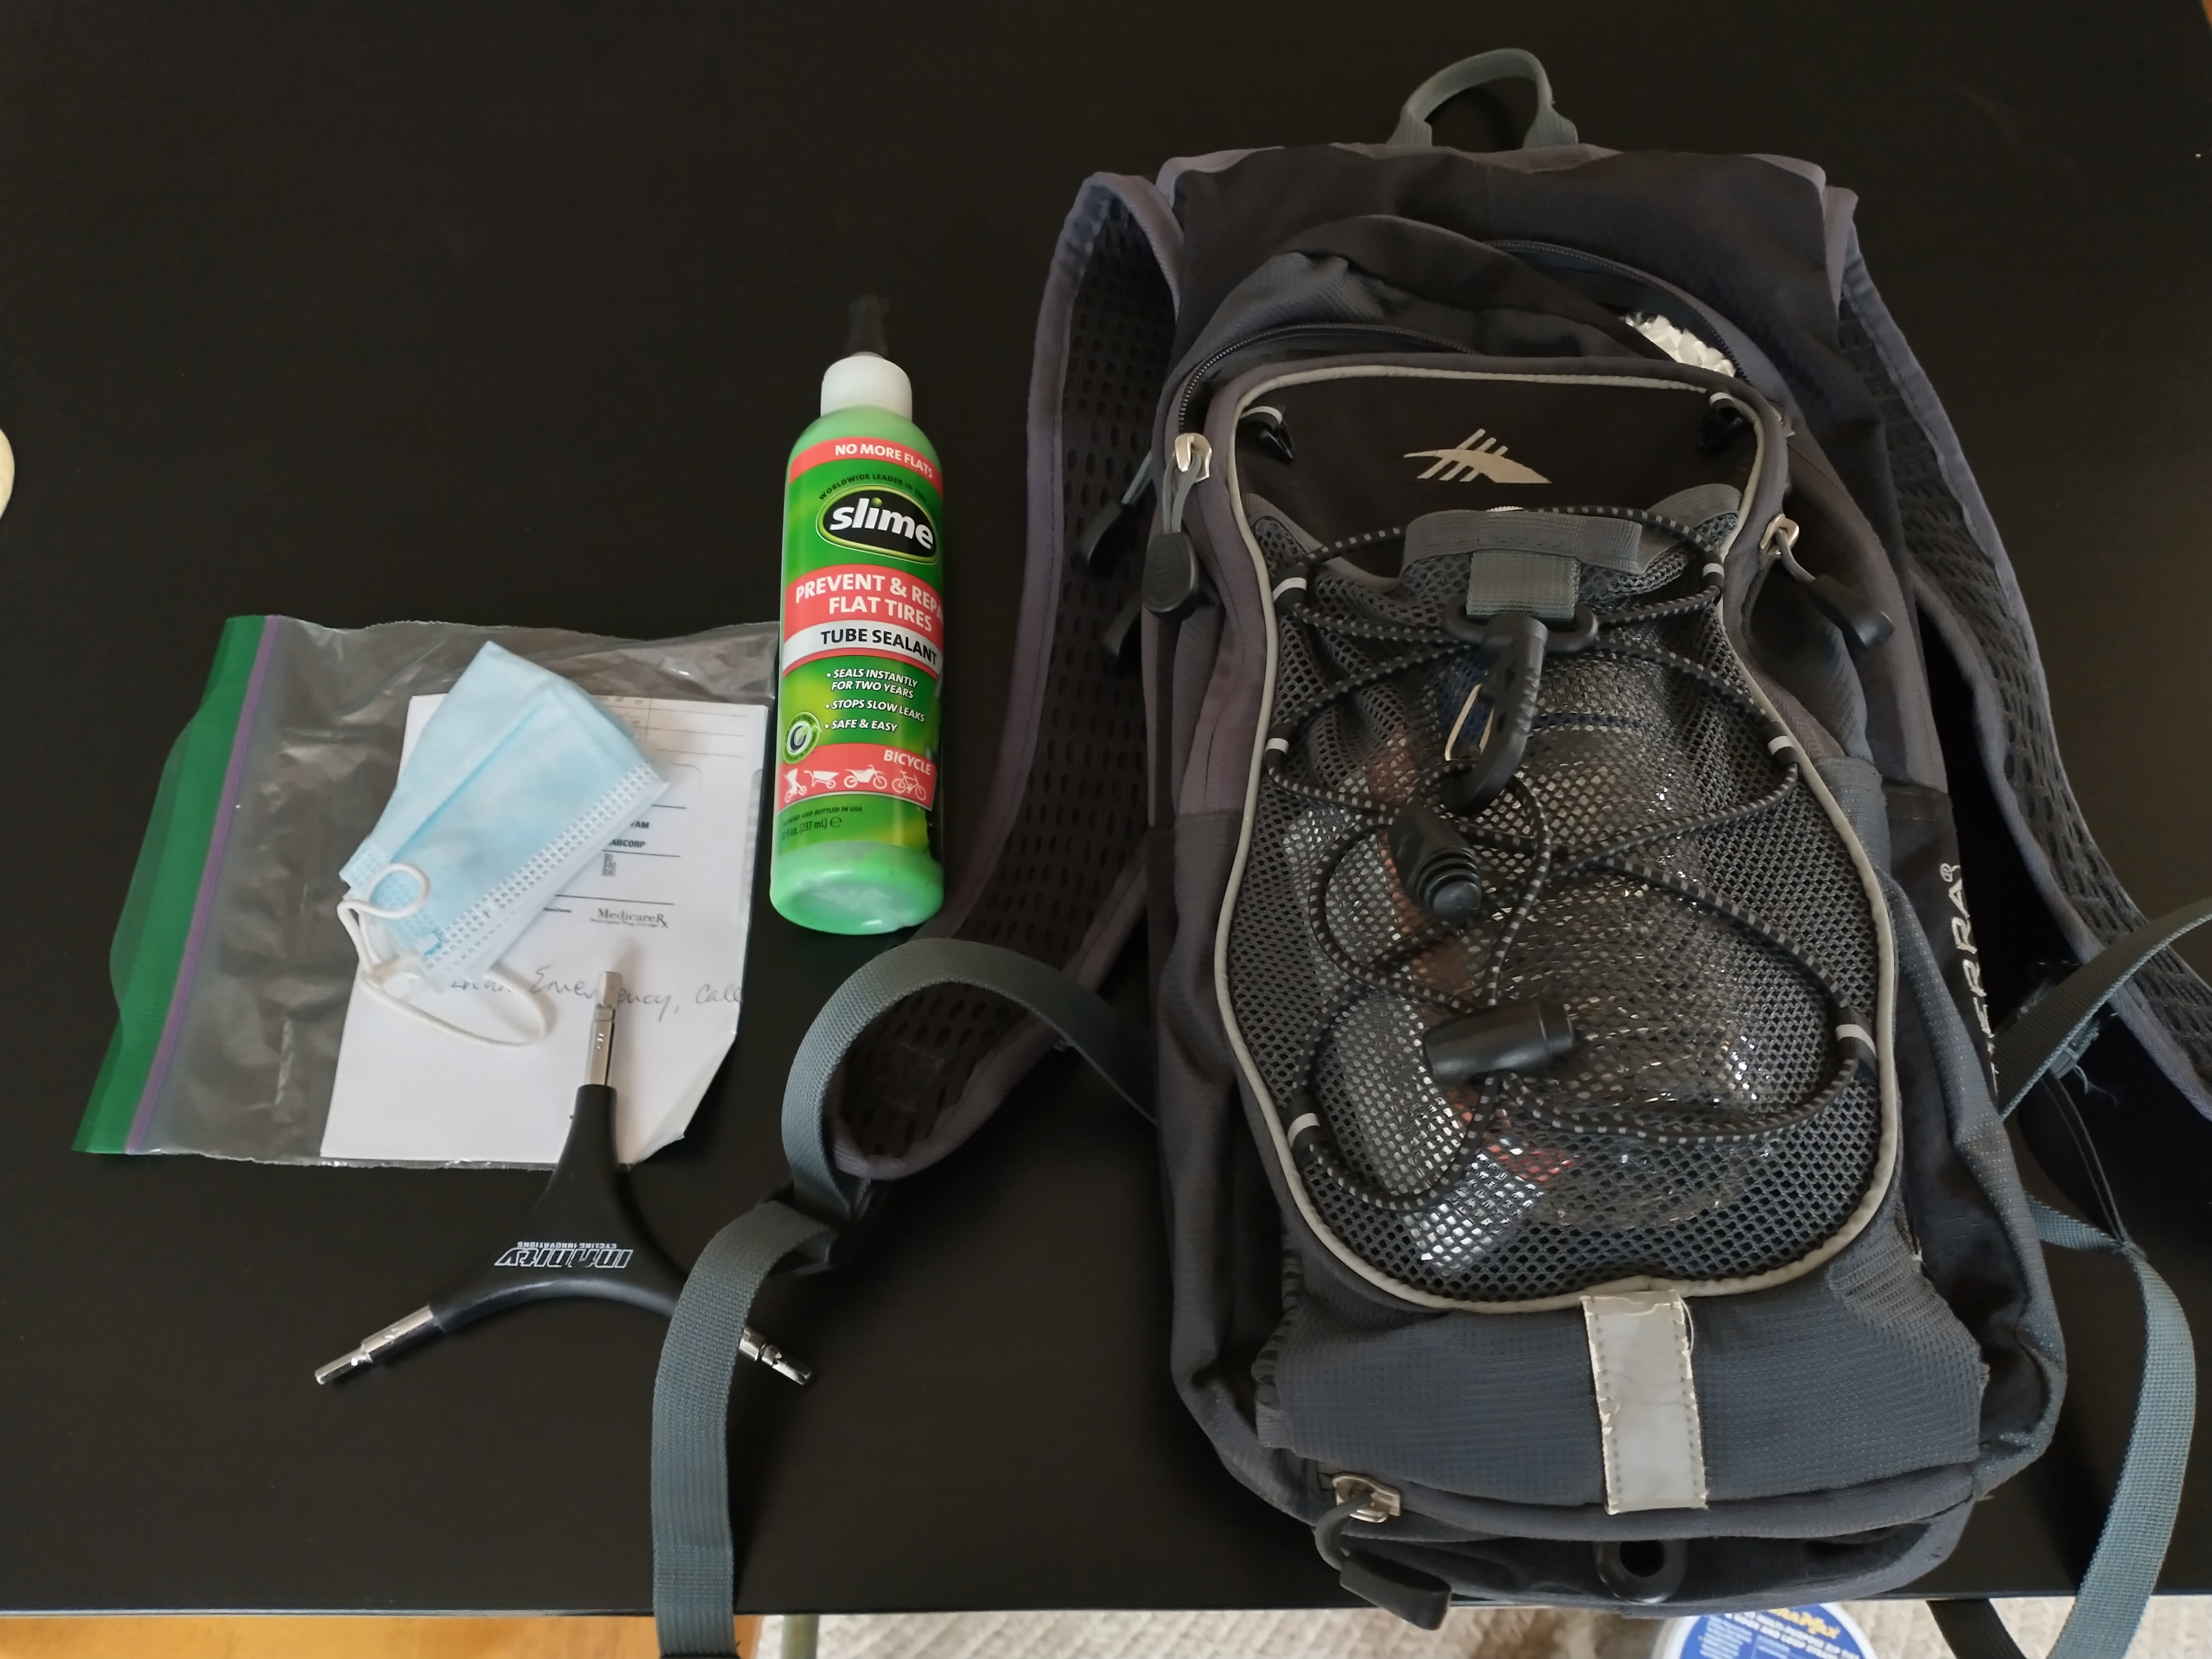
Let’s start with the basics. This image shows most* of the items I would plan to carry on a normal 10-20 mile bicycle ride:
Most of the items in an emergency/repair kit for a 10-20 mi. bicycle ride
From left to right, a spare tube that’s the correct size and type for your bike, a set of plastic tire levers (you can get by with 2 but I like to carry 3), lightweight spoke wrench, multi-tool designed for bicycles (the one shown above is different than the link since it doesn’t appear this particular Topeak multi-tool is available anymore), tire pump (the image below shows this type of pump mounted to the frame so it doesn’t need to be carried in the tool bag), Velcro hook & loop straps (from this Duramax 840-piece kit), some ’emergency’ cash, surgical gloves, and a basic first aid kit. What’s missing from the image above and will be added shortly to my kit is a lightweight Gerber multi-tool with scissors and pliers and a small rag for cleanup after repairs.
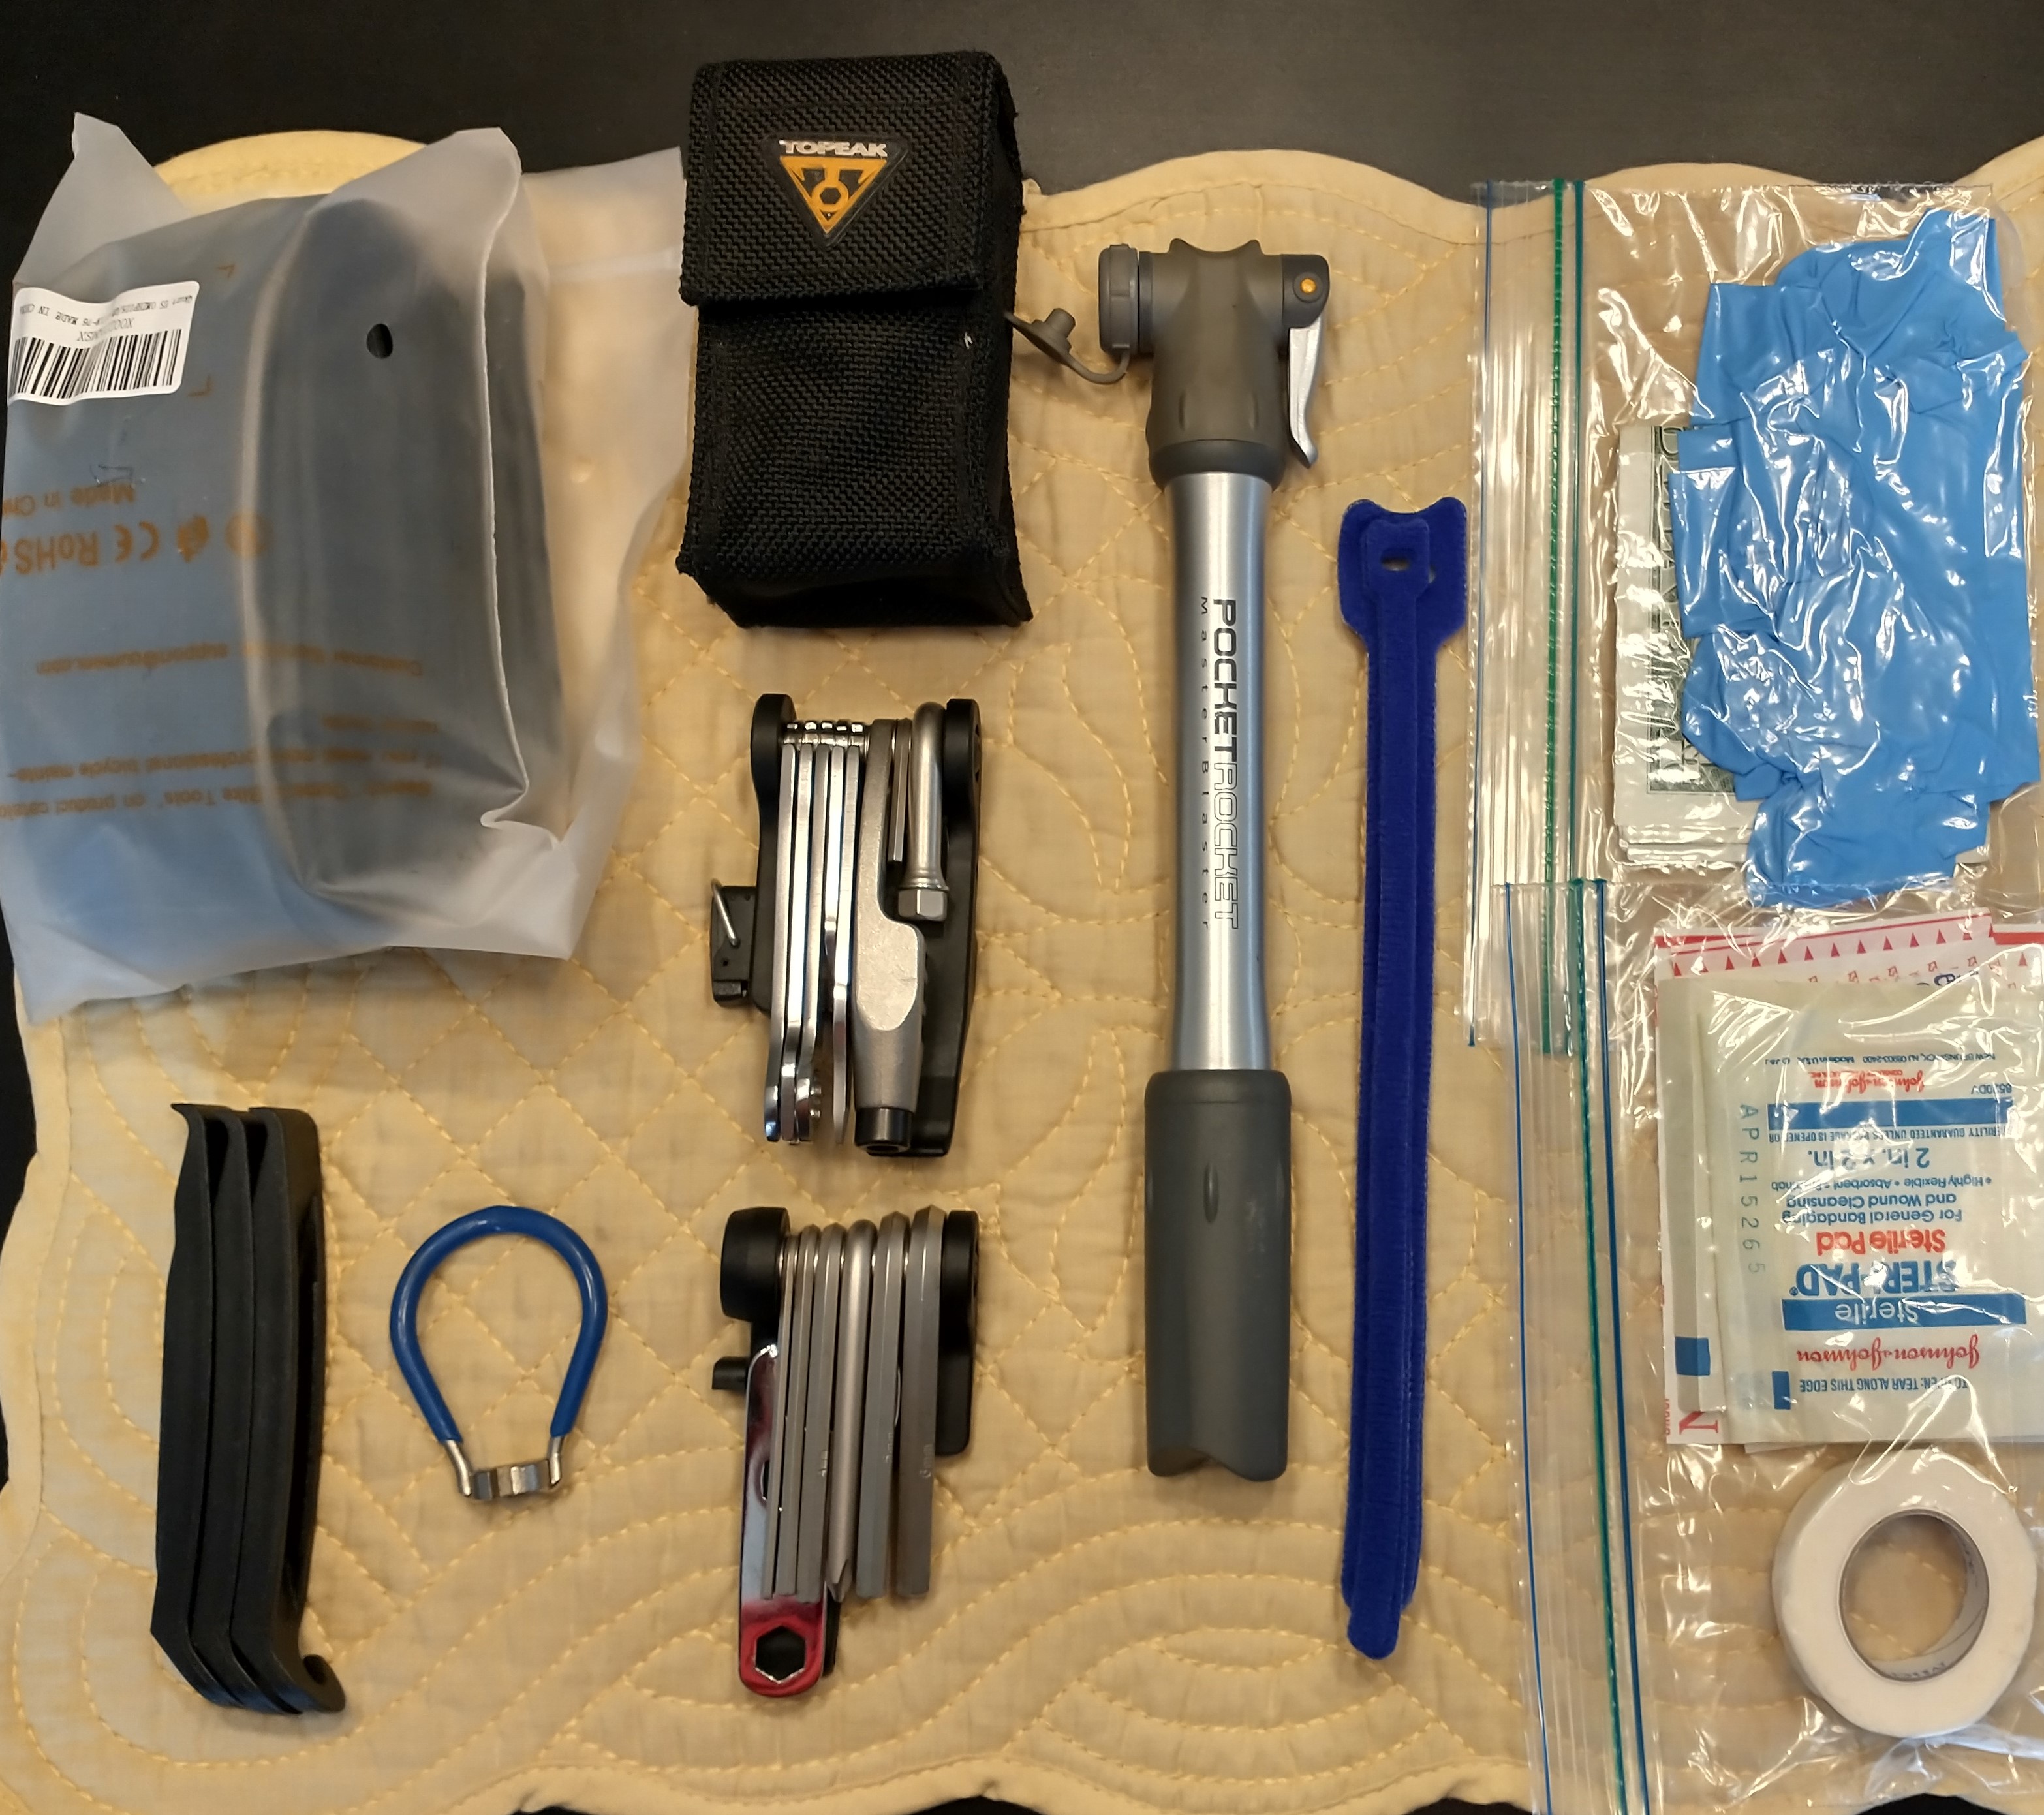
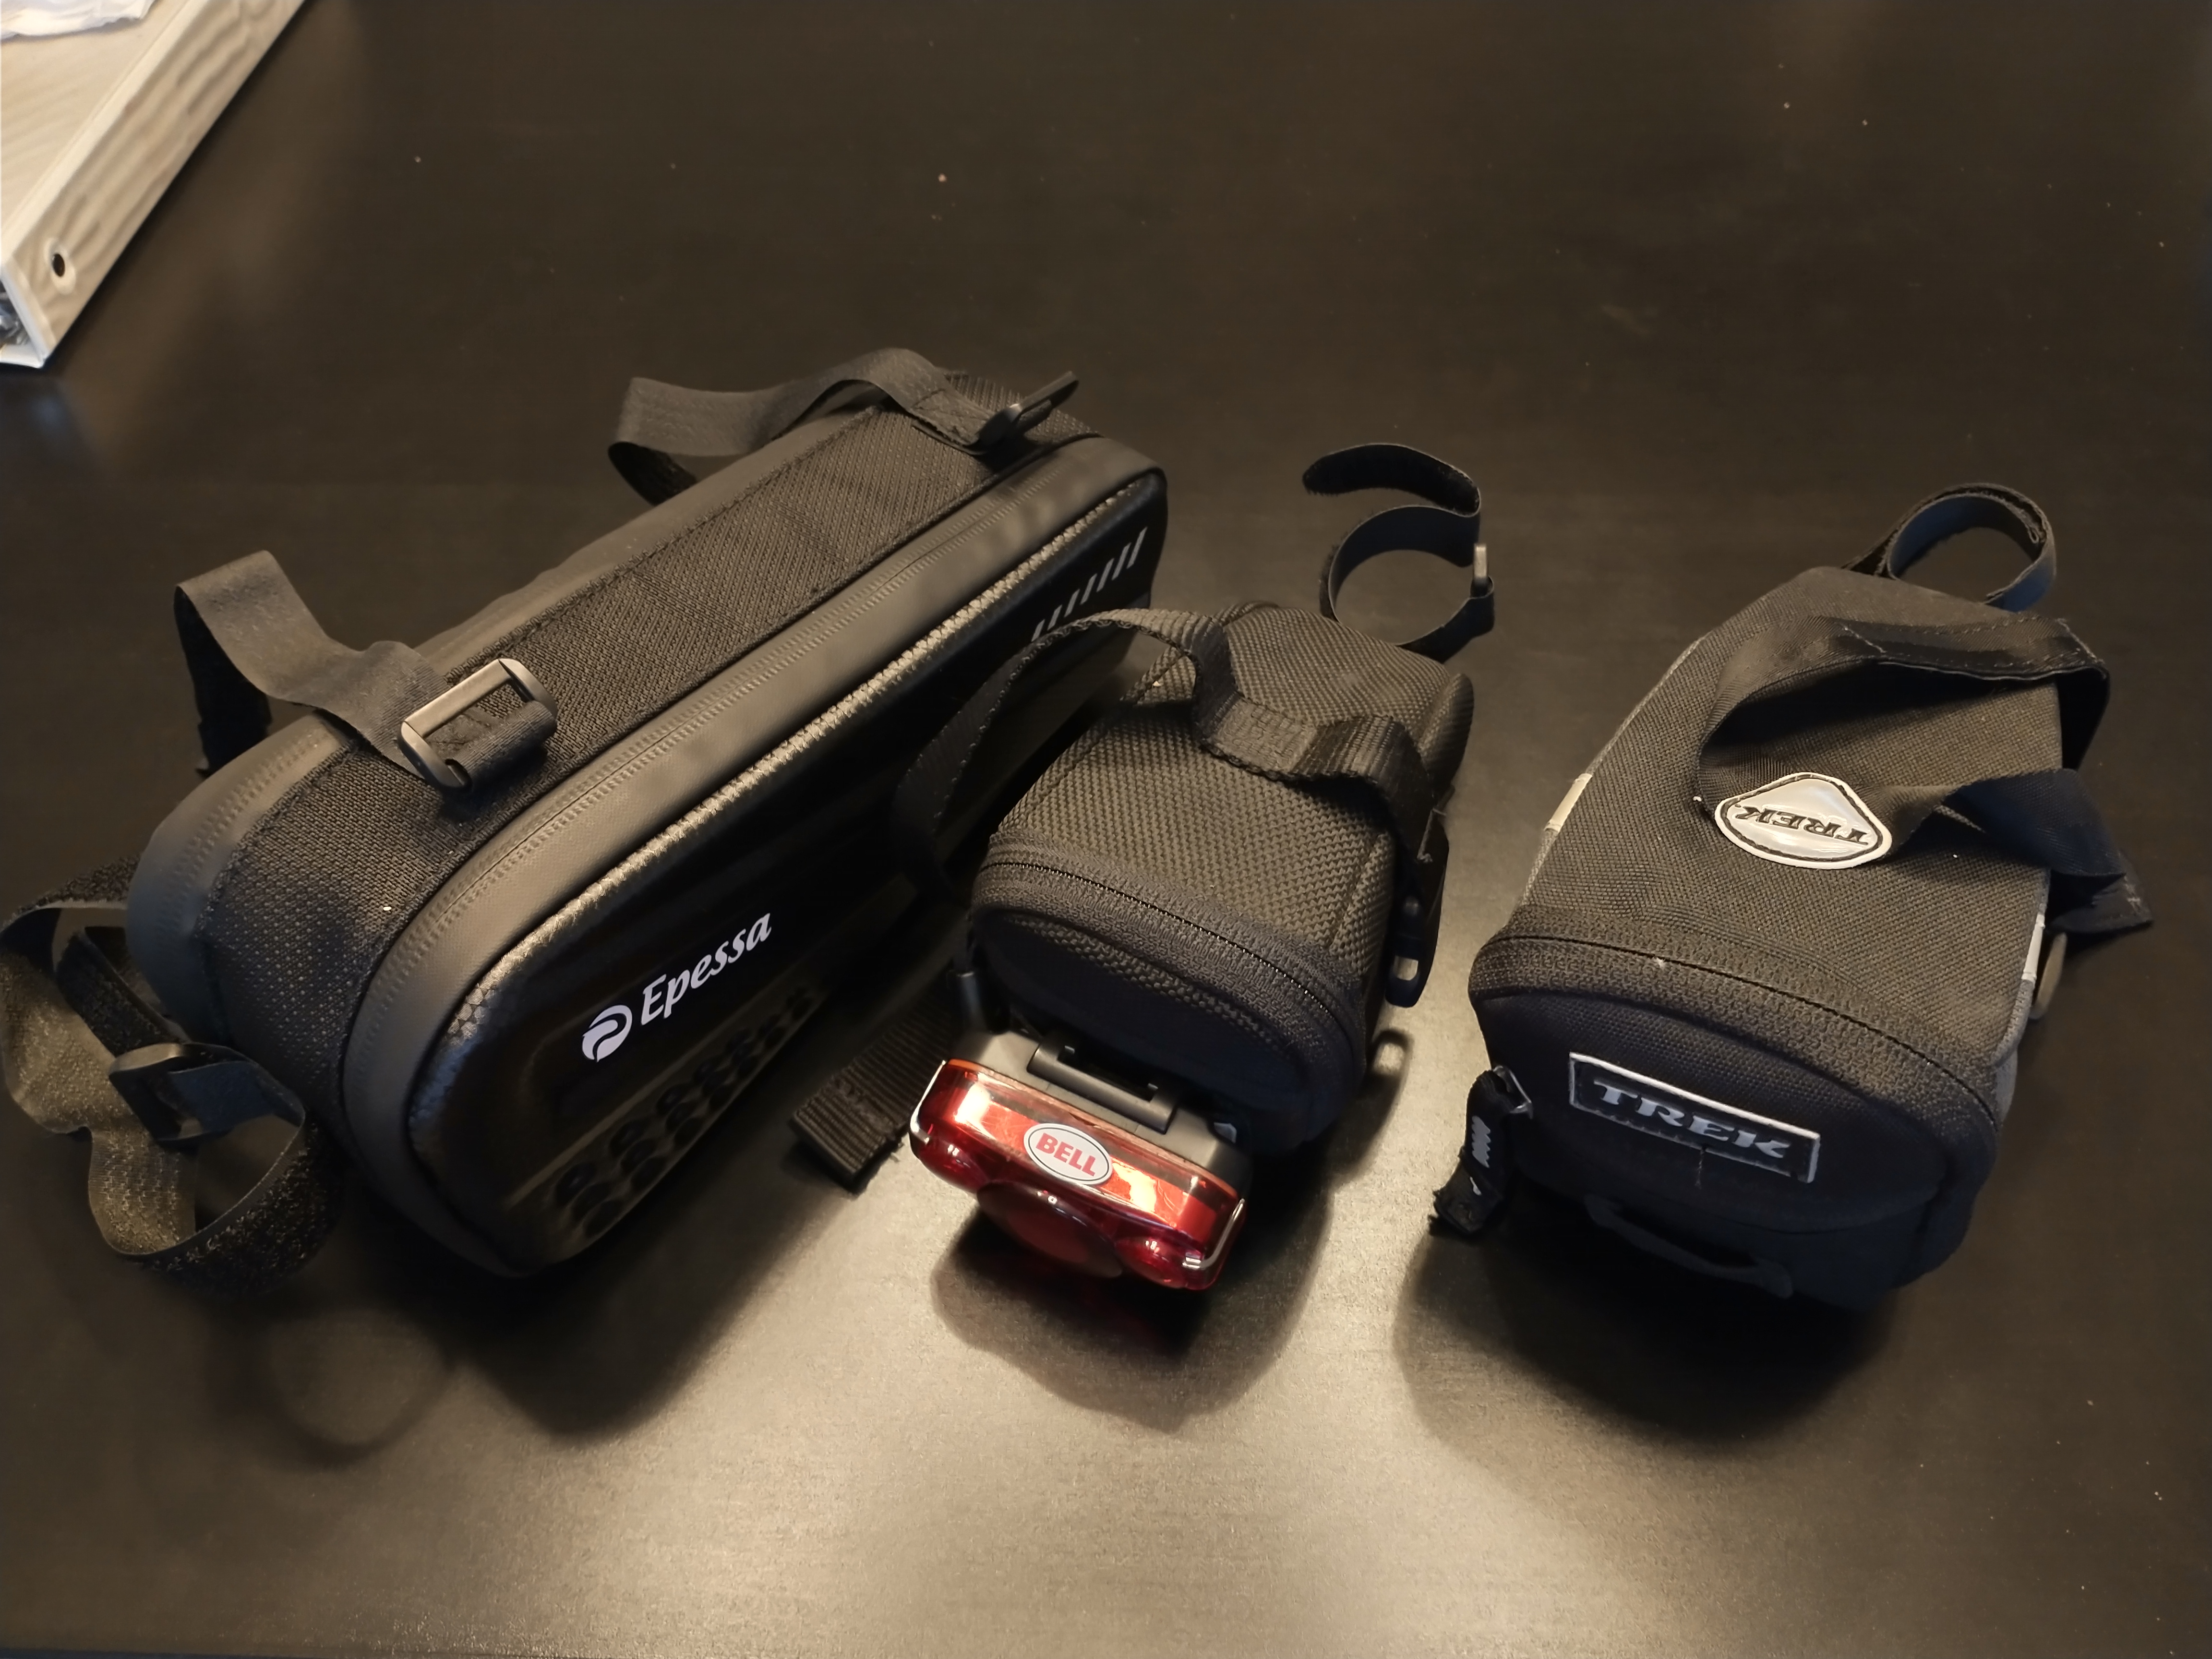
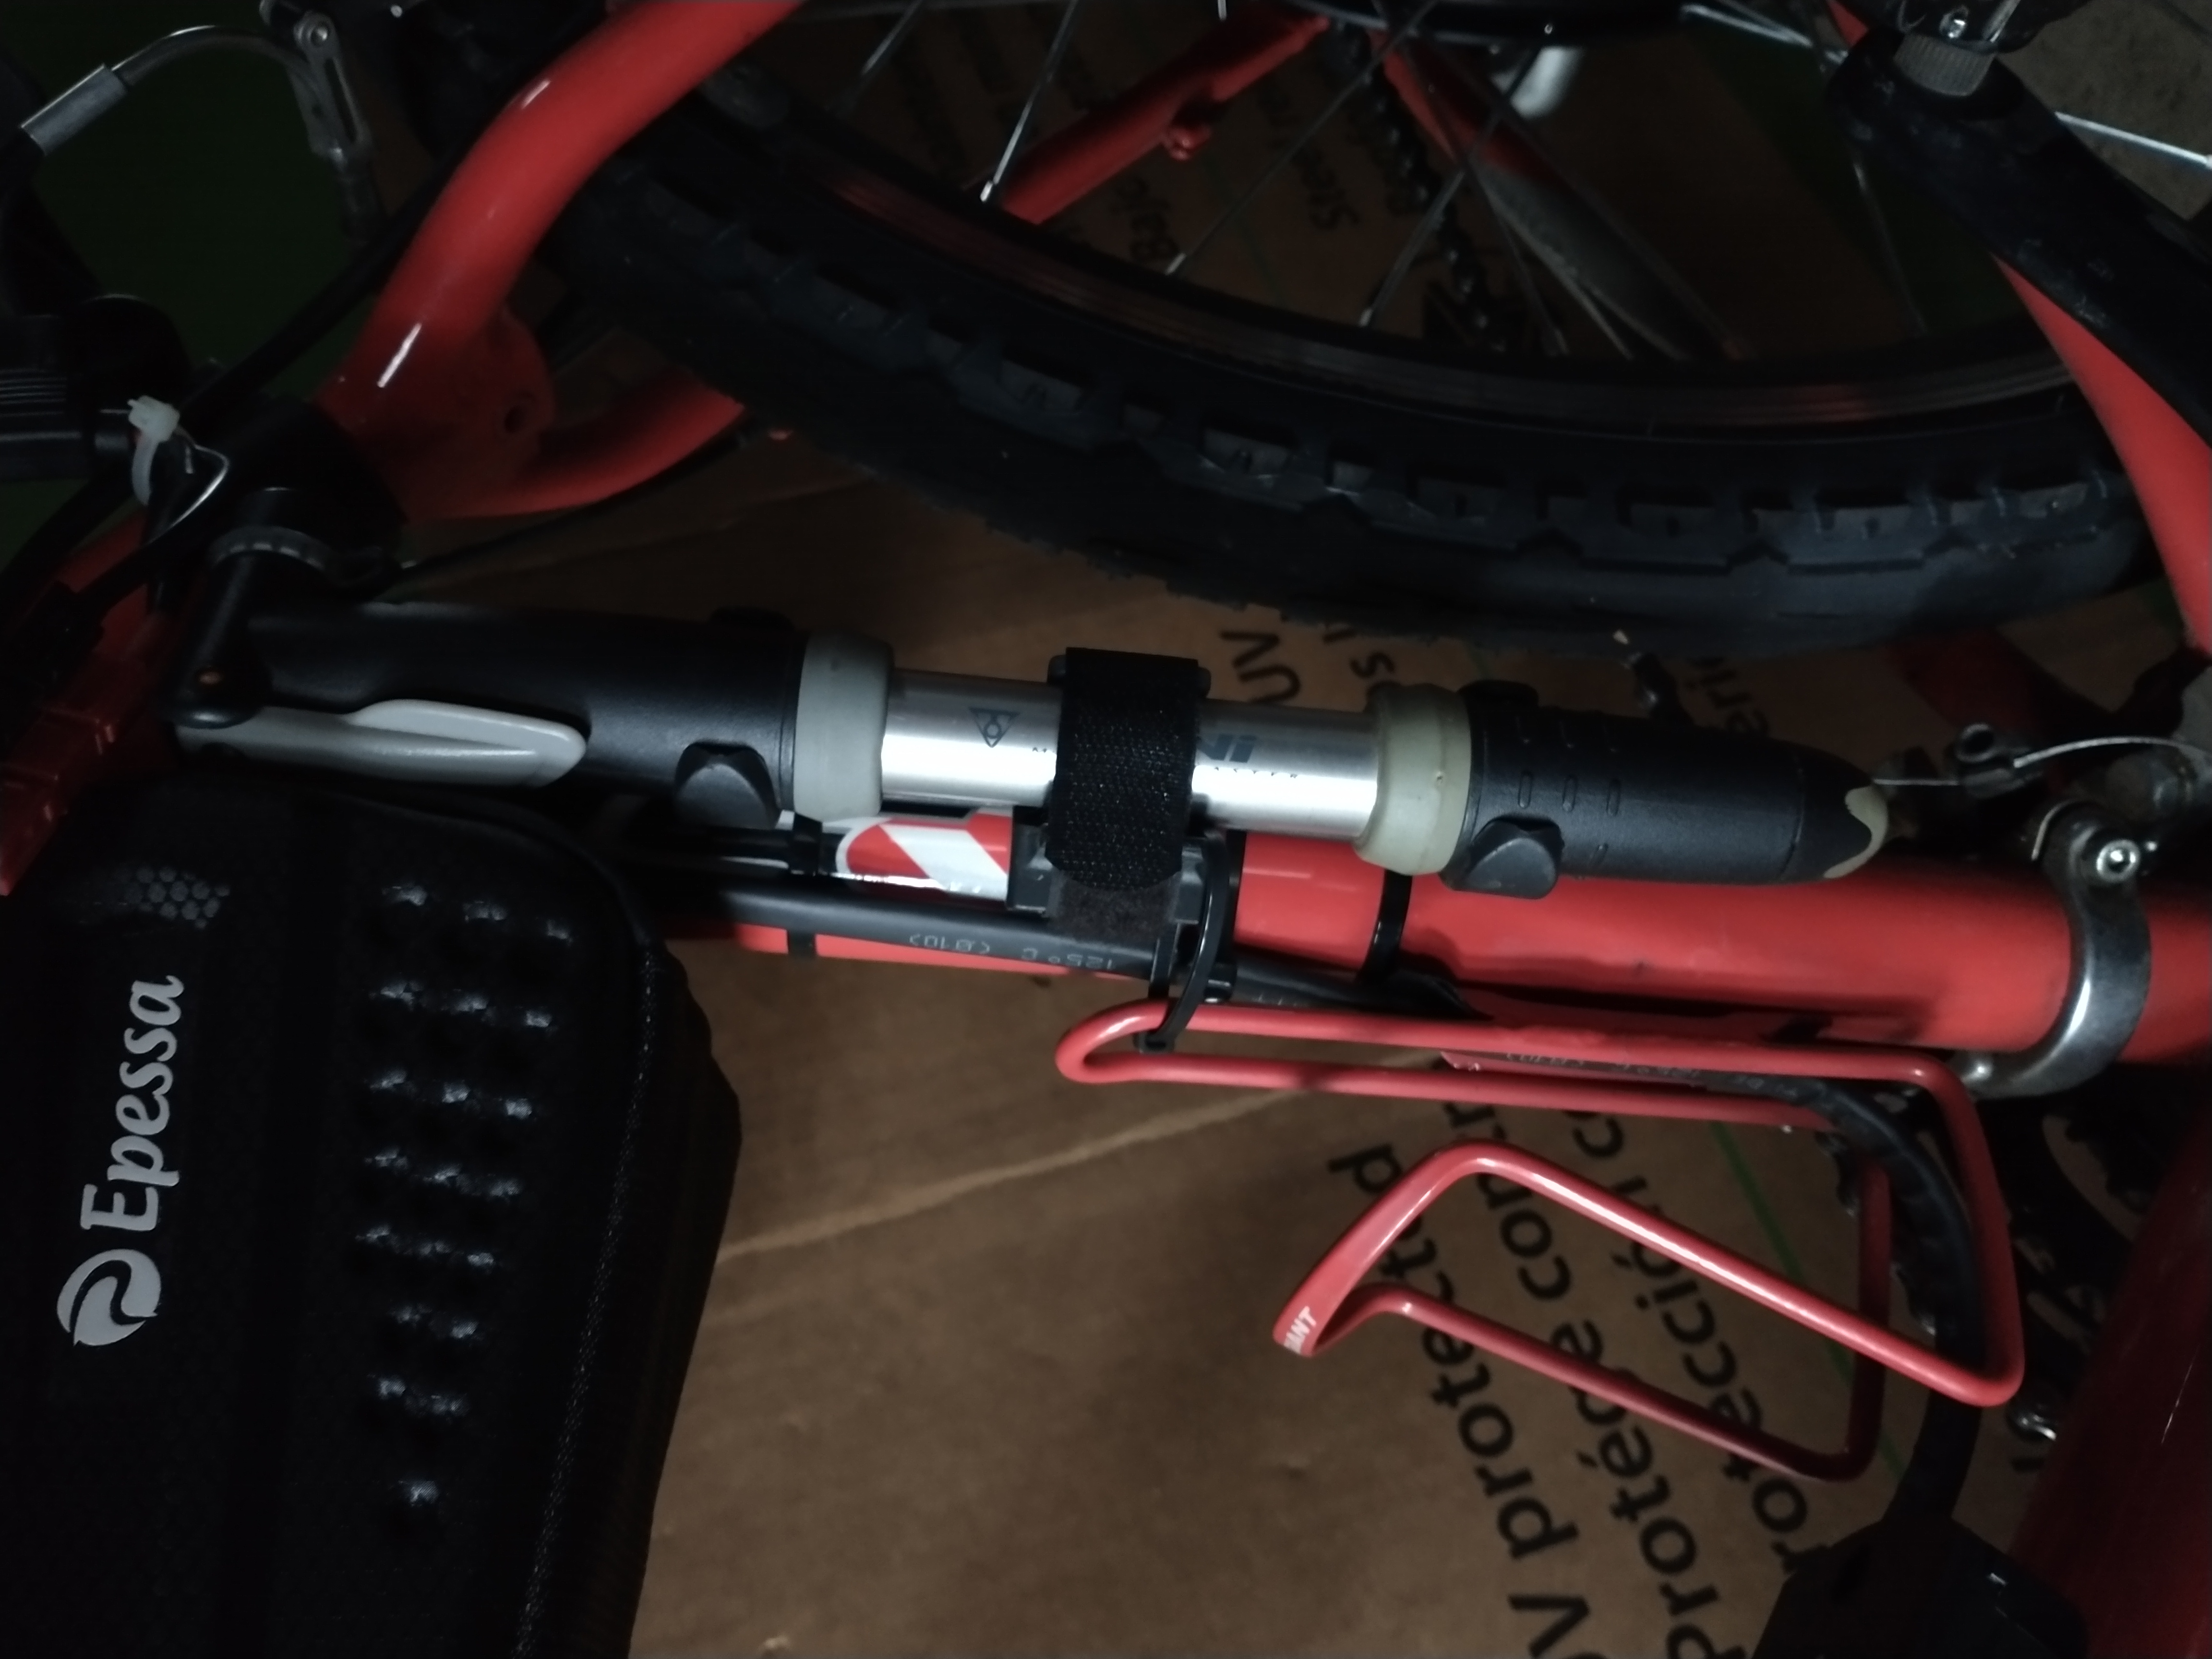
All told, this kit set me back about $100, plus the cost of a frame or seat bag (budget $20 for this) to carry everything in. Below are additional images of various bags I own, an exploded view of my Topeak multi-tool, and a frame-mounted air pump. Also not shown in the image above is a 20-amp fuse that I carry should I blow the fuse between the battery and controller, and a spare key to remove the battery if that becomes necessary.
Epressa frame bag and two seat bagsExploded view of the original Topeak Alien multi-tool soon to be replaced by a Crankbrothers M19The best way to carry your backup air pump – in this application it’s zip-tied to the seat tube
Before we get off this topic, there are a few more items I think are important. When I ride, I take with me a hydration pack, but without the hydration bladder. I use it as a lightweight backpack to carry the following items:
A water bottle
A granola bar or two
A cell phone with a good charge – doesn’t do much good if the battery’s dead though my e-bike batteries include a USB charging port so I could/should carry a USB charging cable which could save my bacon some day
A printed copy of my driver’s license and medical cards along with an emergency contact phone number, some cash and a mask or two – keep these in a weather-proof bag
On some trips I’ll carry a cable and lock so I can lock the bike up if I need to leave it unattended
I’m also going to start carrying a bottle of Slime for a quick (albeit messy) flat repair, which I hope I never have to use!
Here’s an image of the hydration pack I have been using. There are many options out there, but if you don’t own one, here’s one to consider: Hydration Backpack
This hydration pack works well for me. It’s also a convenient way to carry additional tools or parts that aren’t included in your seat/frame bag.
I think I included everything I find useful, however, if price weren’t a consideration, I might be inclined to invest in some additional ‘tools’ such as these:
But alas, price is a consideration and I’ll find less costly ways to skin cats (maybe I shouldn’t use that expression with this audience – sorry), even if I need to carry a bit more weight in my repair kit.
As I conclude this post, I want to direct your attention to a few YouTube videos that I found informative when it comes to creating your personal bicycle repair kit. Here they are, and thanks! I hope this has been helpful…
On March 21, 2023 I’ll be delivering an ‘All About Electric Bicycles!’ presentation to members of the Center for Learning in Retirement program at Delaware Valley University. Below is a link to the presentation .pdf file. If you have questions or comments, please contact me on my personal email account at glenmaxson@gmail.com. Thanks, and enjoy!
Posted inUncategorized|Comments Off on E-Bike Presentation
Just a reminder, Build #3 is my first mid-drive build, which I embarked on largely based on JohnnyNerdOut’s recommendation. Johnny recently released a YouTube video that describes the difference between rear hub and mid-drive systems, and why you should care. Check this out before continuing: Hub motor or Mid Drive Motor Buyers Guide : Which system is right for you? OK, now that you watched his video, you’ll understand what comes next.
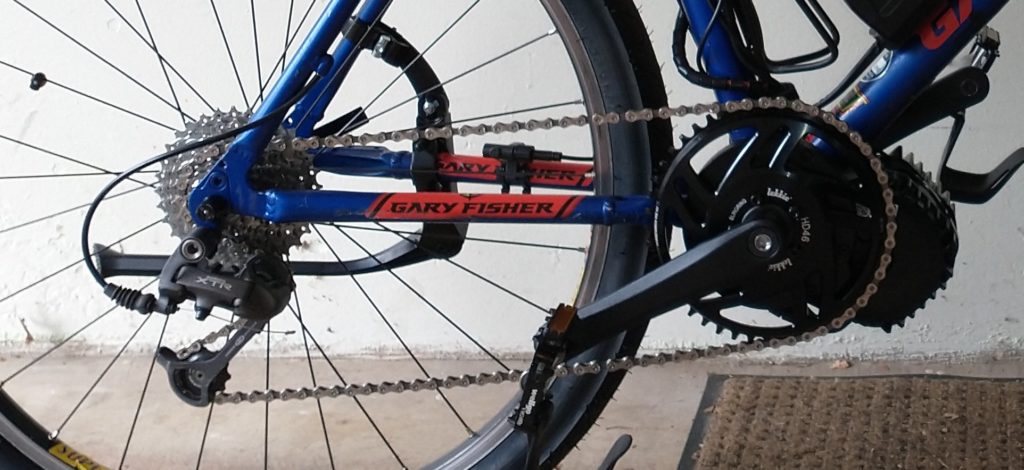
As mentioned previously, Build #3 uses the Bafang mid-drive system. Here’s a picture of what that system looks like in its final incarnation:
9-tooth rear cassette, Lekkie 46 tooth NW Bling Ring, and KMC X9 116-link chain with original rear derailleur
Once you have sorted everything out – correct chainring, proper chain line alignment, proper chain, and a quality shifter* – you’re ready for a test ride. First, let me say that you don’t ride a mid-drive e-bike the same way you ride a rear hub bike. Like Johnny says, ‘ride a mid-drive e-bike like you would a regular bike’. This means changing gears when necessary to minimize stress on the chain, cassette, rear derailleur components, and the motor itself. In comparison, a rear-hub system can handle a little more abuse (aka less shifting) since it’s not loading the chain and rear derailleur/gears.
*Note: I couldn’t find a ‘quality’ 9-speed shifter, so I cut the one that came with the bike off from the brake lever. This isn’t optimal since it looks a little wonky, but it works great!
If you ride bicycles a lot, you probably understand gearing and when shifting is necessary, and are willing to put a fair amount of your own effort into your ride from time to time. In this case a mid-drive system might be for you. With the right PAS (pedal assist) setting, the energy supplied by the motor feels very natural. The additional throttle is almost counter productive in this case since it just interferes with the natural pedaling process. Ride it like a bicycle and the mid-drive is a beautiful thing!
This is what I discovered yesterday during my test ride. On PAS setting 4 (of 9, the way I programmed the system) I could easily maintain 15mph and would shift down a gear or two for the hills. I have 5 more PAS levels to work with if I want to break the sound barrier, but I’ll likely never use more than 5 (which will maintain about 20mph – legal limit on most trails). That said, there will be a flat, straight road with no traffic someday where I’ll see “what she’ll do”, but things get a little scary on a bicycle at that speed, so it can wait.
So, I really like my mid-drive e-bike, and with my new 15ah battery, I’m guessing we could go places. It will be a while before I have a good idea of the actual range with this motor/battery combination. I might even be able to be scientific enough to compare mid-drive and rear hub efficiency using the same battery. That will be interesting. I’m thinking the mid-drive will win since it really requires more pedal input than my rear-hub bikes.
Realistically, all 3 of my e-bikes are fantastic. Build #1 with a rear hub and 21-speeds – perfect. Build #2 with a rear hub and 7-speeds, but a 48 tooth front chainring – amazing! And build #3 with a mid-drive, 9-speeds and a 46 tooth Lekkie NW Bling Ring – phenomenal! Next, how about a 48v 500w Bafang rear hub step-through for my wife. It could happen…
Posted inUncategorized|Comments Off on Build #3, Test Drive 2
This new site has two primary purposes. First, it’s an exercise designed to help others develop their own WordPress websites. And second, it’s to communicate to aspiring DIY e-bike builders my best practices and resources that can help them successfully build an e-bike without spending a fortune.