Perhaps you’re not considering getting an e-bike because they’re too heavy or too complicated, or because you think it will ride (maybe even look) more like a motorcycle than a bicycle. Well there are many e-bikes that are heavy, are complicated, or that look and ride like a motorcycle. I kind of like that sort of e-bike, but many do not and Velotric’s new Breeze 1 is none of these things, but is SO much more. So let me tell you about the Breeze:
750 watt motor
Sensor swap – torque and cadence sensing
Class 2, with ability to configure for Class 3
Battery – IPX7 rated, charge status display (time remaining)
Range – 35-50 (Eco, Trail, Boost modes)
Hydraulic brakes
Standard bike rack (recommend pulling battery when loading the bike of a rack)
Ergonomics – handlebars, locking ergo grips, adjustable handlebar stem,
Posted inUncategorized|Comments Off on Introducing the Velotric Breeze 1
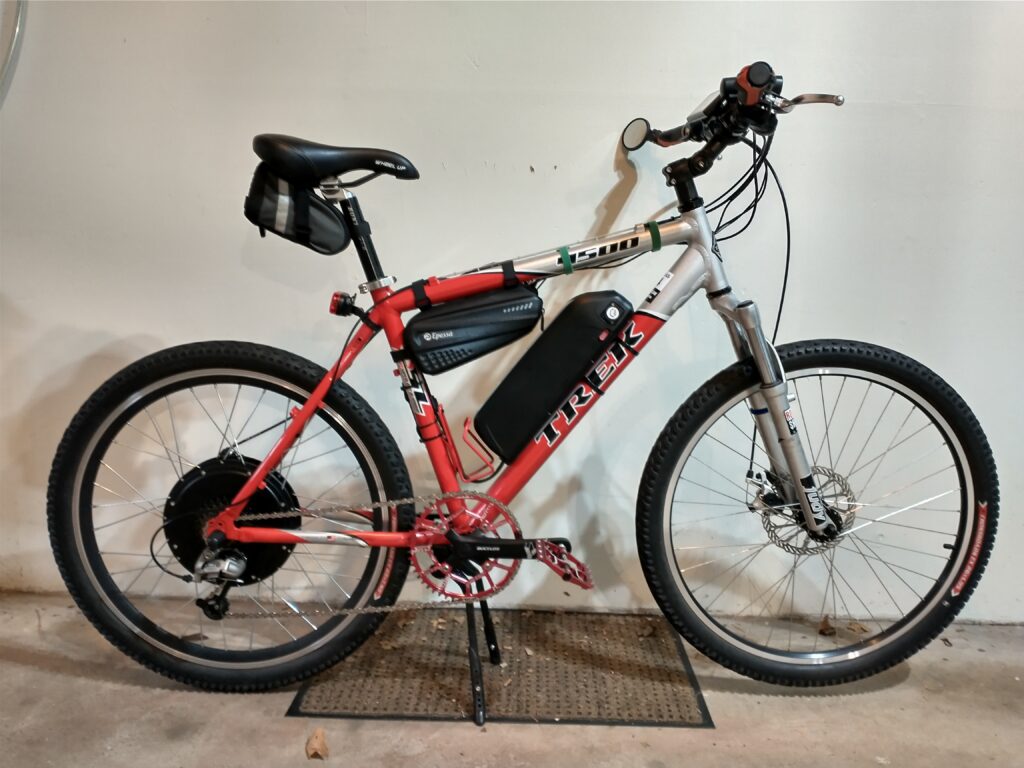
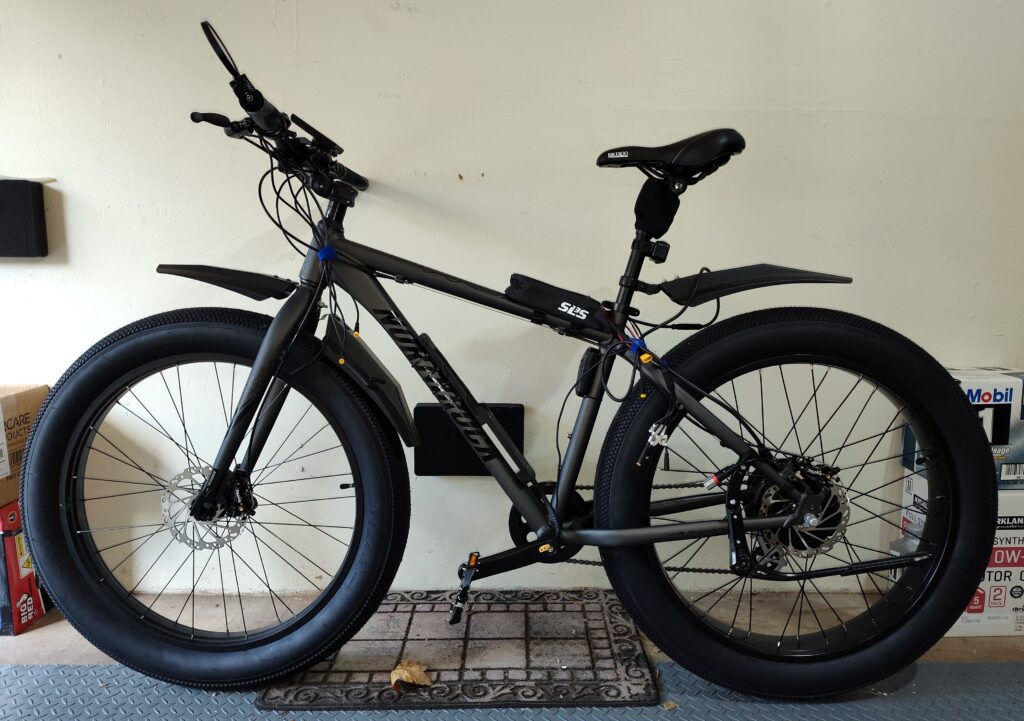
Here’s a picture of Red Rocket (RR) before surgery:
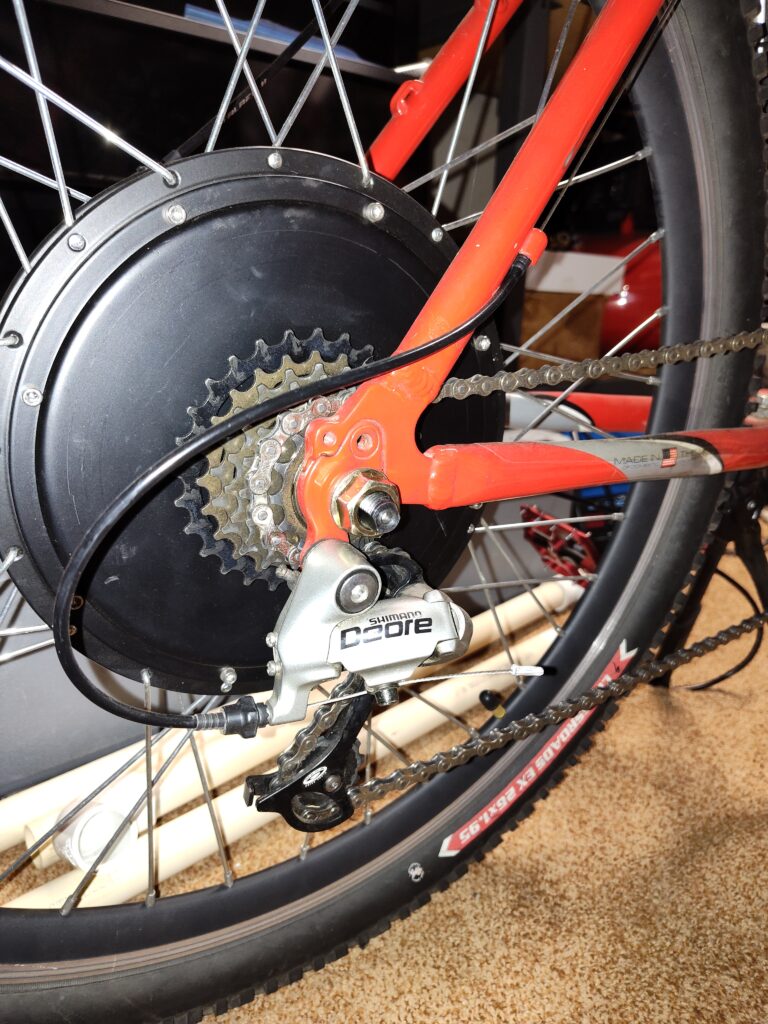
RR has a 48v 1000w Voilamart brushless, gearless motor driving the rear wheel and a 50-tooth narrow-wide chainring driving a 7-speed freewheel. With all that power and speed, I thought it might be interesting to convert RR to a single-speed. Also, I never put PAS on this bike, so it’s pedal power or throttle only, which works fine for this bike.
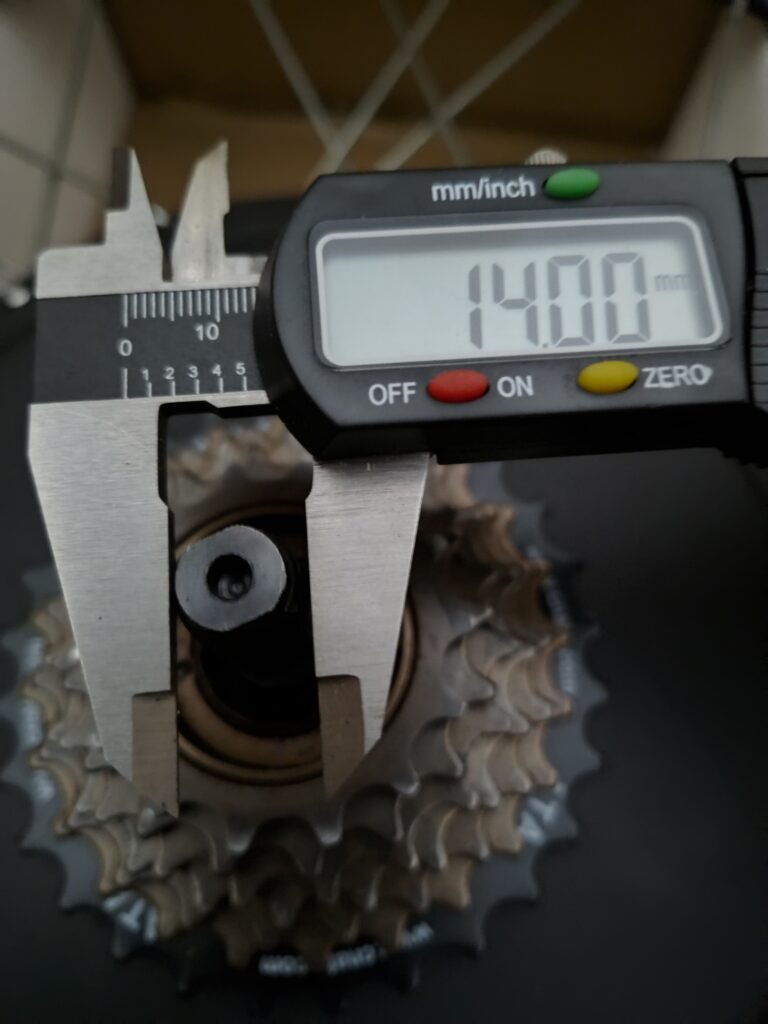
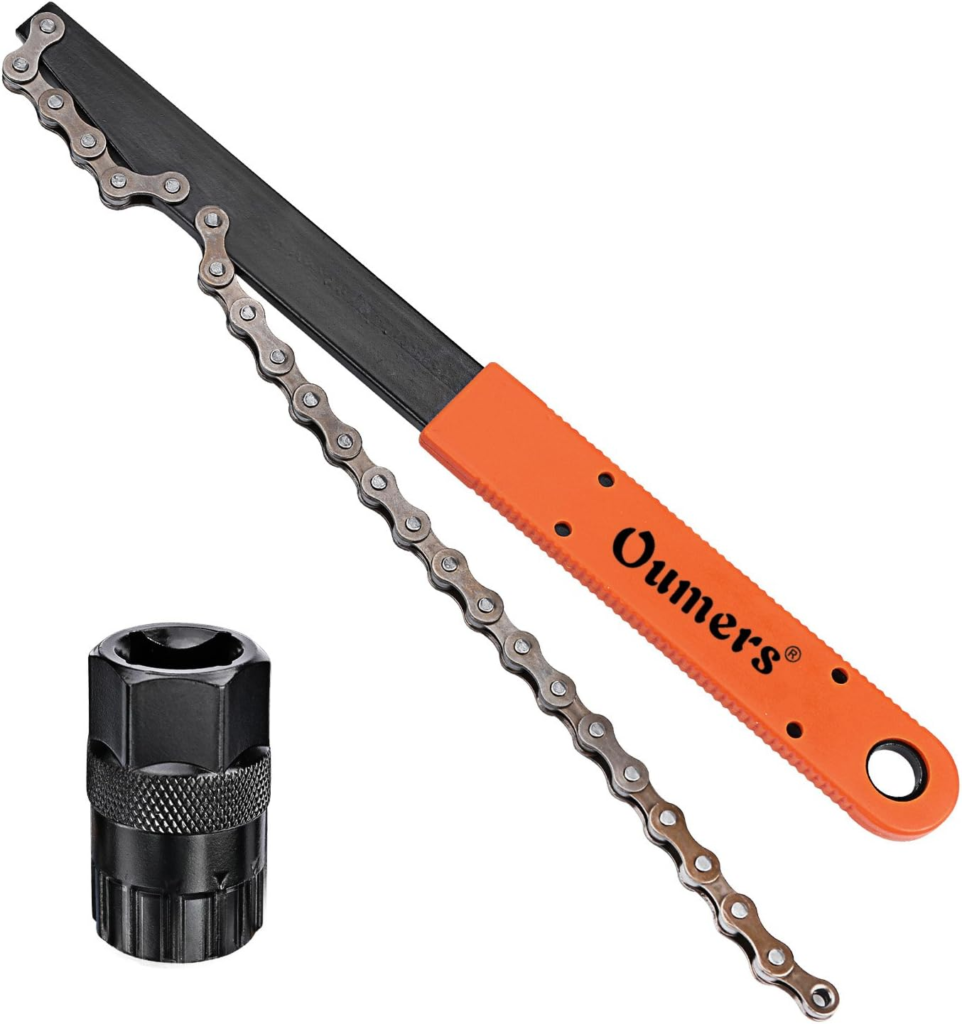
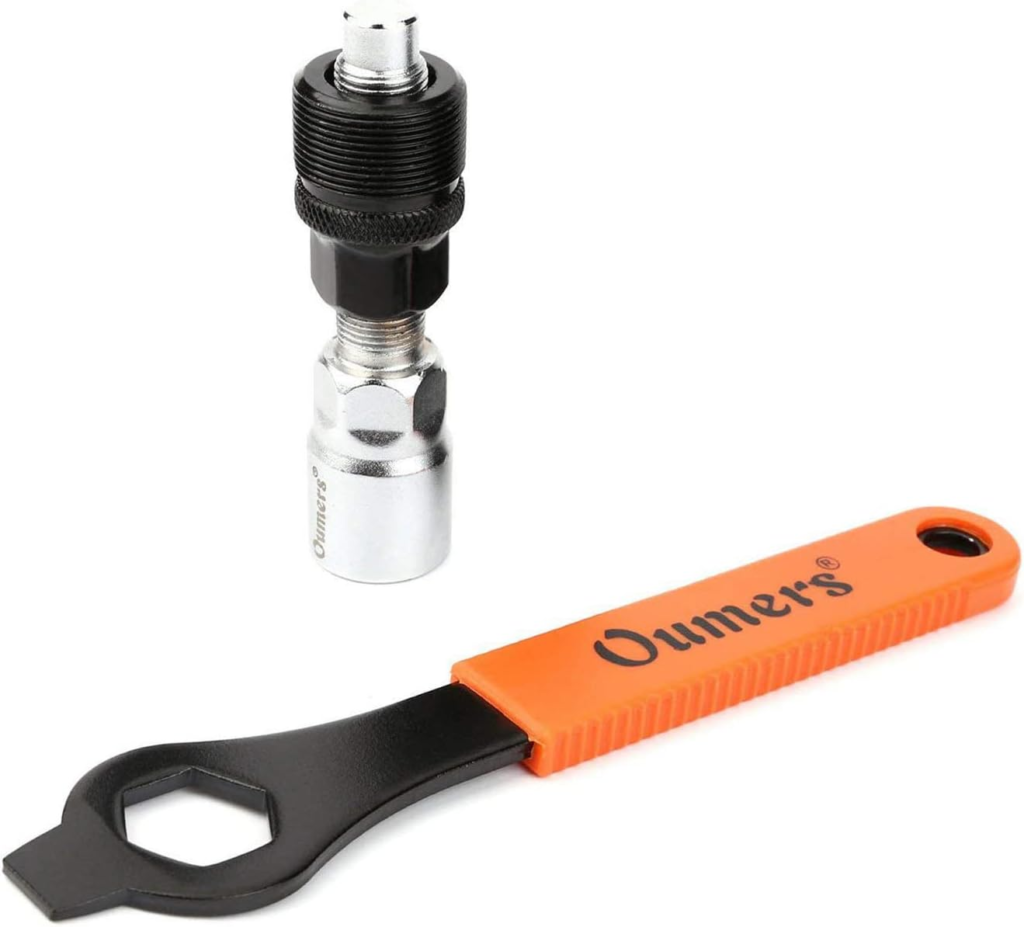
So, a couple things to think about when executing this conversion. First, freewheel removal. Turns out this ebike, like most, has a rather thick ( ) rear axle. This means the freewheel removal tool center opening needs to be wider than this – most aren’t.
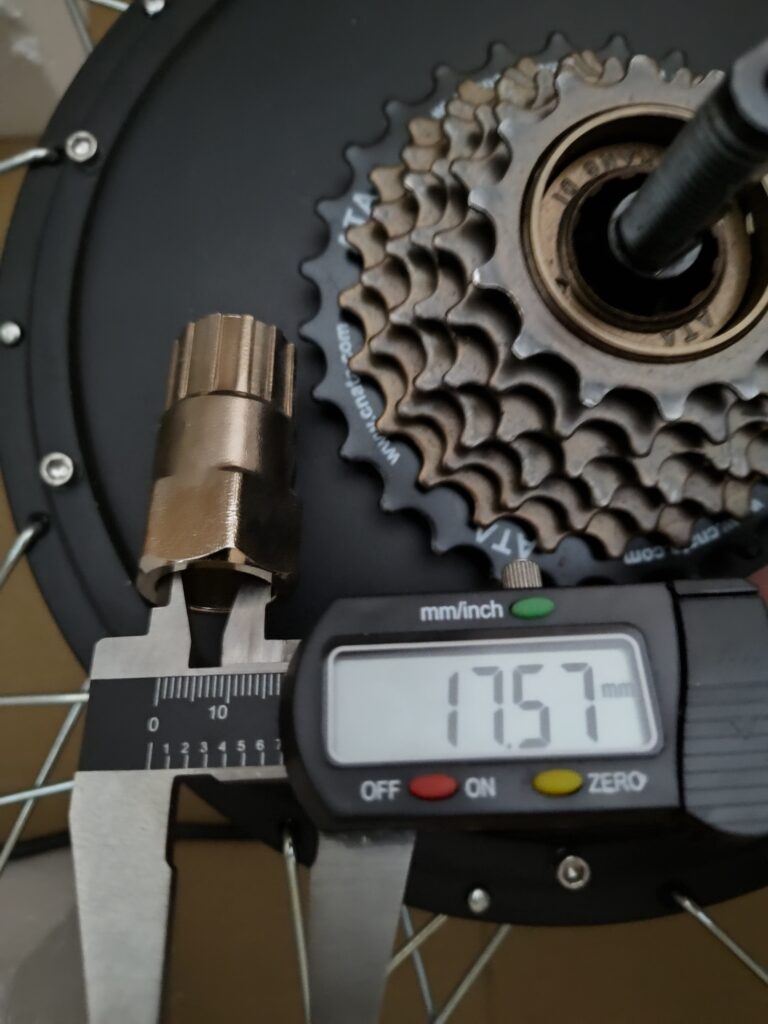
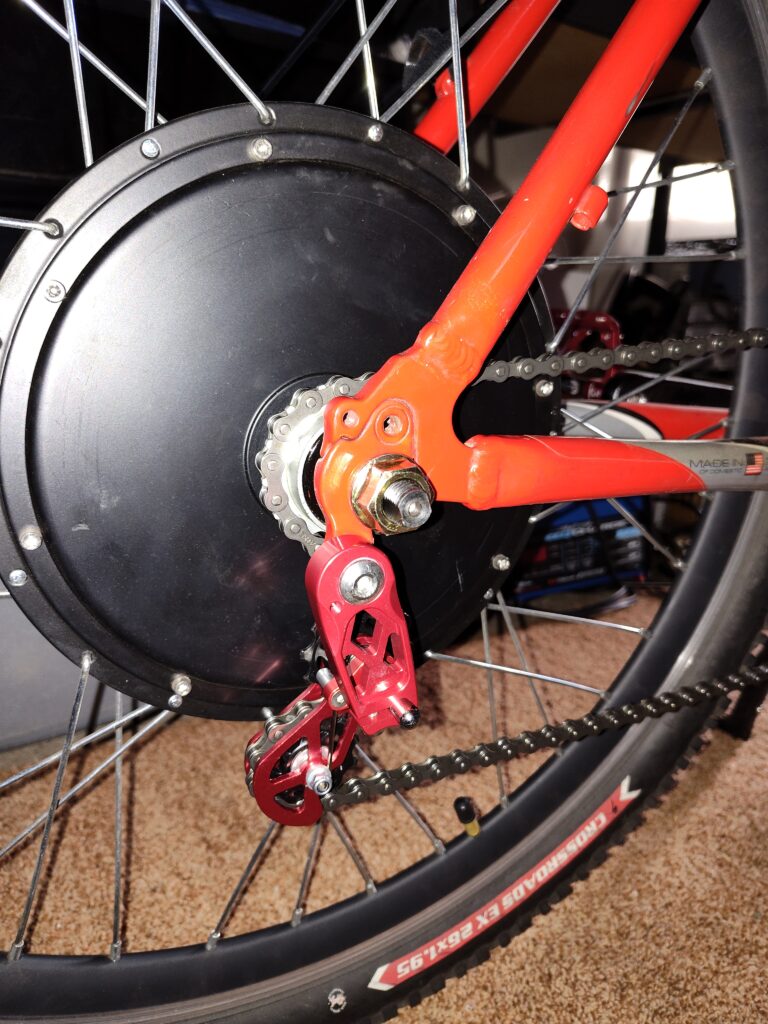
With the freewheel removed, now it’s time to deal with single-speed freewheel selection and associated chain alignment. I initially selected a ‘BMX style freewheel‘ which was a mistake. Nice sprocket, but it sits way too close to the motor housing and there’s no way to correctly align the sprocket with the front chainring. To fix the alignment problem, I ordered this threaded freewheel hub from Amazon.
And even though RR doesn’t have rear suspension, I’m a fan of chain tensioners, so will use this tensioner ordered from AliExpress.
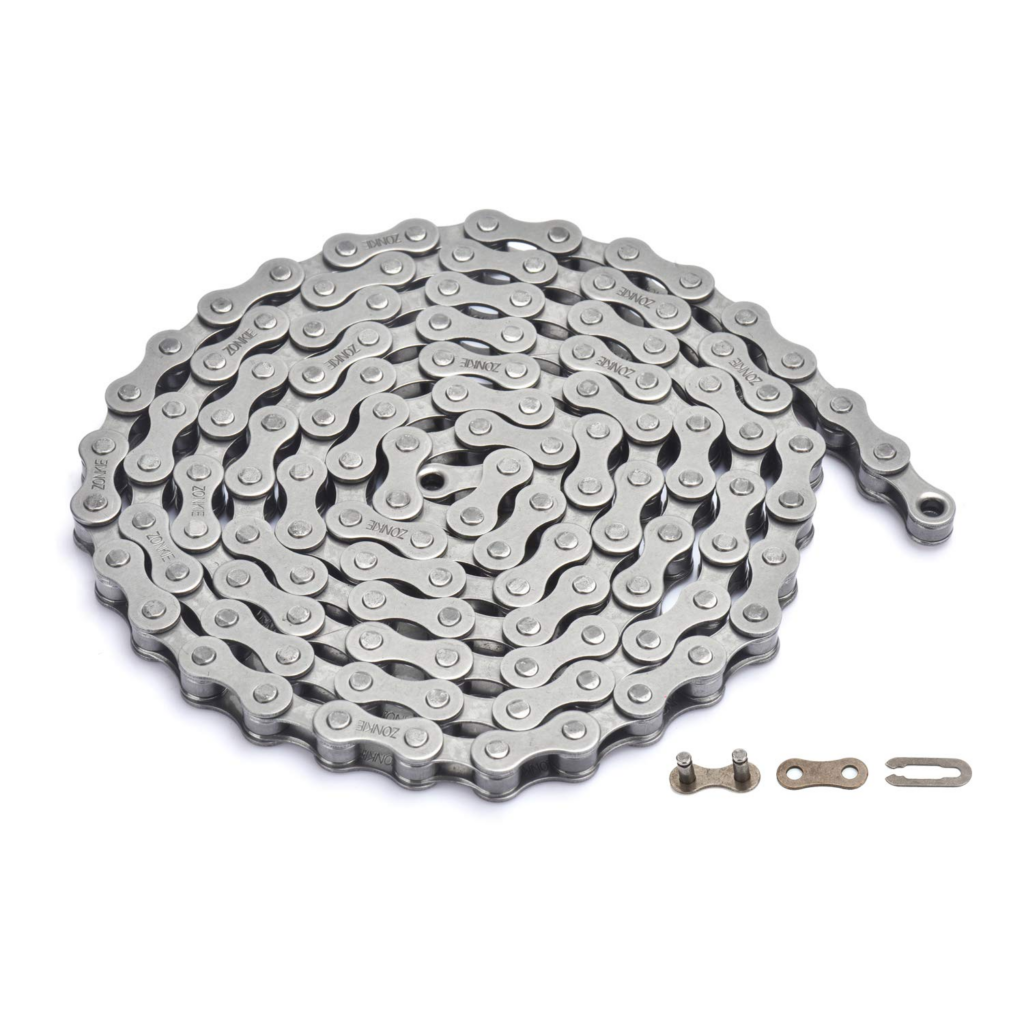
And a single-speed chain from Amazon. Someday I’ll understand how a single-speed chain differs from a 7/8-speed chain, but for now I accept that they’re different and I should just go with the one designed for this application. The 1/2”×1/8” ZONKIE single-speed chain replaces 1/2″x3/32″ 7-speed chain. Always learning – that’s my moto…
Looks like every other chain to me.
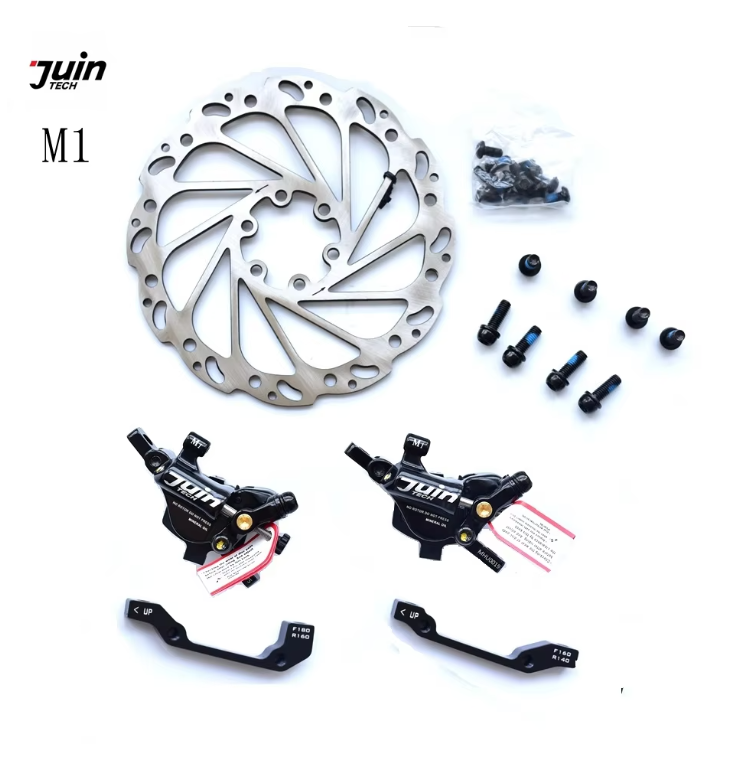
Once the parts arrive and have been installed and tested, I’ll post post-surgery pics and first impressions here. And, just ’cause it makes sense to do it, I’m upgrading RR’s brakes to hydraulic using the Juin Tech-M1 Electric Bike Disc Brake kit I’m running on the Himiway Cruiser and on my latest Northrock (Fatty III) build. I love these brakes and the fact that they can be installed in a cable brake system makes them a fantastic mechanical disc brake replacement option. Here’s what’s included in the kit from AliExpress, which is also ‘in the mail’.
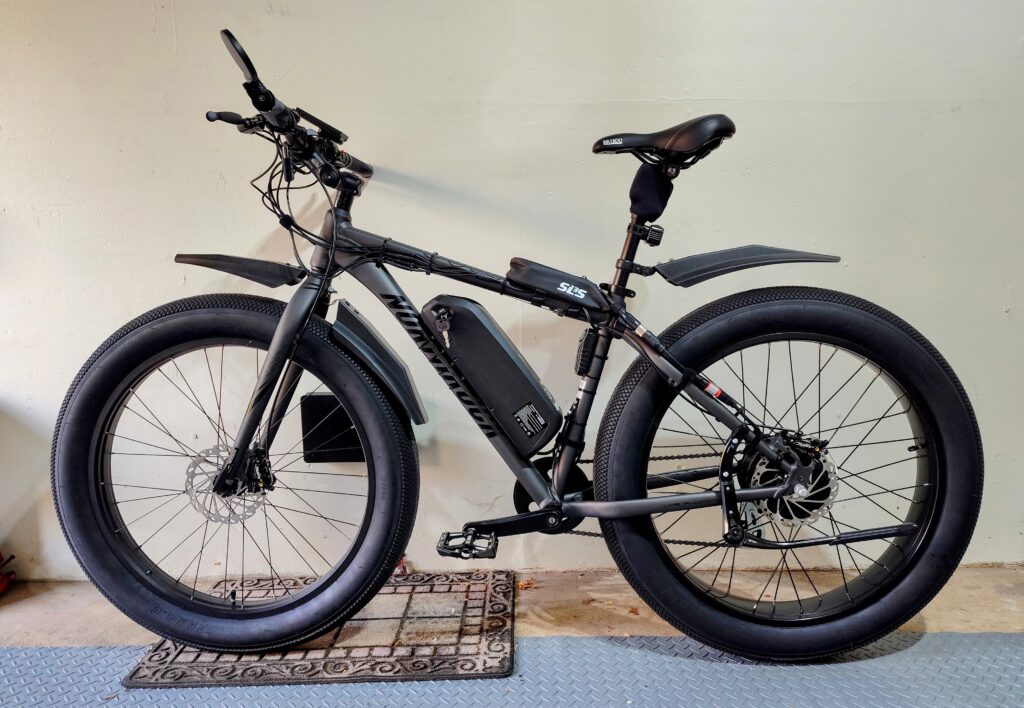
Post-surgery pics as promised:
But first, pre-surgery – 7-speed freewheel cluster and derailleur
And after, with 14-tooth threaded freewheel hub, tensioner, and 1/2”×1/8” single-speed chain
Really cleans things up back there! And as mentioned previously, I could probably eliminate the tensioner as well, but I’ll go with this for now, and maybe go tensioner-less as a test at some point. Also here’s a side view running a 50-tooth front chainring. The only minor compromise I made, which isn’t really a big deal at all (fortunately*), is that I had to move the front chainring inboard on its mount (*which gives me about 1/16″ clearance next to the chain stay – not much but enough).
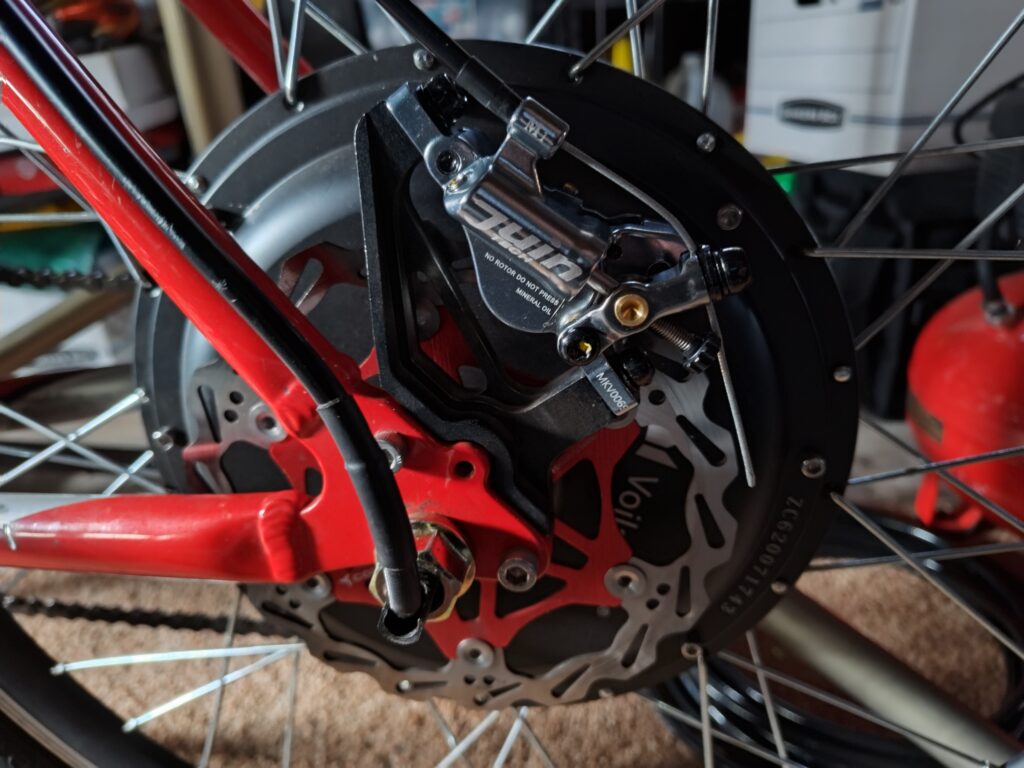
And, while my bike was in surgery, it also got its new pair of Juin Tech M1 hydraulic brakes installed – sweet! In this image, they’re installed but not yet dialed in. Didn’t have time to get everything prepped yet for a test ride. Just too busy these days…
I can’t speak too highly about my Juin Techs. These are incredible brakes, and at ~$130 for a pair, which includes fresh discs, I think that’s a fair price for what you get.
Posted inUncategorized|Comments Off on Single-speed for Red Rocket
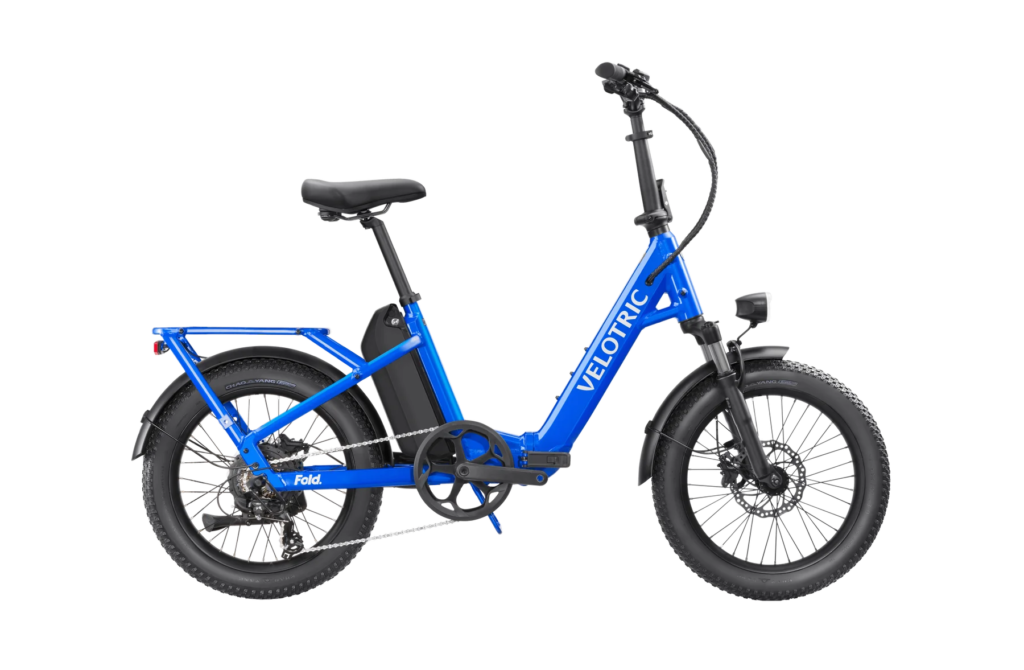
The Fold 1 might look like a toy, but it’s anything but.
Here’s what you get for a paltry $1149:
And it folds up into nothingness to fit into the boot of your car:
I like everything about this e-bike, except maybe I would have preferred torque sensing over the cadence sensing pedal assist provided with the Fold 1. That said, I have cadence sensing on my Himiway Cruiser and I really like it. Still, many, especially new riders, might find torque sensing to be more forgiving and a bit more natural.
“We loved the Electric Blue color of our test bike, and we think the Fold 1 is one of the best-looking folding e-bikes we’ve tested. In most cases, its performance was equally impressive. The bike’s Speed, Range, and Brake test results were particularly notable, with ideal – and sometimes groundbreaking – results. In terms of its foldability, it was largely effective despite some hiccups with the latch mechanism. And finally, its ride quality was first-rate when compared to other folding e-bikes we have tested.”
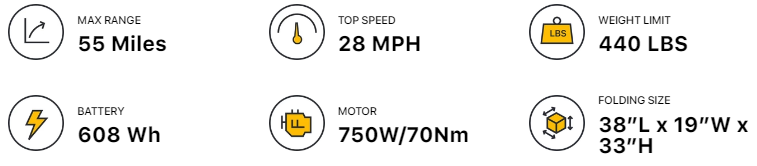
PS – If you haven’t already seen this, I wrote a post recently about the ‘perfect’ e-bike rack for your Fold 1 e-bike here: https://ratelectricbike.com/?p=973
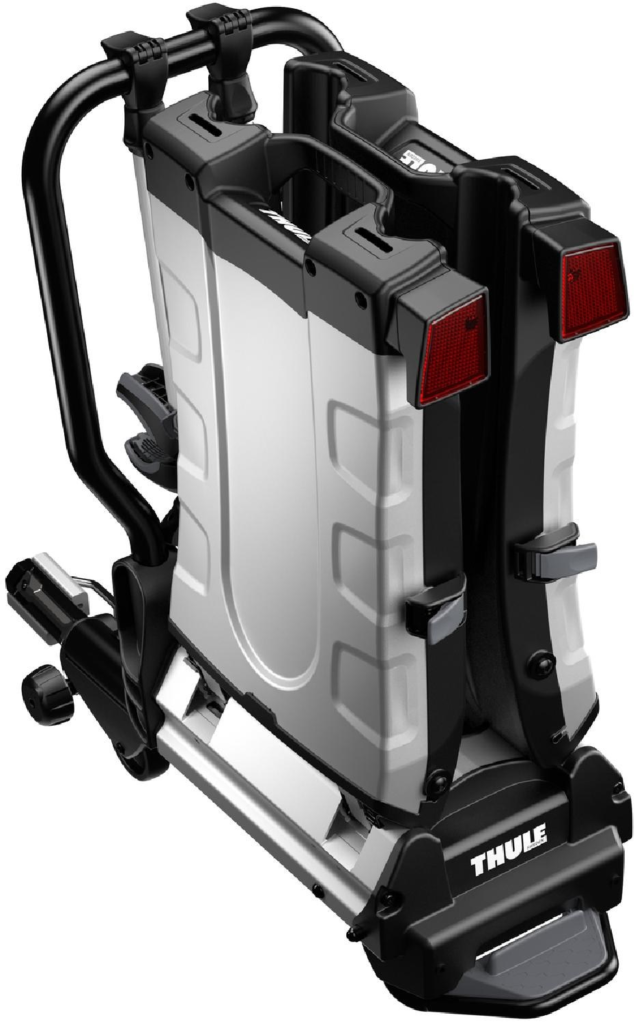
It’s the Thule EasyFold XT 2-Bike Hitch Rack which can be purchased at REI for the low, low price of $850. Yeah, that’s a lot of money, but there’s no better rack for your Fold 1 than this!
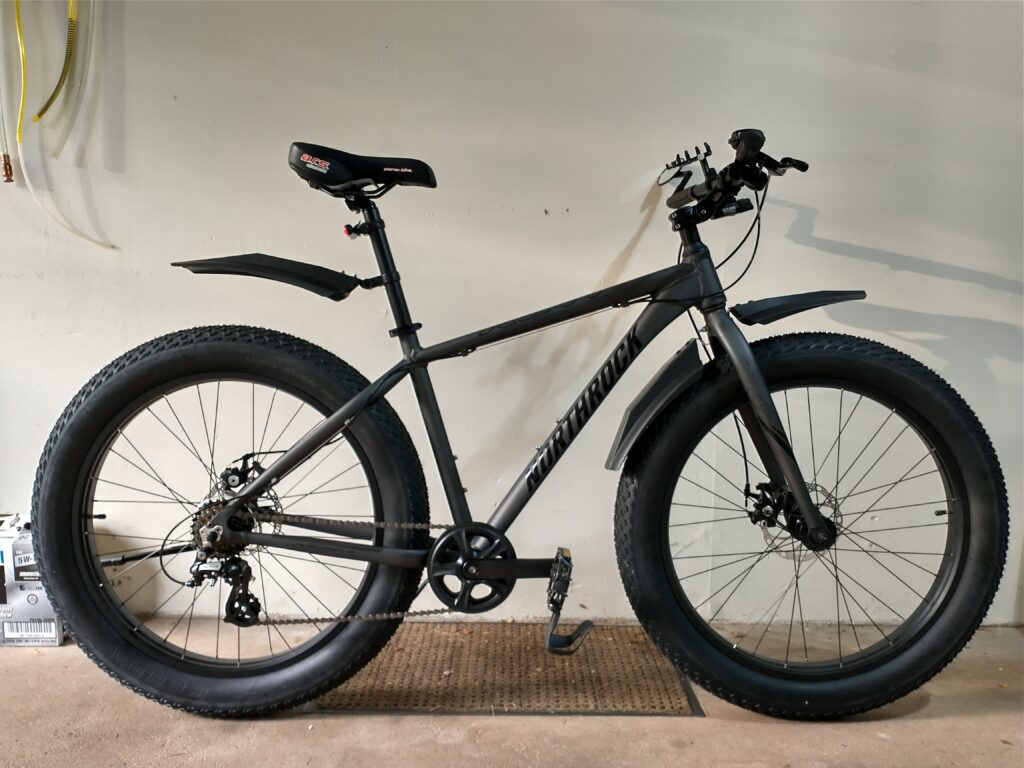
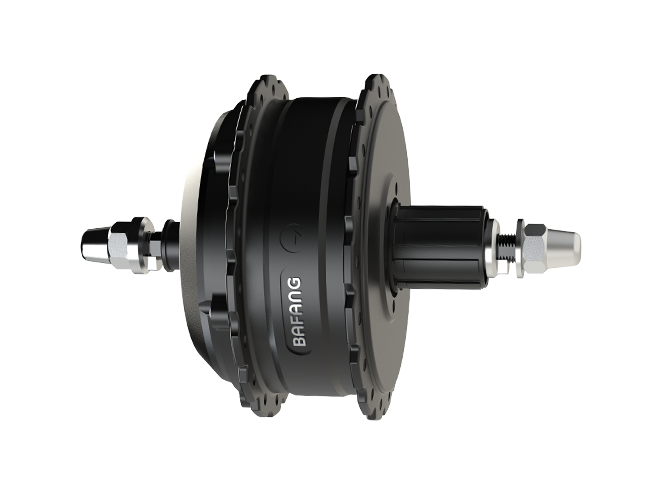
A while ago I reported on the unboxing and initial setup of Fatty III (here). We’ll, this morning I decided to jump into the build-out investment by purchasing a Bafang 1000w G062 rear-hub motor (here), as well as some other necessary components (7-speed cassette, kick stand, grips, rim tape, top tube bag…). Also, for this build I’m going to use a battery and battery mount I already own, so no additional investment there. And when all is said and done, Fatty III will morph from this:
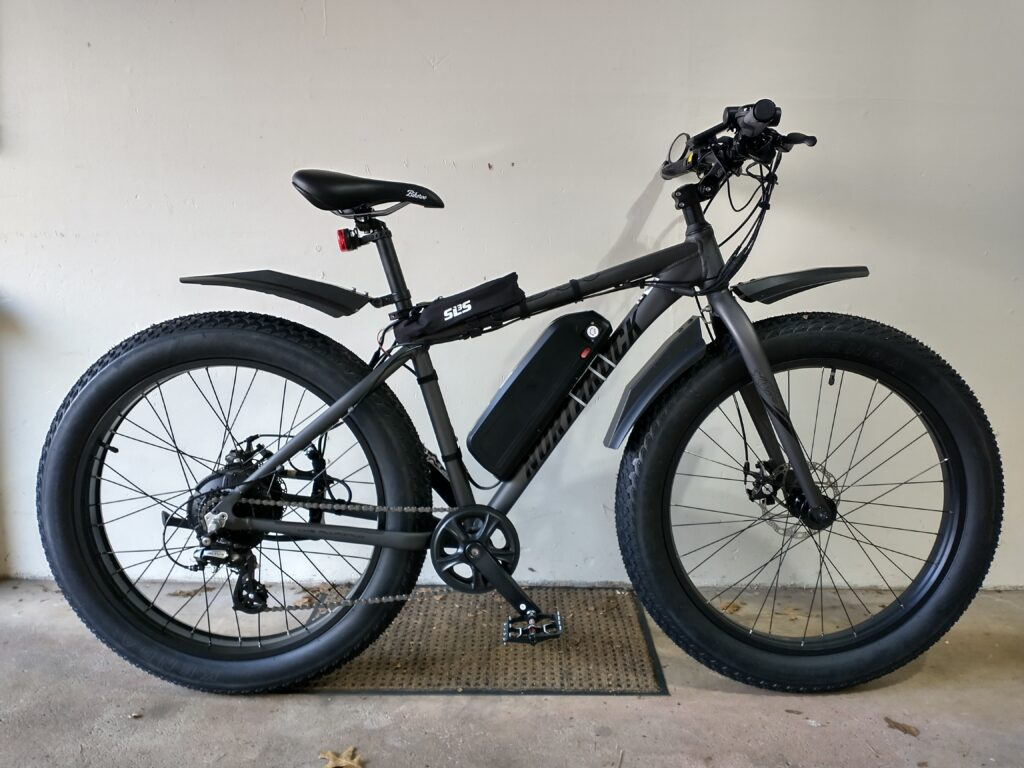
To this (hopefully)!
Time will tell, since I expect this build will take 3-4 weeks to complete (complete by the 1st or 2nd week of October). I’ll be sure to post images of the final product here when it’s fully baked.
PS – One important change I’m going to make with this build is the addition of Juintech M1 hydraulic calipers which I had added recently to my Himiway Cruiser and really like! The cool thing about these hycraulic calipers is that they use the existing brake cables and levers, so are really easy to retrofit into an existing mechanical disk brake system.
Day 0
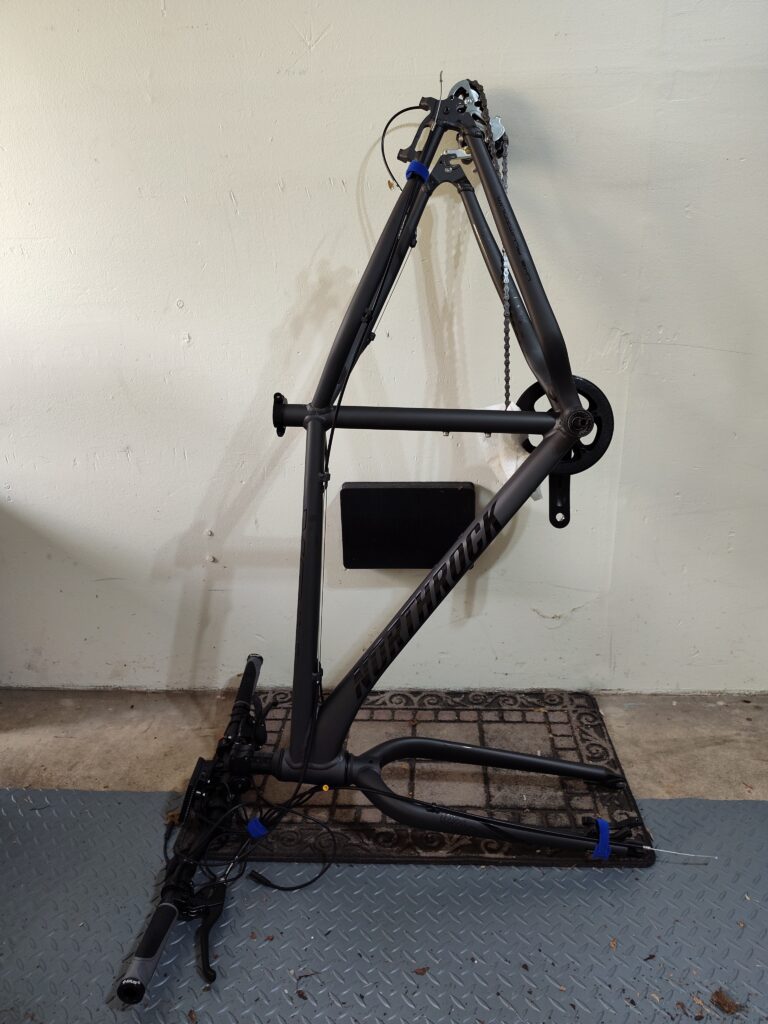
As with every e-bike build, you need to start with a clean slate. Here’s my Northrock undressed and ready for a complete make-over:
Day 1
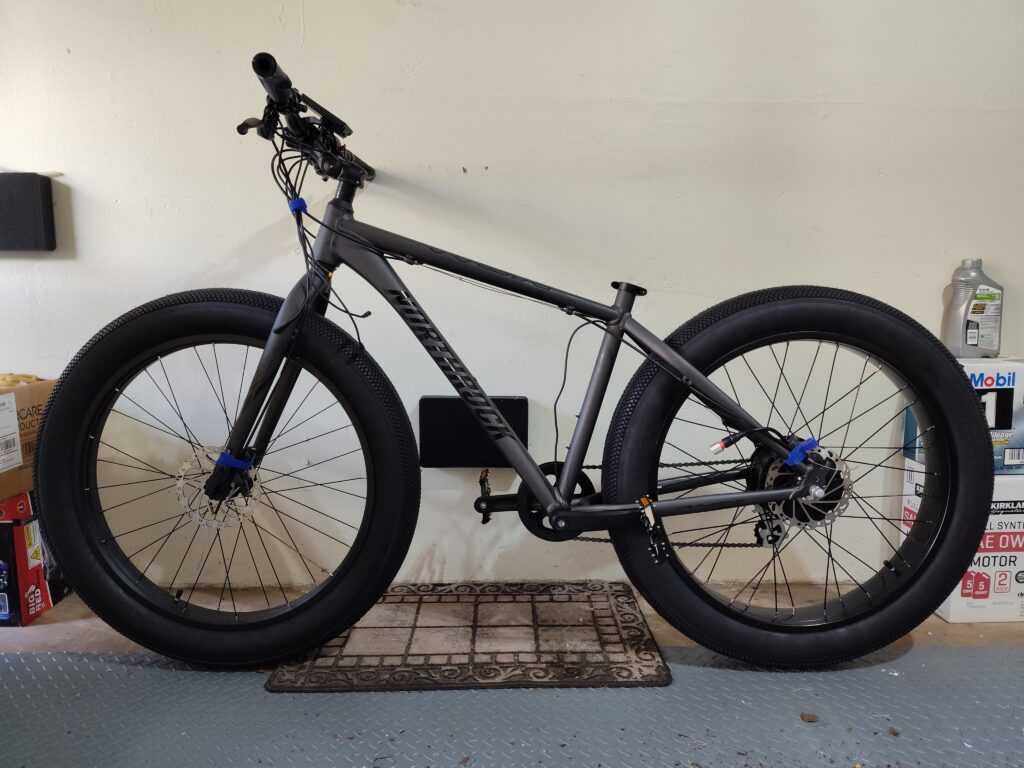
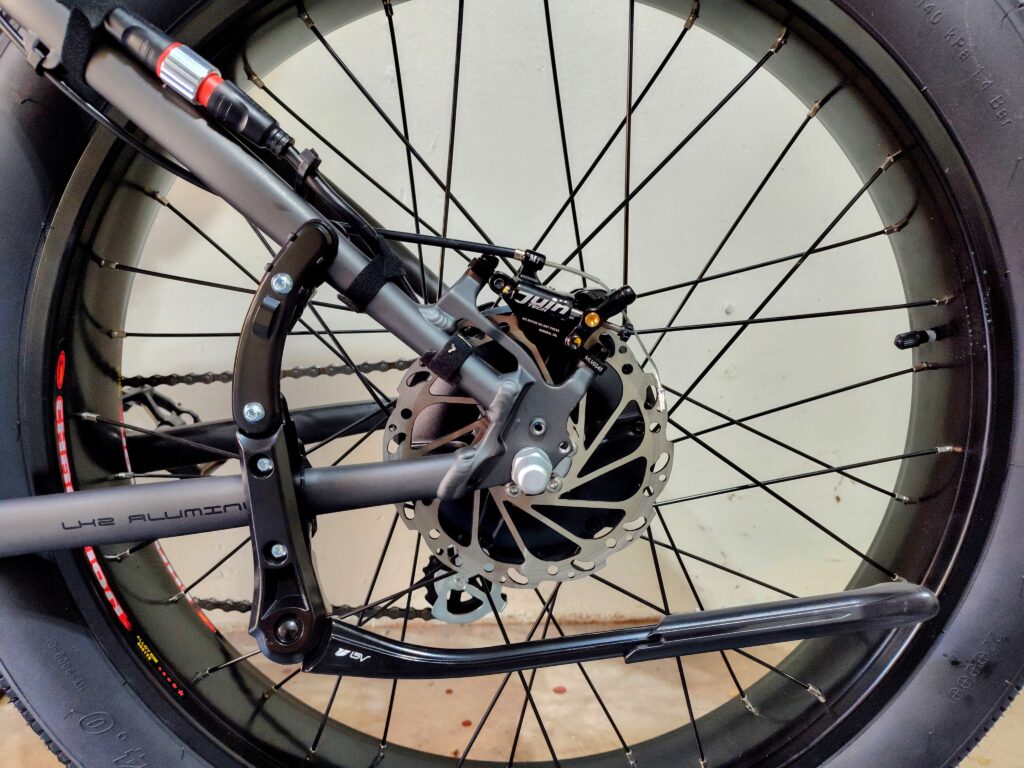
Got my new rear wheel dished since the original wheel is offset (to the brake side) on this bike. Also mounted new tires that replace the original knobbies, upgraded the pedals, and installed new disks that came with the Juin M1 brakes. And as mentioned above, the rear wheel was built around a Bafang 1000w G062 rear-hub motor with a Shimano 7-speed cassette. Note: When installing the 7-speed cassette on a custom build, it’s important to be precise in spacing the cassette away from the hub/motor and away from the chain stay/rear axle holders. Be precise with your measurements and spacing (add shims and washers as needed) and you’ll be fine. Here’s my Day 1 progress:
Day 2
Most components have been installed, but what remains is wire management and finishing touches, and tuning – meaning the bike needs to actually work. Here’s an image of my Day 2 progress:
Lots of new bits have been added, making this almost look like a functioning e-bike, but there’s a whole ‘nother day to go before this black horse moves out of the stable, ready to run…
Day 3 – and a couple weeks later
Everything is installed and we’re ready for testing. So what can go wrong? Well, for starters, the bike won’t ‘start’. After contacting the supplier, and after a bit of swapping parts with another 1000 watt e-bike in the stable, it was determined that Fatty III has a bad display. And supposedly there’s a replacement being shipped to me as I write this. I say supposedly because nothing is certain when dealing with Chinese parts suppliers. I got a text message that ‘something’ is being sent from Jamaica, NY, but the message doesn’t say what, and although the message appears ‘scammy’ I have to believe that my new display is in the mail and will arrive in 12 days. That’s right, Jamaica is 95 miles away and the package will take 12 days to arrive???
So, while we’re waiting, here’s the image you have all been waiting for – Fatty III in all its glory!
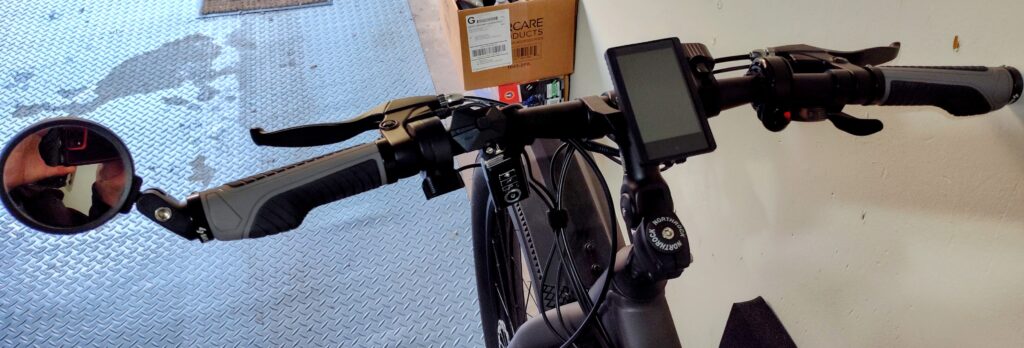
And handlebar management – mirror, grips, brake levers, throttle, touch pad, alarm fob, display, bell, shifter, etc. – lots going on here.
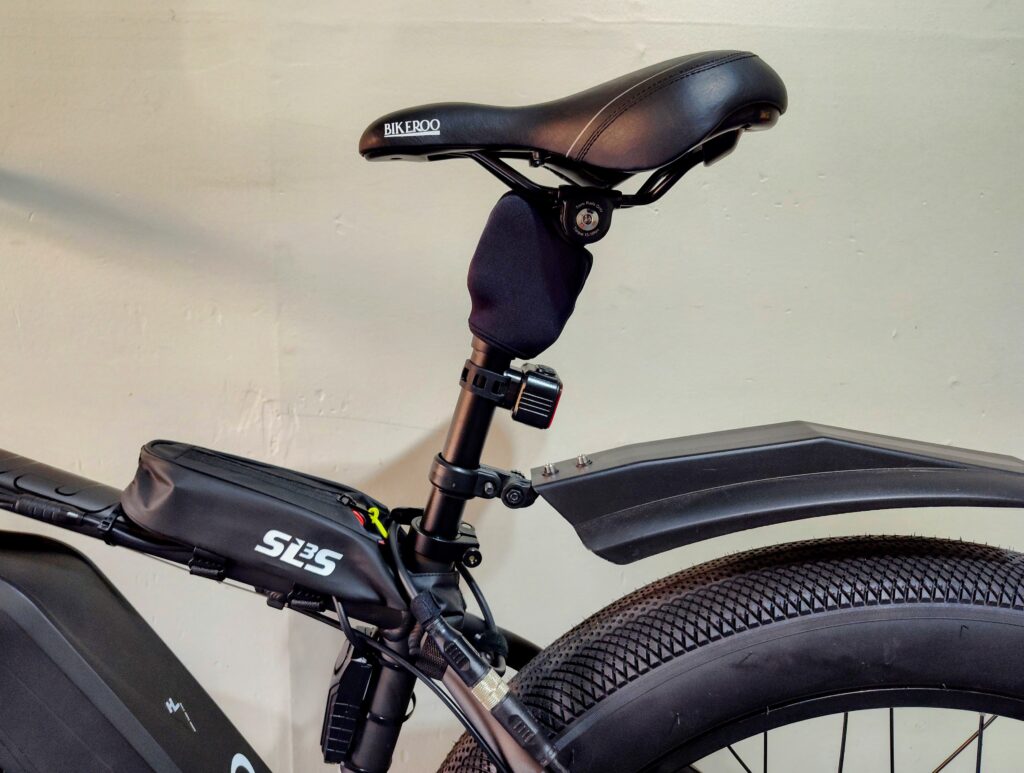
And the controller’s stowed in the top tube bag, the suspension seat post has a neoprene cover. And the tail light, alarm, street tire tread, and my comfy Bikeroo saddle are also shown here.
Then there’s the Juin Tech hydraulic brake caliper (what a great invention) and rotor and replacement kick stand are shown here, with the 1000 watt Bafang G062 engine tucked in behind. By the way, other than my minor issue with the display, I’m very impressed by this kit (BAFANG G062 48V 1000W Motor Fat Wheel Ebike Conversion Kit 26×4.0″ Rear Cassette Drop Out 175mm, with 860C Display). Note: The price from this supplier has increase more than $100 since I purchased my kit early September (about a month ago)…
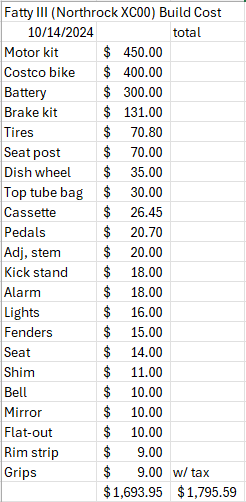
And the other thing I know you’re going to ask is HOW MUCH DID THIS BUILD COST? Well, let me repeat a statement I often make in my e-bike classes and that is “Building an e-bike does NOT save money.” In fact, it’ll often cost more to build than it will to buy a pre-built factory e-bike with similar components. OK, so how much did it really cost? The answer, $1700 (before tax). $1800 with PA sales tax.
Note: Final parts links appear at the end of this post.
Question: Is this build worth $1800? And the unequivocal answer is, YES! And here are a few reasons:
This build is exactly what I want – no compromises.
Should any part fail, every part is available on the internet and can be replaced for a reasonable price and for years to come. Replacement parts for ‘proprietary factory’ bikes often cost more, may be out of stock, or might be unavailable after a few years.
I can upgrade/replace any part, any time, which I do. All my bikes get tweaked often…
I always learn new things when I build, and I know my bikes intimately. Brakes, cables, derailleur, you name it – you built it and you know how to fix it. I think this is important since e-bikes, and bikes in general, need maintenance.
And then the downside(s):
After the build is done, you own it and if something stops working, it’s your problem. There really is no warranty. But when you buy a factory bike, you’re usually covered for a couple years. For many, this is important. Something breaks, take it to the shop. Also, your e-bike’s safety is your responsibility. You built if with your tools, and if you didn’t tighten something properly (handlebar stem bolts, rear axle bolts, etc.) you could be in serious doodoo. Pay attention to details, check every nut and bolt twice (at a minimum).
So that’s it. With the new display ‘in the mail’, Fatty III will be ready to launch. Now my only problem is deciding which bike to ride. And I have to admit, this is a nice problem to have!
Maybe you’re not one of those e-bike nerds (which I am) that owns a fancy-dancy e-bike battery charger that let’s you adjust the charging current and percent charge (which I do). So the question is, if I don’t really want to charge my e-bike battery to 100% every time (which is bad – for your battery), how do I know how long to keep my battery on the charger if I only want to charge to 80%, for example? Great question, and I’m glad you asked!
For the answer, I’m going to discuss the ‘easy’ way to do this, which will get you in the ball-park. For this example, I’m going to use my 48 Volt (V) 18 Amp-hour (Ah) Hailong e-bike battery recently purchased from Amazon.
Let’s begin by calculating the total Watt-hours (Wh) for this battery: Ah x V=Wh
18Ah x 48V = 864Wh
So, when I finished my last ride, the display was showing 2 bars on a 5 bar scale, so I know I have approximately 40% SOC (state of charge) remaining in the battery. (note: each bar on a 5-bar scale represents about 20% SOC)
Now I need to know what my charger’s output is in Watts (without looking at the back of the charger where it’s posted). This is easy: Volts x Amps = Watts
And since I know my battery is 48 Volts and the charger is rated at 3 Amps (yes, you might actually have to look for this number on the back of your charger), then I can calculate this charger’s Wattage to be 144 Watts.
Then by dividing my battery’s Watt-hours by my charger’s Watts , I can figure the total time it would likely take to fully charge my battery from 0-100% (which is never a good idea). In my case, dividing 864Wh by 144W says this operation would take approximately 6 hours. But if I still have 40% SOC in my battery and only want to charge to 80% SOC, I’m going to have to do a little more math.
So, if 40% of 864 is 346, and 80% of 864 is 691, and the difference between the two is 345Wh. Divide this number by 144W and you’ll get something like 2.4 hours to charge to 80% from a 40% SOC.
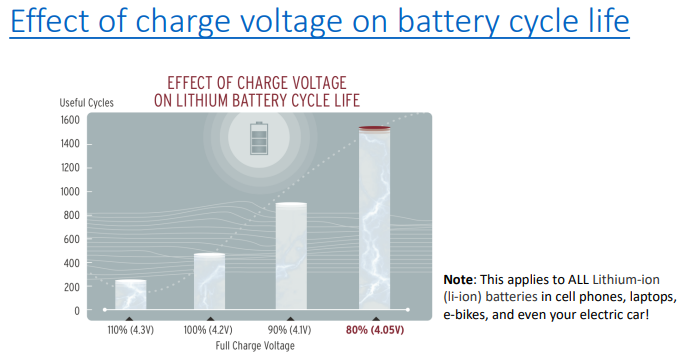
Now that wasn’t really that difficult, was it? And we all know that always charging our e-bike batteries to 100% is just not a good practice if one cares at all about battery longevity (which I do). So putting a bit of effort into running these calculations for your battery a) is a good brain exercise, and b) should improve your battery’s longevity significantly! I often use the following chart in my e-bike classes to demonstrate this point:
Useful (charge/discharge) cycles is a measure of battery longevity, and using this image as a guide, your battery could have a useful life 3+ times longer by charging only to 80% versus 100%. And this is a good thing for the planet and for your pocketbook!
** Update **
To simplify the math for y’all, I created this very cool Excel spreadsheet. Go to this link to download it:
When you download the spreadsheet, you’ll be able change any of the relevant parameters to recalculate ‘time-to-charge’ in hours:
In this example, I’m using my 48 volt 18 amp-hour battery with the factory 3 amp charger. Change any or all of these values and the time-to-charge will change. Enjoy!
Posted inUncategorized|Comments Off on Calculate time to charge
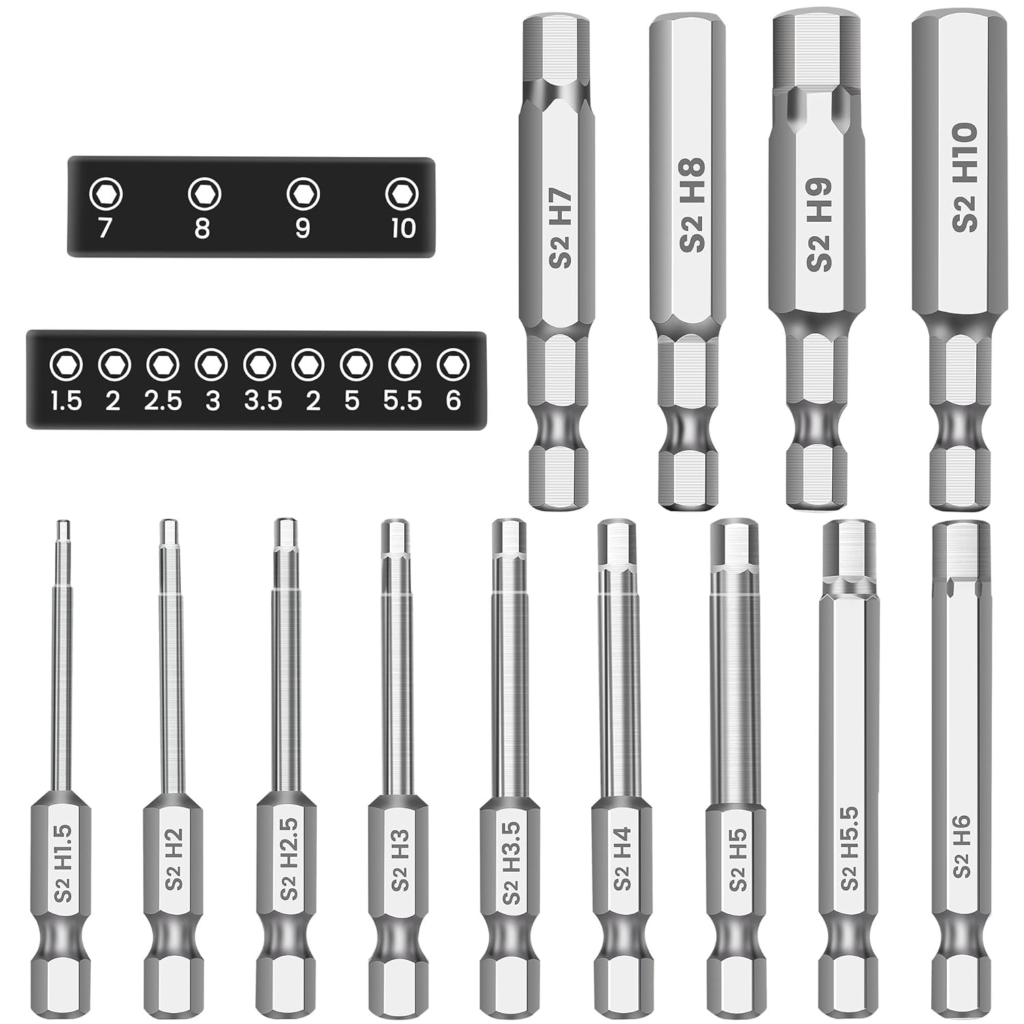
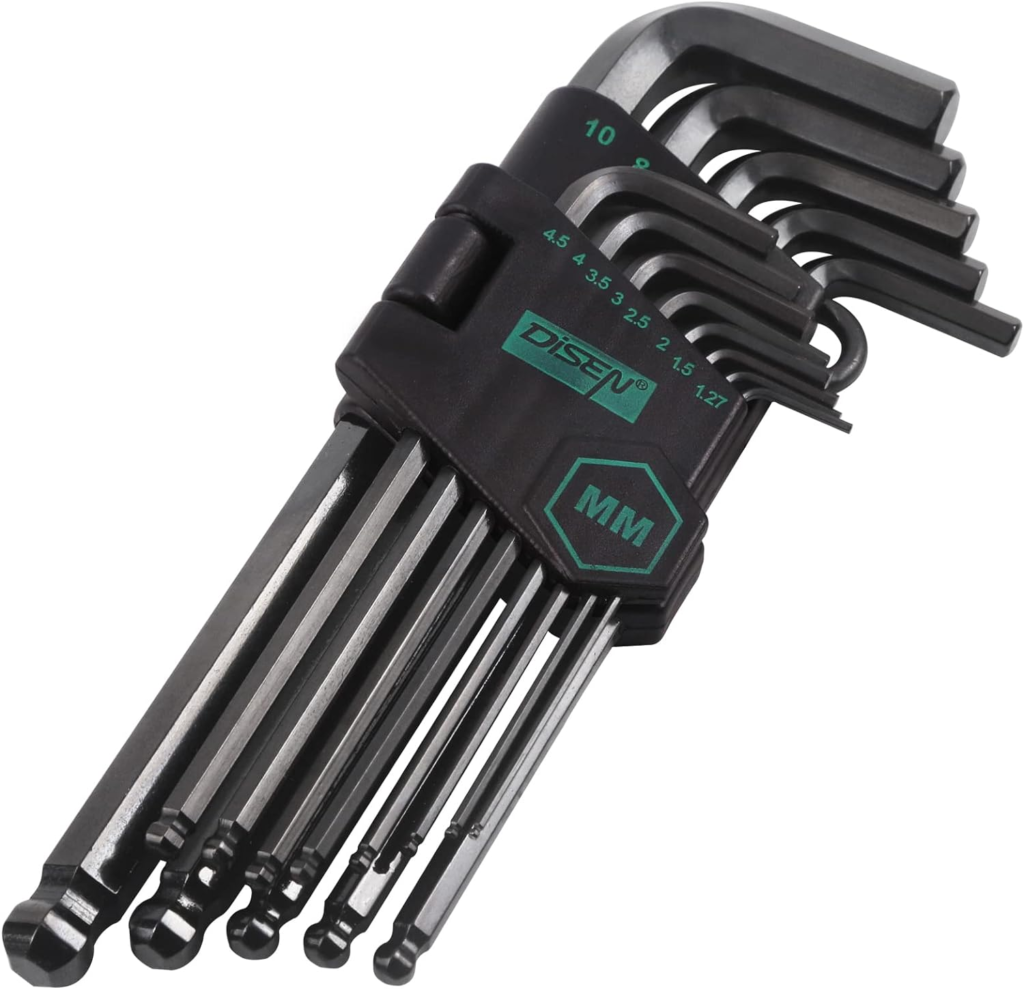
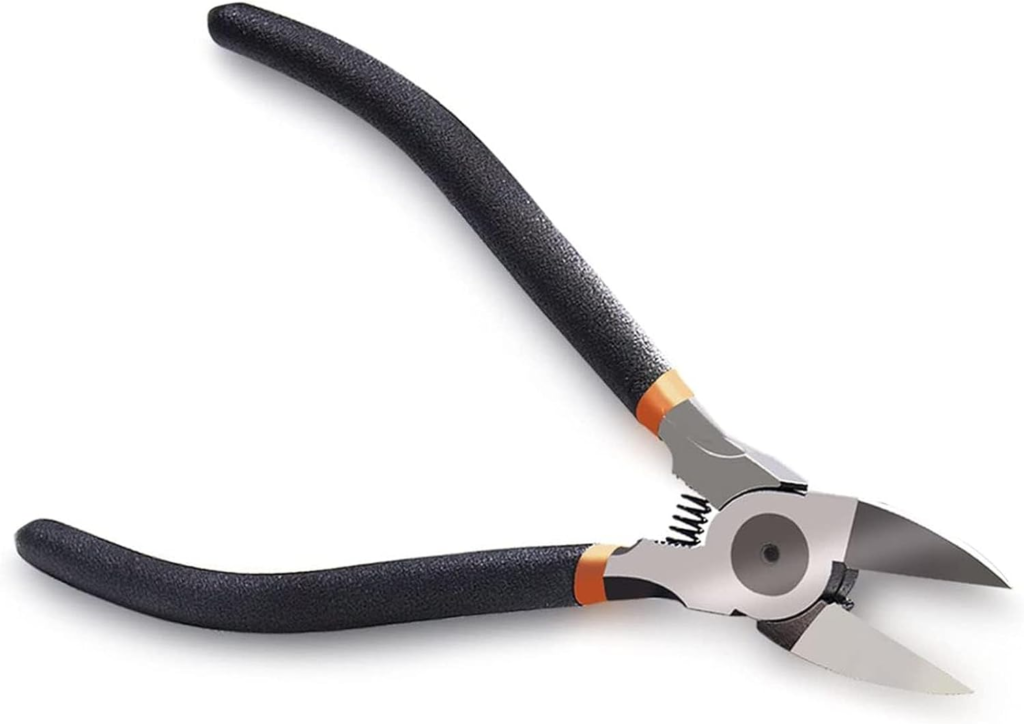
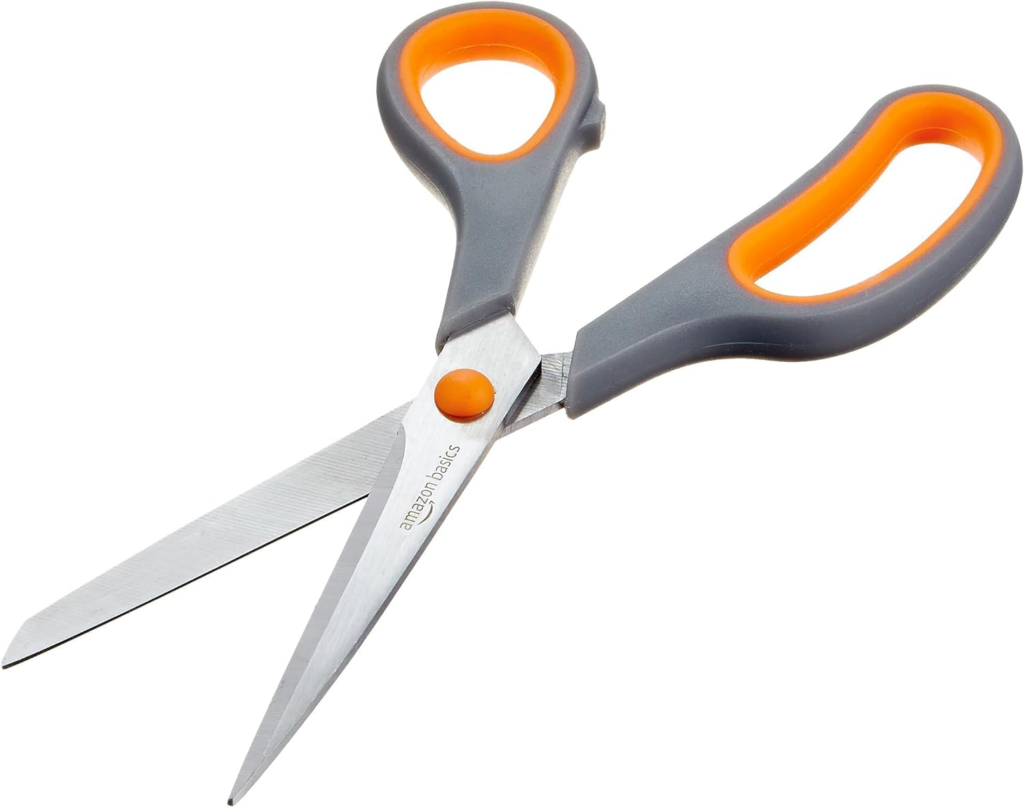
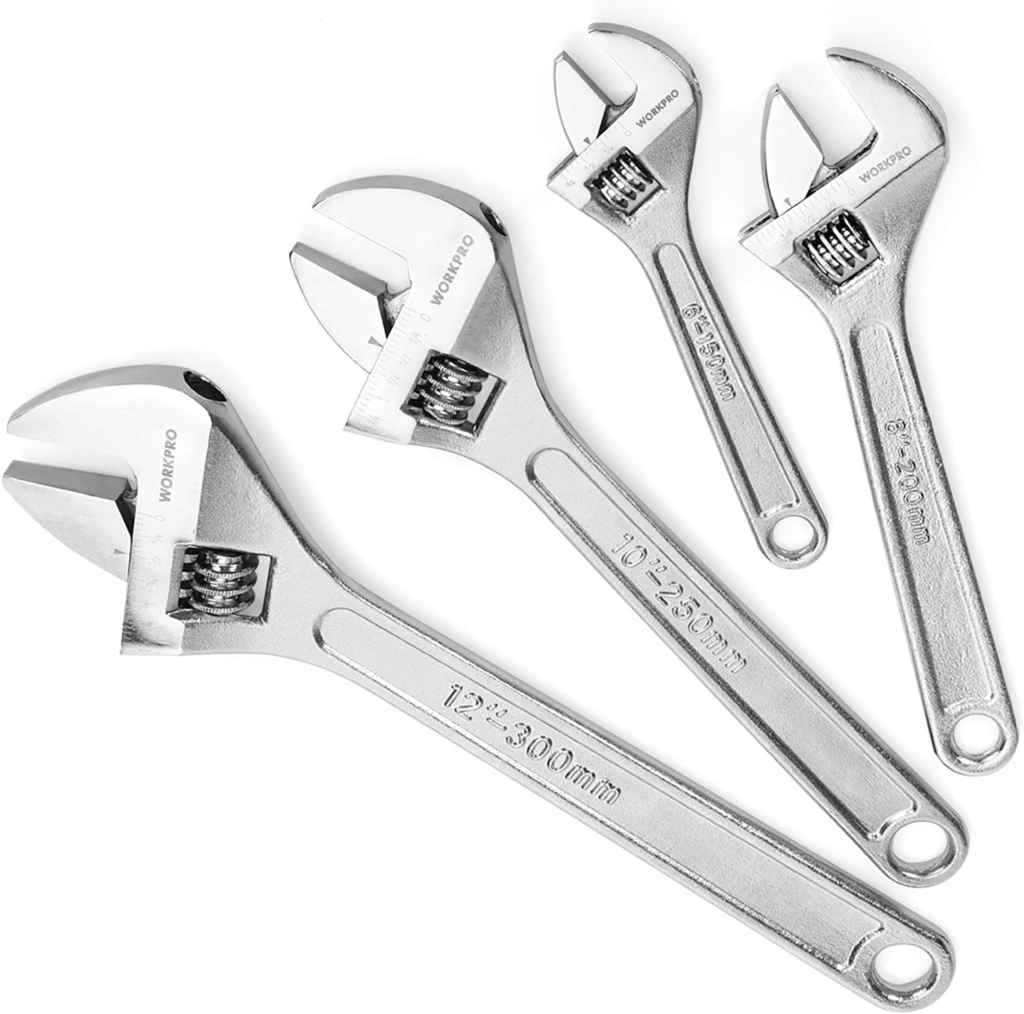
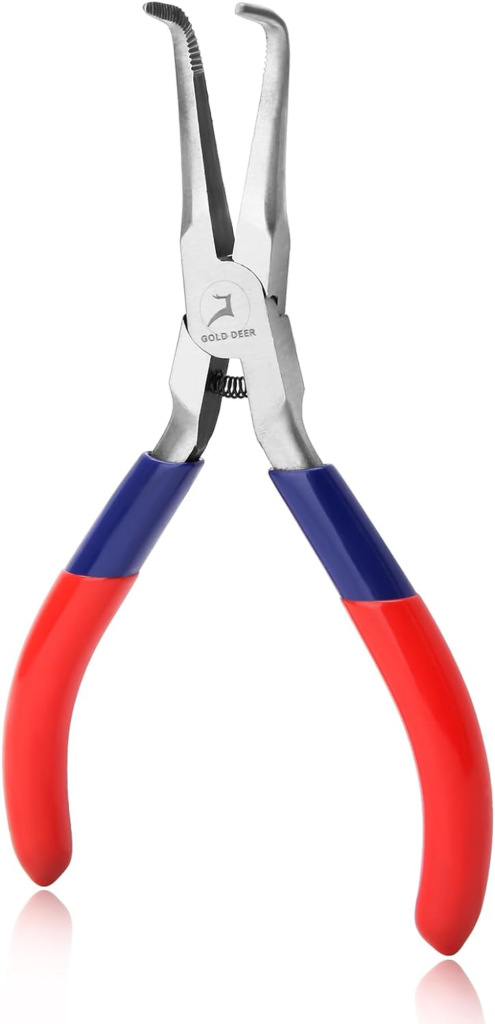
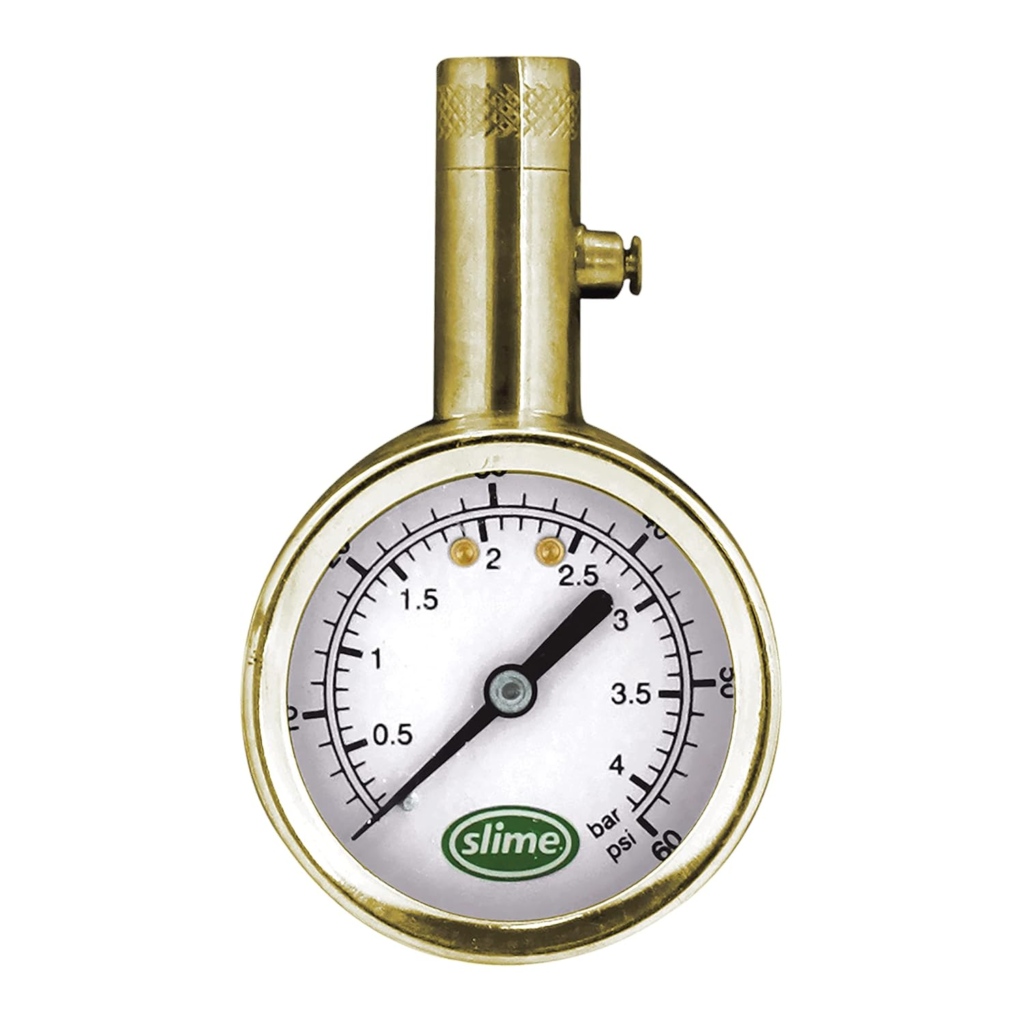
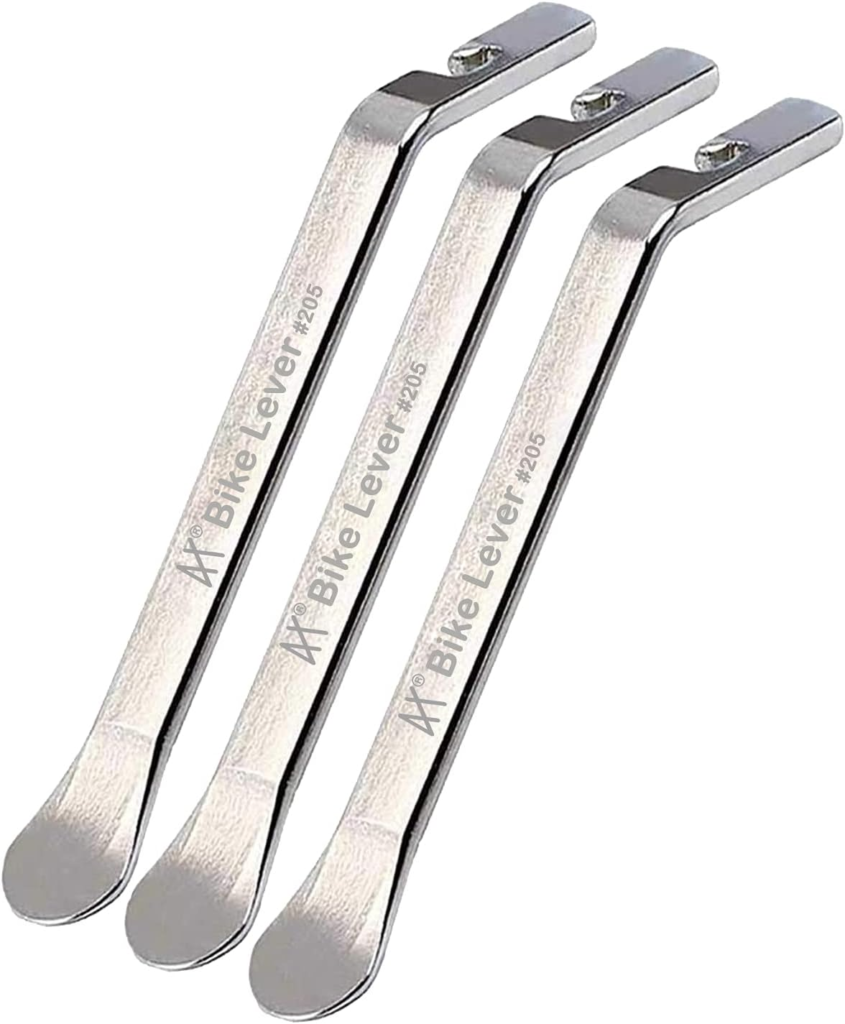
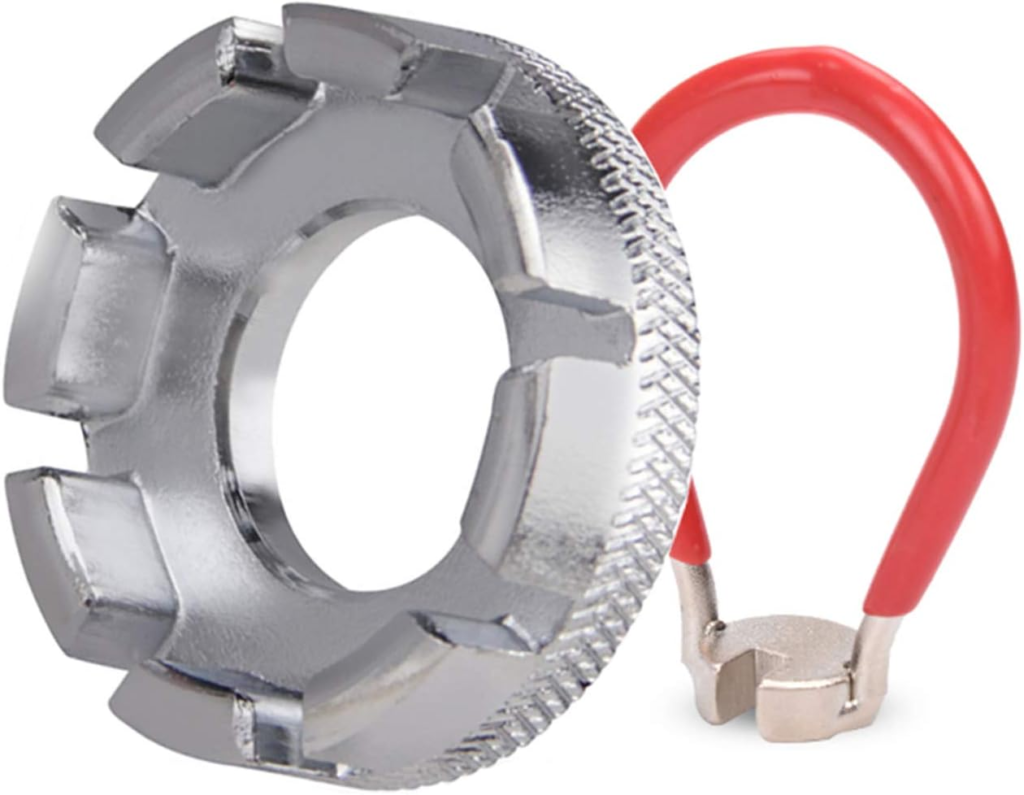
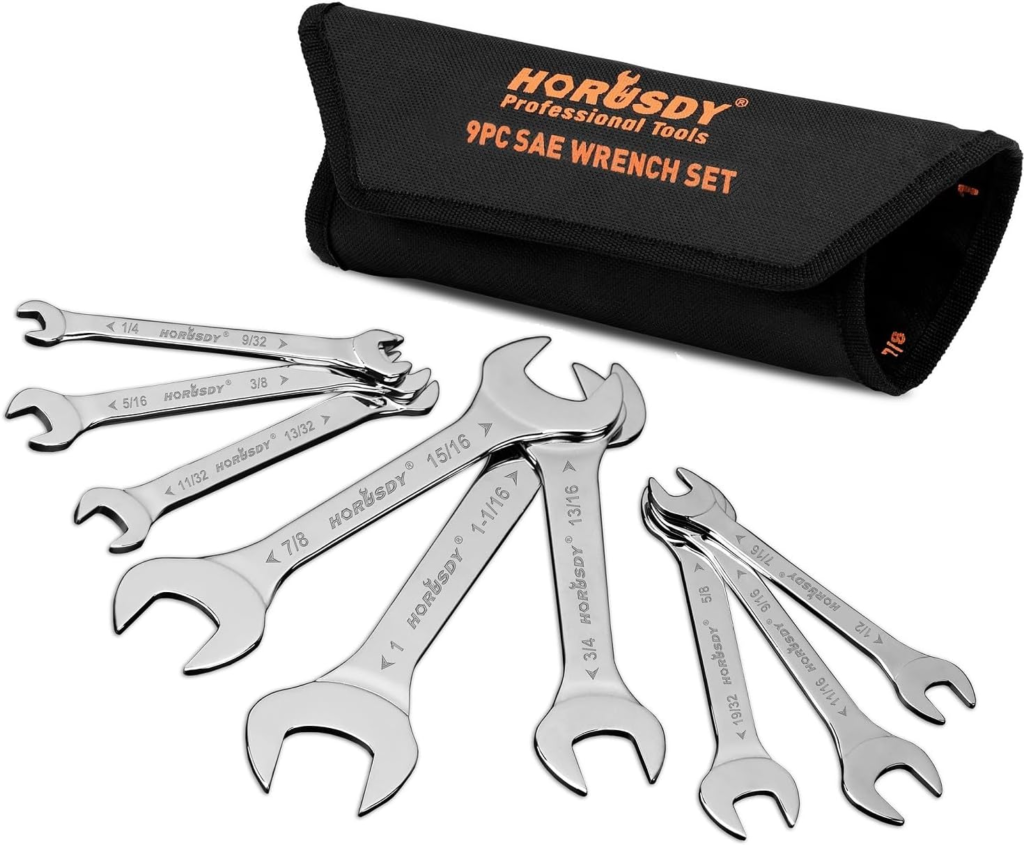
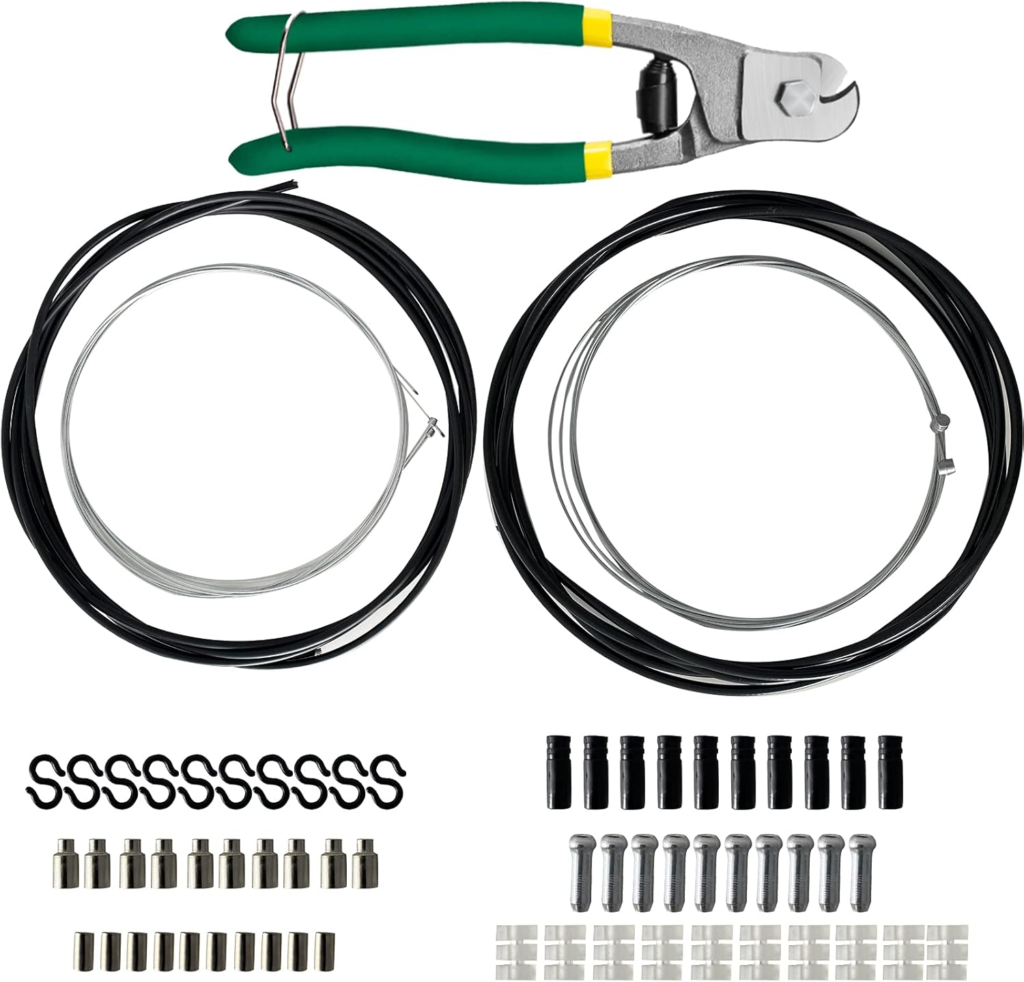
If you’re thinking about getting into the ebike building or assembling business, there are a few essential (and many more not so essential) tools you’ll need to get started. Following is a list of many of the tools you might consider owning in order of important at the top of the list through ‘nice to have’ at the bottom.
Important:
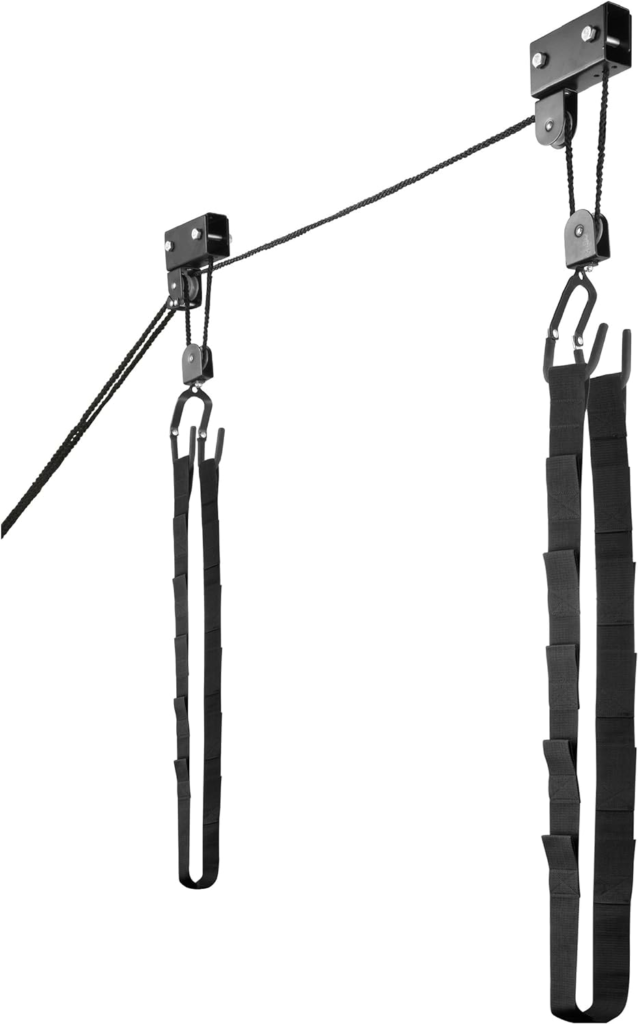
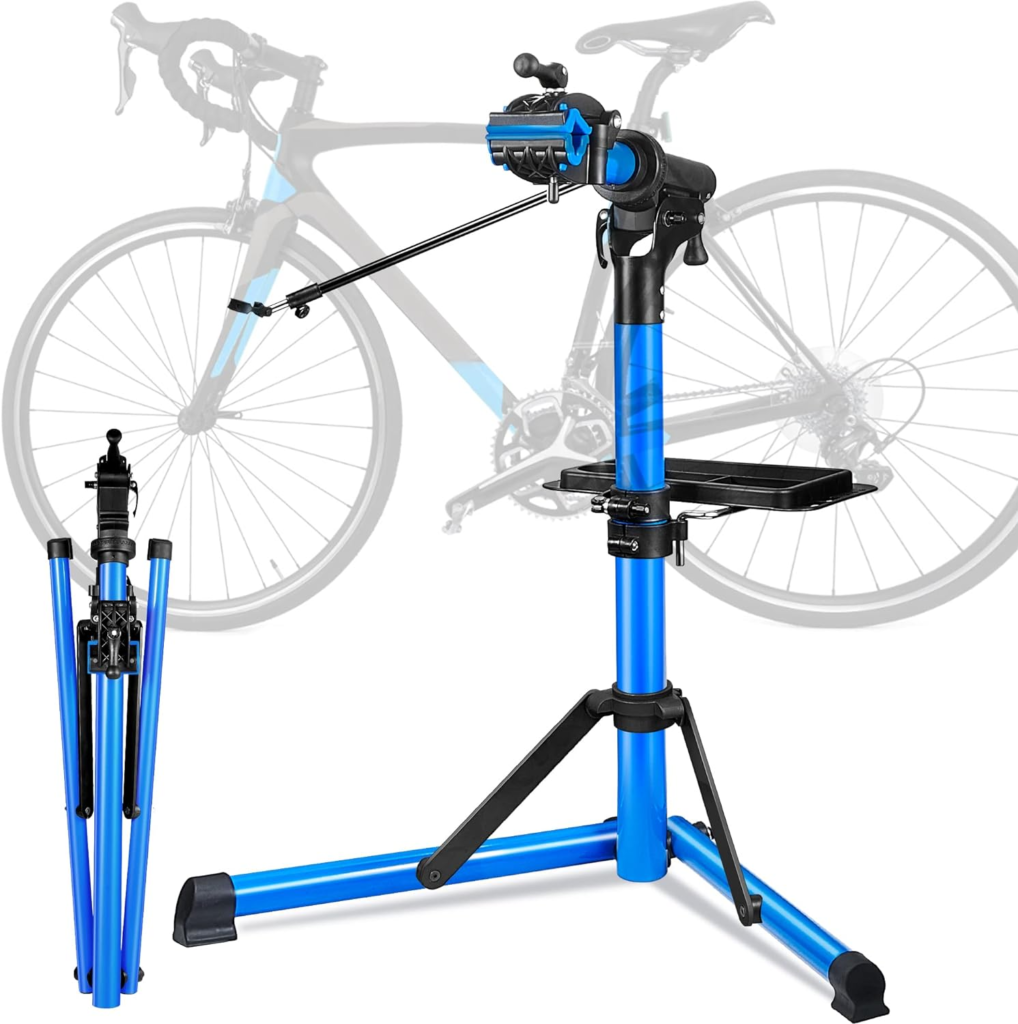
Bike stand, or another way to elevate your heavy ebike for maintenance. Personally, I use a garage hoist system, because I can and it works for me:
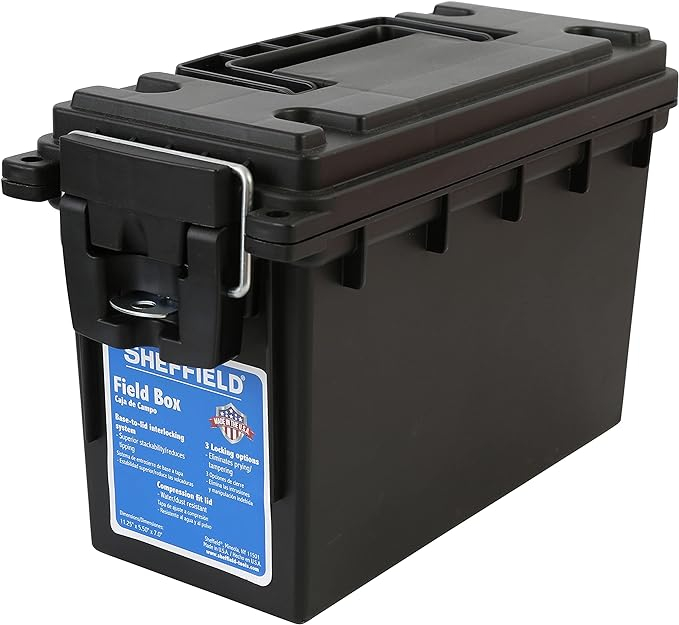
Next up is a place to store your tools. I use an ammo box since my tools travel, but having a good place to store your tools so they’re easy to access when needed is inportant:
I just use a rechargable bicycle headlight when I need additional light on my project, but better might be an actual hiker’s headlamp to help direct light to where it’s most needed:
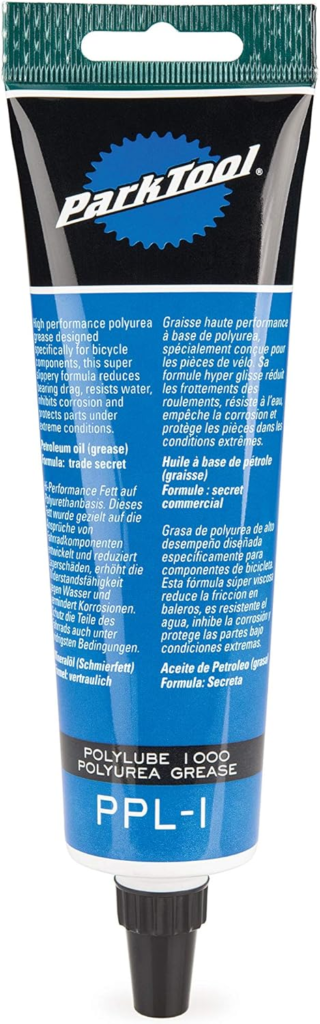
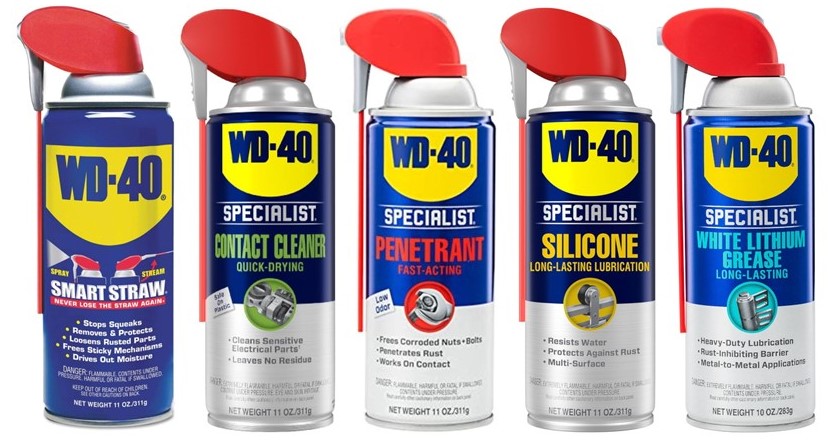
And of course, the cure-all/fix-all, WD-40 – never leave home without it. Now available in many flavors…
Wow, that’s a long list! I’m sure I’m missing a few items, but this should at least get you started on your ebike building and/or assembling adventure.
Enjoy!
Posted inUncategorized|Comments Off on Tools for the ebike builder/assembler
Since this is a blog about electric bikes, you might be thinking that I’m going to talk about ‘torque-sensing’, but I’m not. I want to talk about ‘torque’ with respect to all the important fasteners on your ebike. You know, like to Allen-head bolts that hold your handle bar on so it keeps your front wheel going in the right direction and the handlebar doesn’t pop off when you least expect it – that would be a BAD DAY! So here goes:
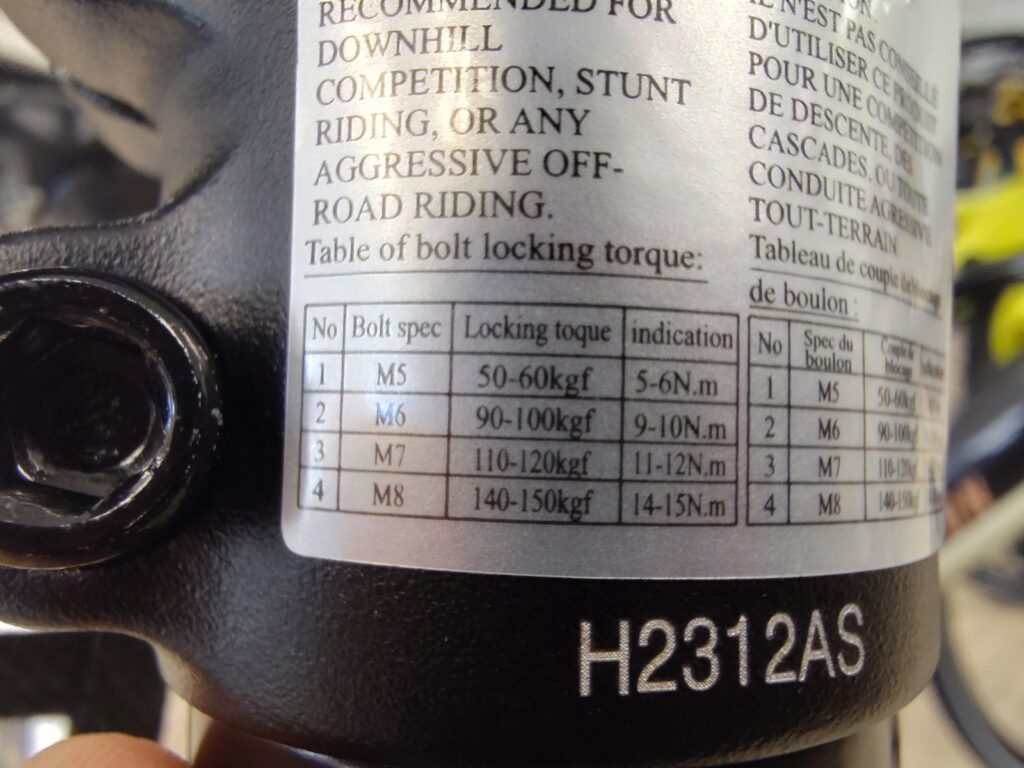
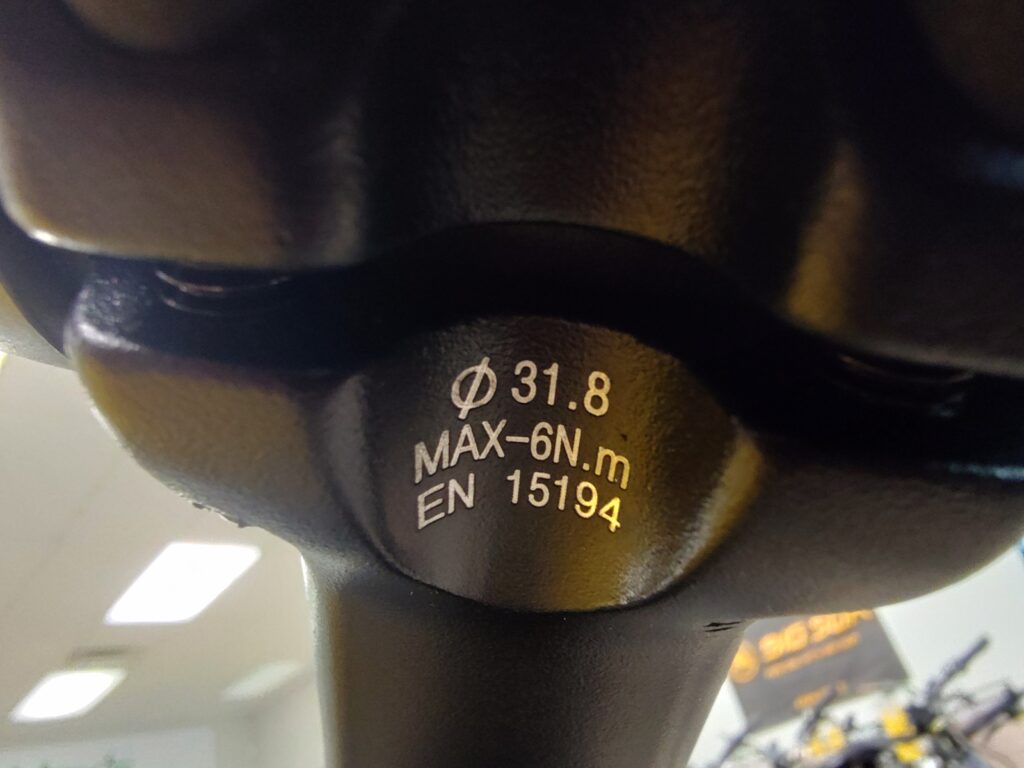
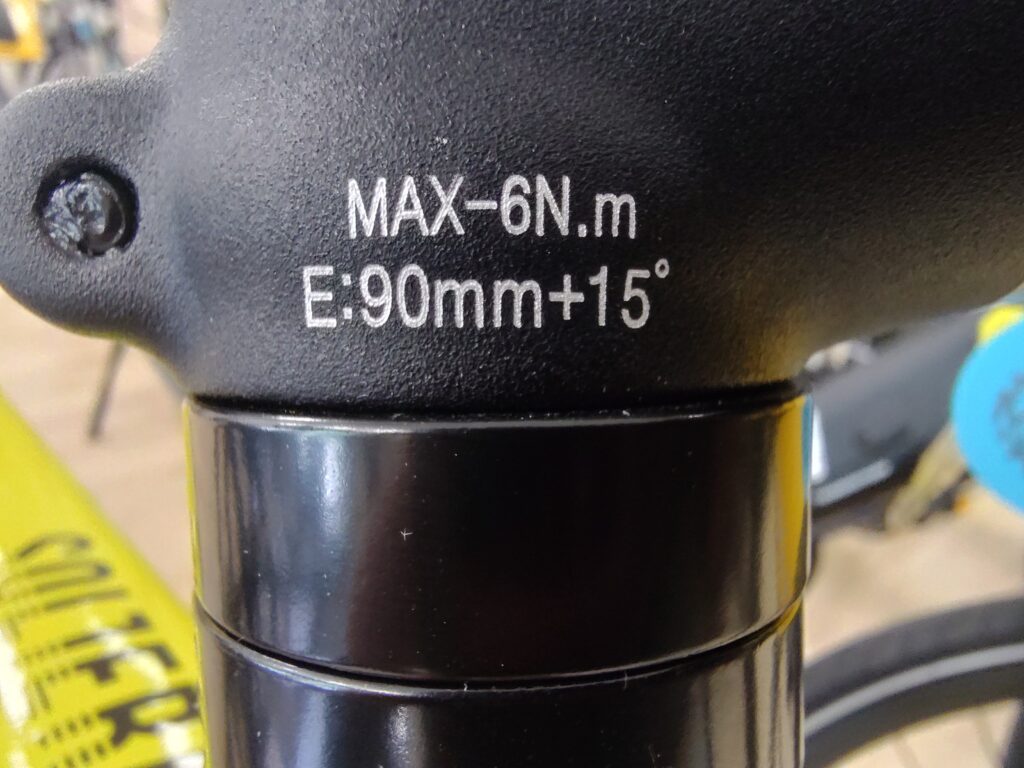
Many modern ebikes have ‘bolt torque specs’ printed on the important parts, like this:
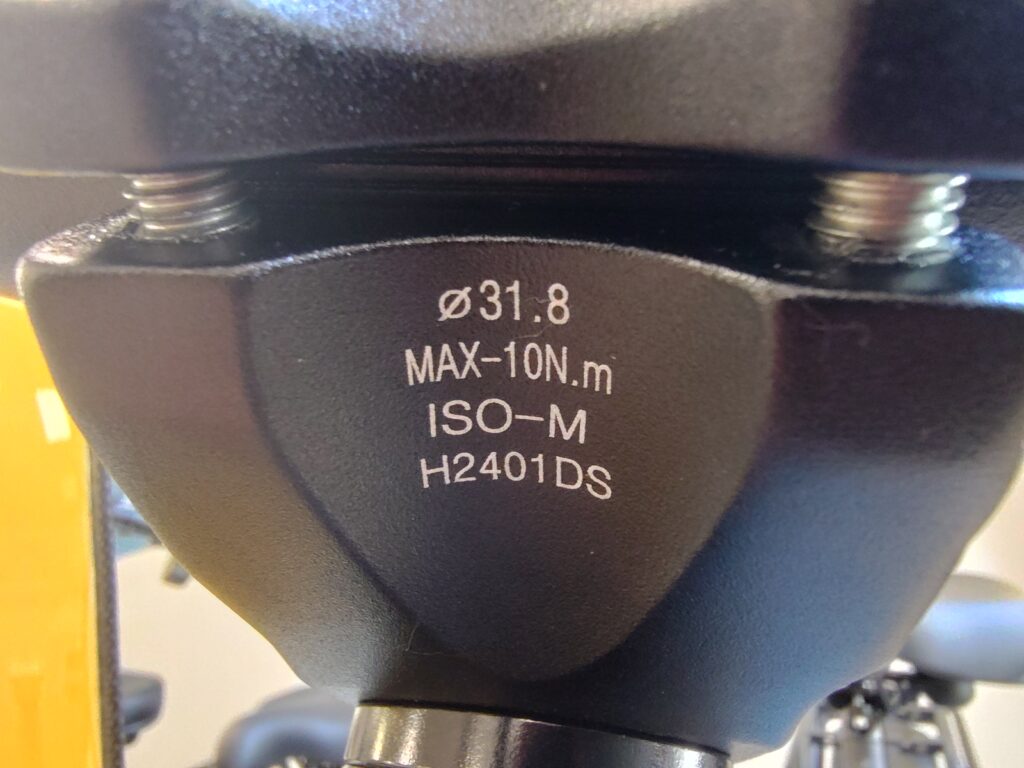
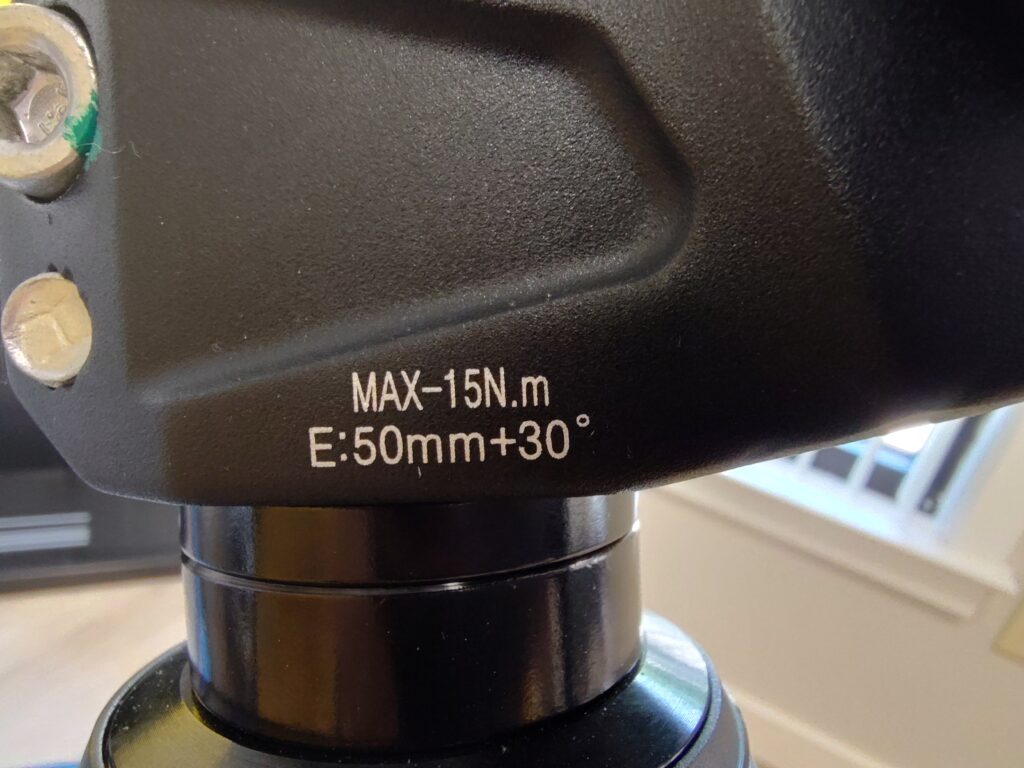
Or have a microscopic eye-chart located somewhere on the bike, like this:
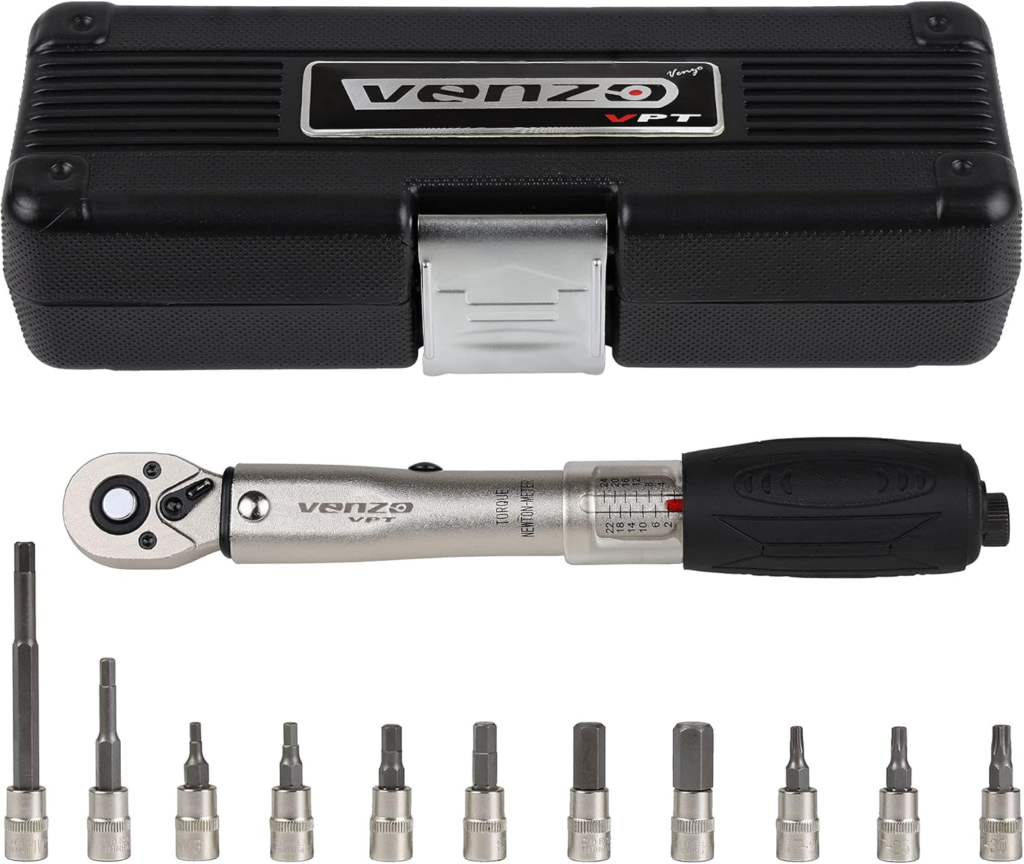
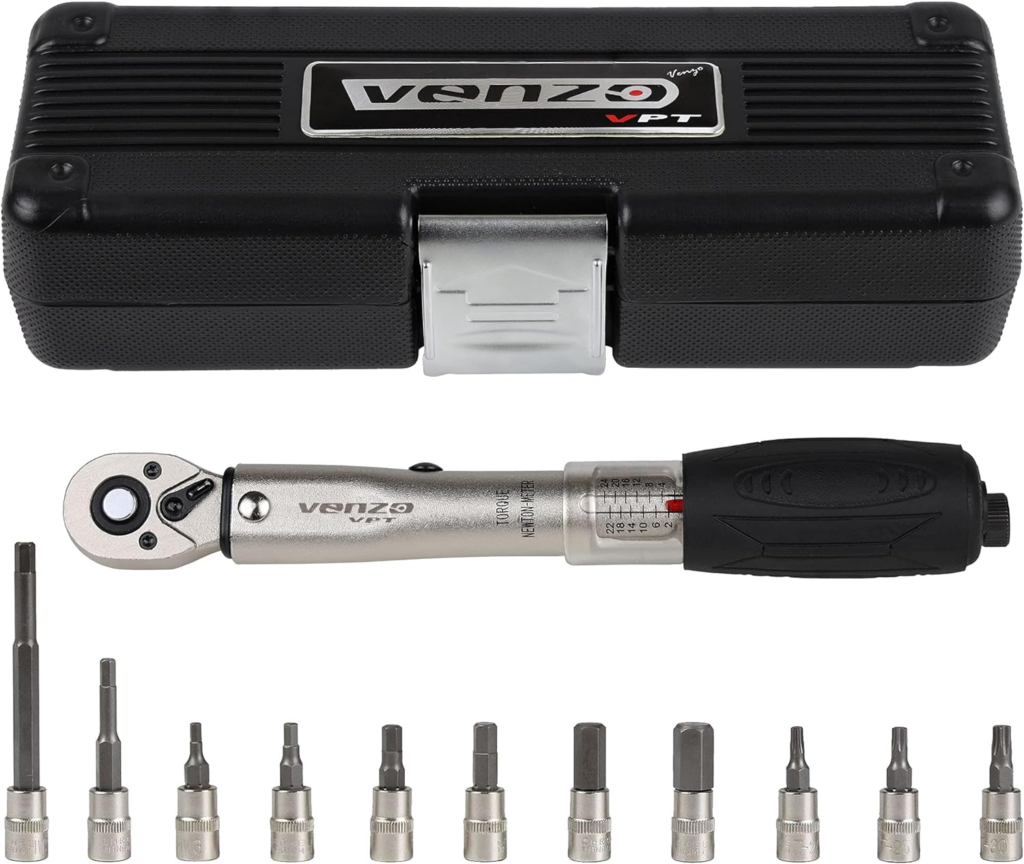
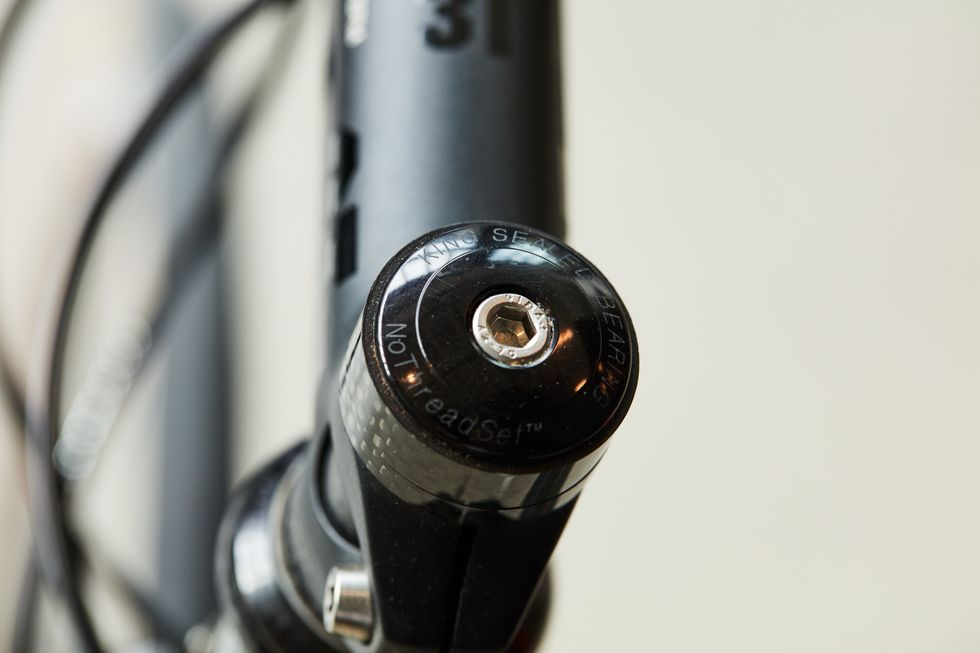
So this begs the question “how would I know when I have the right torque?” when tightening a specific bolt, now that I know how much it should be. Well, I’m glad you asked. It turns out that some clever engineer designed a ‘torque wrench’ for just this purpose. And here’s the one I use daily. This is the Venzo 1/4 Inch Drive Click Torque Wrench Set from Amazon:
There are other sets available, but this one works for me. But let’s continue with some other useful information one should know about one’s ebike, starting with vocabulary.
Stem/Bar ‘Faceplate Bolts’ – 6N.m when 4mm Allen bolts are used, 10N.m for 5mm bolts
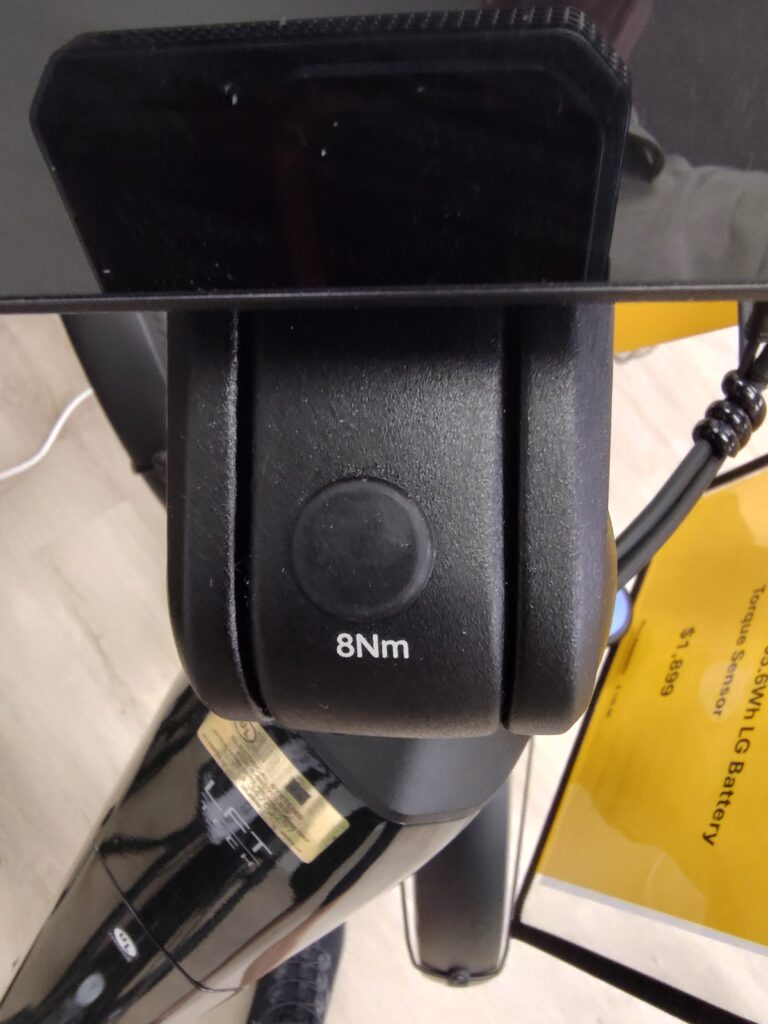
Stem/Bar ‘Top Cap Bolt’ – typically 8N.m
Stem/Bar ‘ Fork Tube Pinch Bolts’ – 6N.m when 4mm Allen bolts are used, 15N.m for 5mm bolts
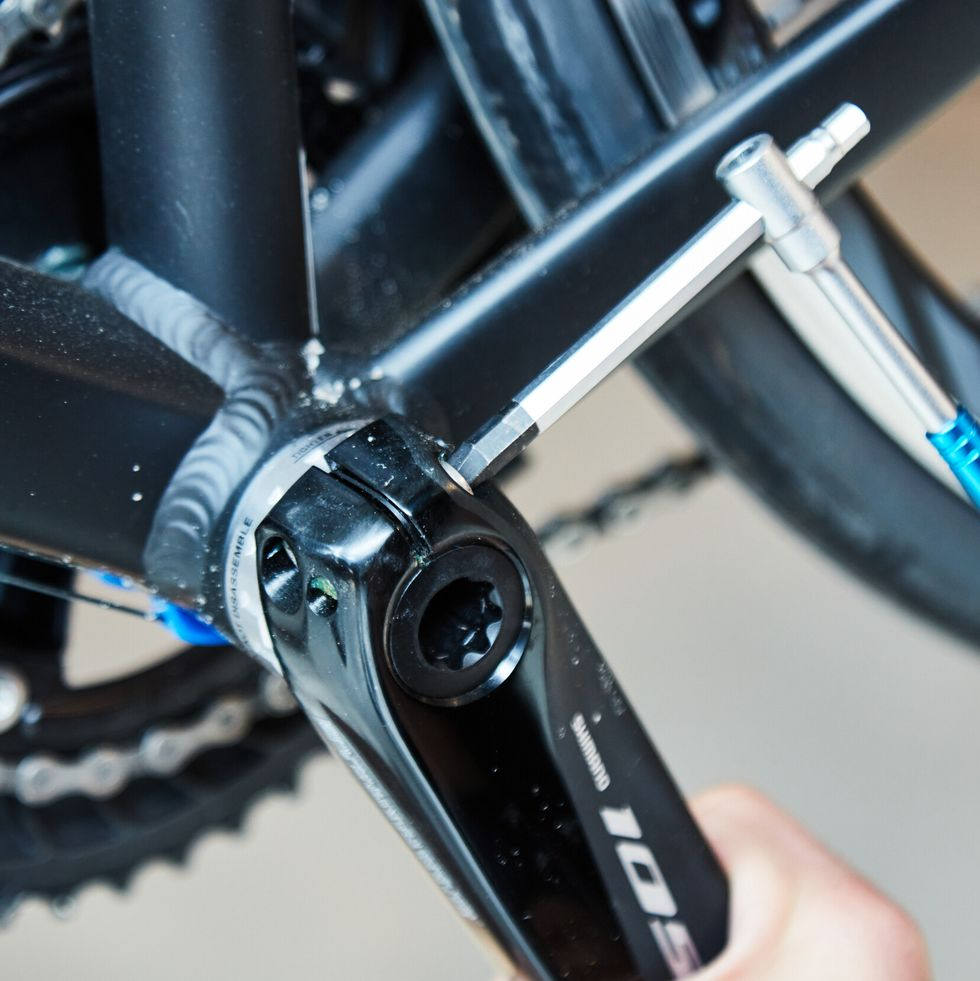
Crank Arm Fixing Bolts – typically 35-40N.m
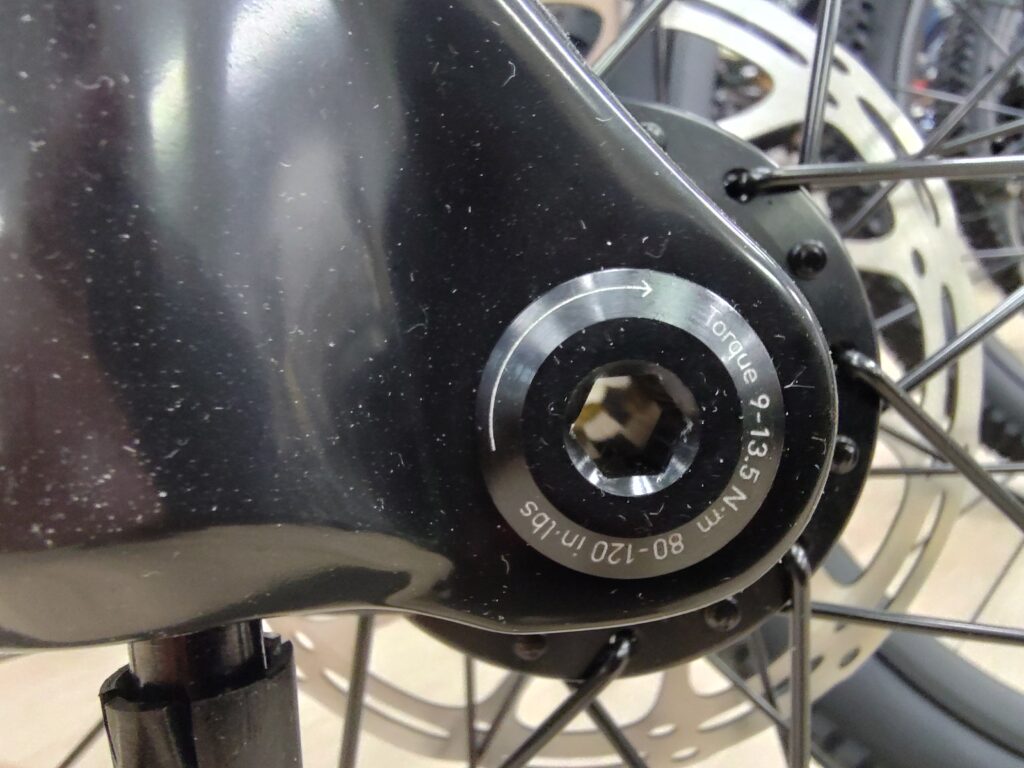
Thru-Axle (front) – 9-13.5N.m as specified
Rear Axle (for rear hub motors) – typically 35-40N.m
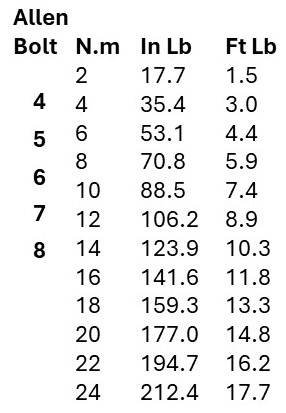
And this is just a few of the parts where proper torque is most important. Handlebars, pedals and wheels falling off does not make for a good day. When torquing other parts like chainring bolts, the derailleur hanger bolt (ebikes usually have only one rear derailleur), disc brake cable anchor bolts and disc bolts, saddle clamp bolts, shift/brake lever bolts, brake caliper bolts, and such I use the following chart as a guide. This provides a torque range to different size Allen bolts which is a good starting place. At the end of the day, too little torque can result in a loose part and too much torque can strip the threads on your expensive bike, so this is also bad!
The left column shows Allen bolt head size, and to the right, the approximate torque values. Use this only as a guideline should the respective parts on your ebike don’t happen to have torque values stamped on the part.
Posted inUncategorized|Comments Off on A word about Torque – ’cause it’s important!
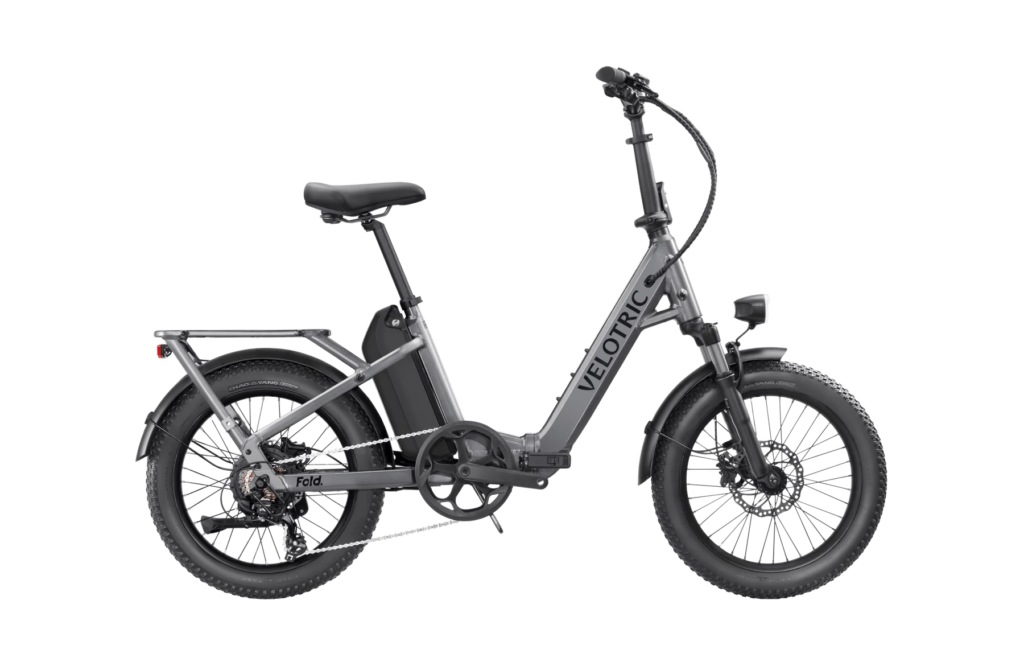
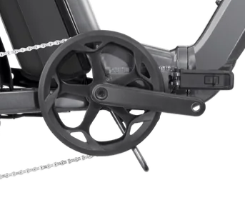
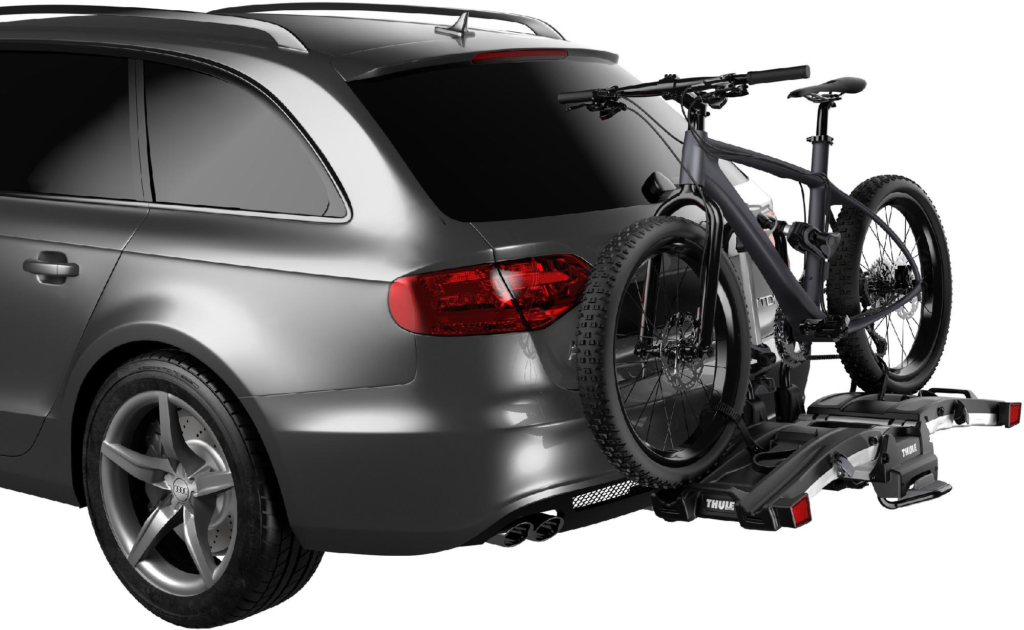
If you happen to have purchased a Velotric Fold 1 folding e-bike recently:
You’ll notice a metal bracket that hangs down below the chain ring. This protects the chainring when the ebike is folded, which is a really good thing. But…
When it comes to loading your ebike (assembled, not folded) on a bike rack designed for electric bikes, this bracket can be a problem. Solution…
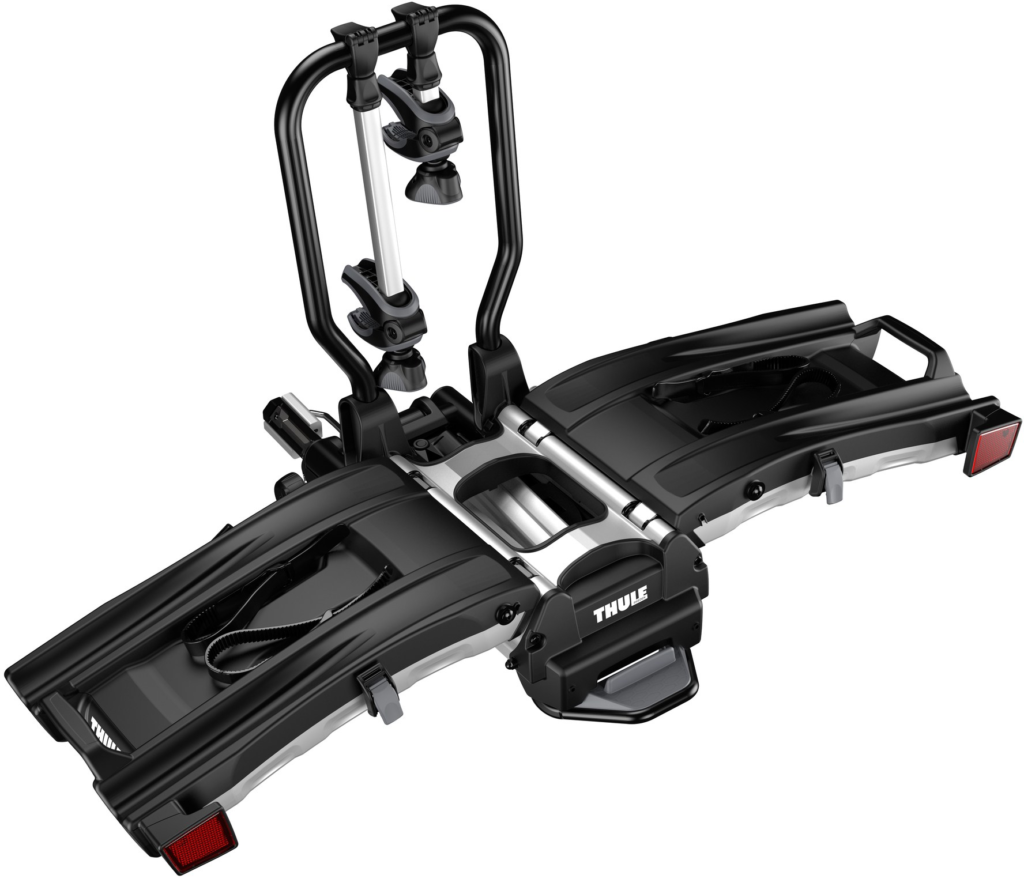
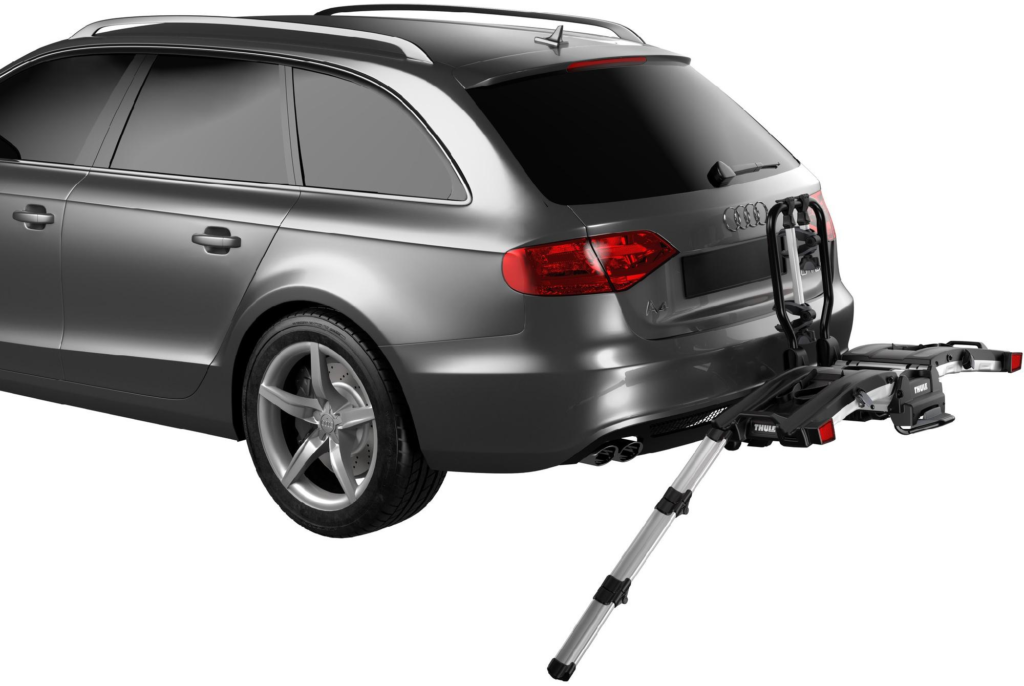
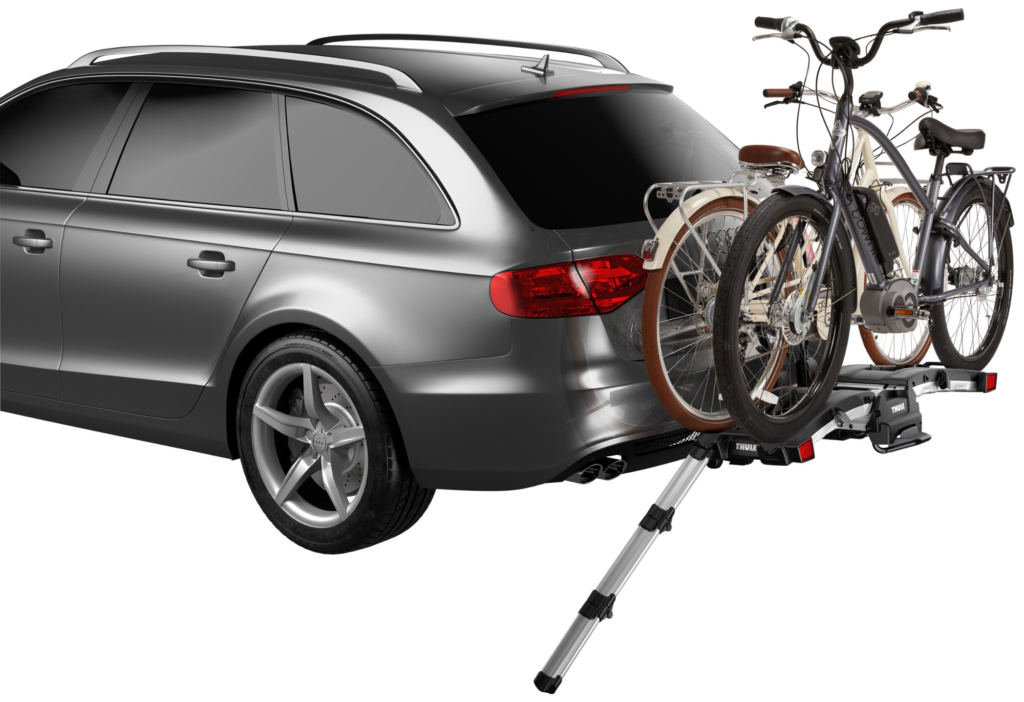
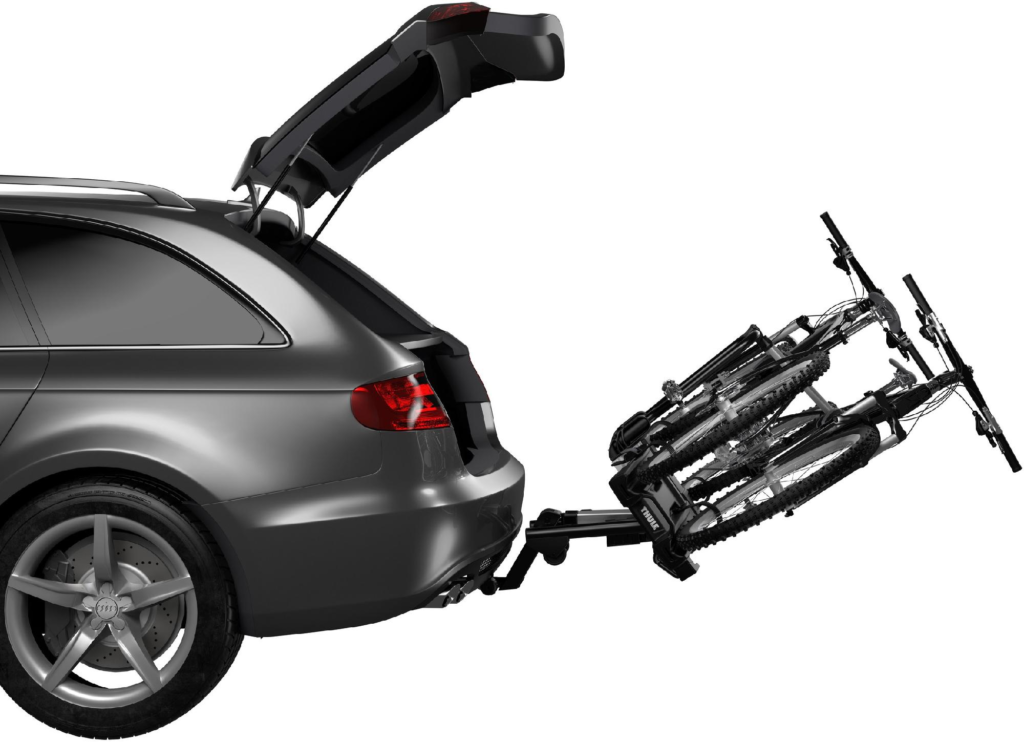
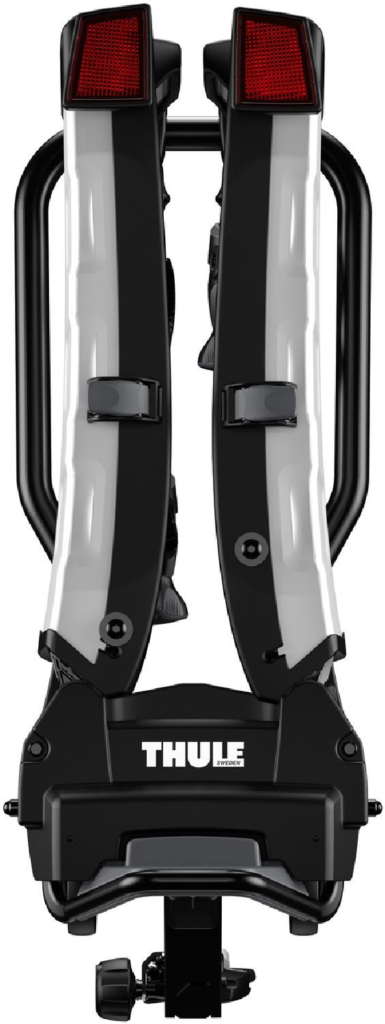
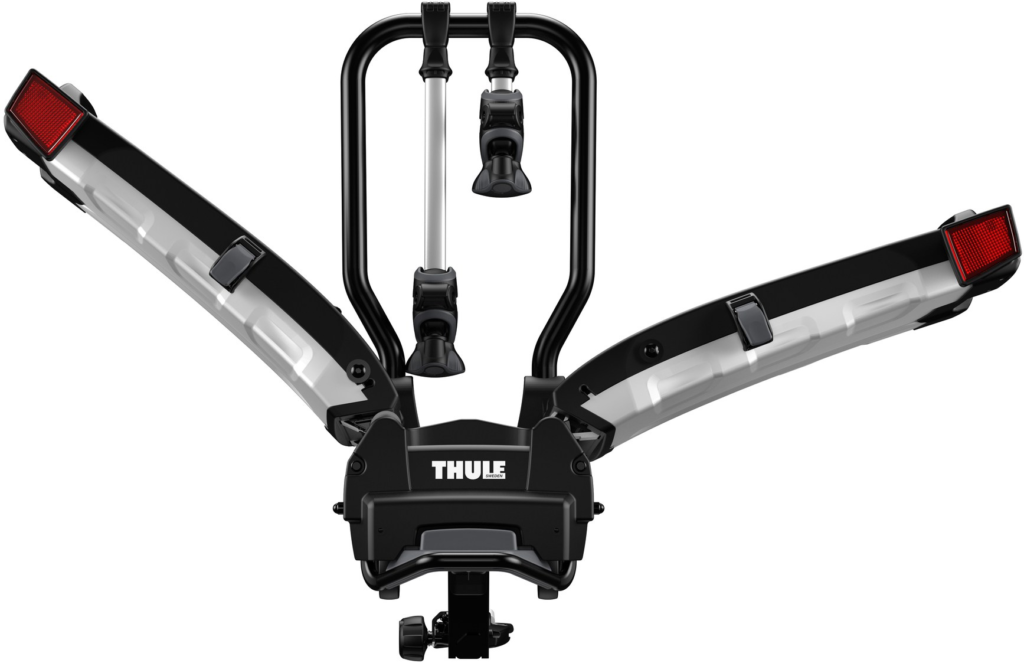
This is the Thule EasyFold XT 2-Bike Hitch Rack available from REI for $850, or (as of 9/21/24) from Amazon for about $750. And yes, it’s expensive, but it has a ramp and it’s really well designed. So if loading your Fold 1 on a Hollywood ebike rack isn’t working out, the Thule rack just might be the answer. Here’s what a Fold 1 looks like on Thule’s EasyFold XT rack:
And here are some more images of the Thule in action:
PS – One great feature of this rack versus other racks designed specifically for ebikes is its weight at 45 lbs. My Hollywood rack, which I love, is a bit heavier at 54 lbs… And a downside to note is that this rack, unlike many others on the market, does not fold up flush with your car’s tailgate. This rack will always extend out some distance from the back of your car, and it’s small enough you probably won’t remember its there. Great rack, but you have been warned. Oh, and it folds up like suitcase, with handles, so it’s convenient to carry and store. All said, it’s just a really great rack – for a little less than $800 after PA sales tax…
Posted inUncategorized|Comments Off on A bike rack to consider for your Velotric Fold 1
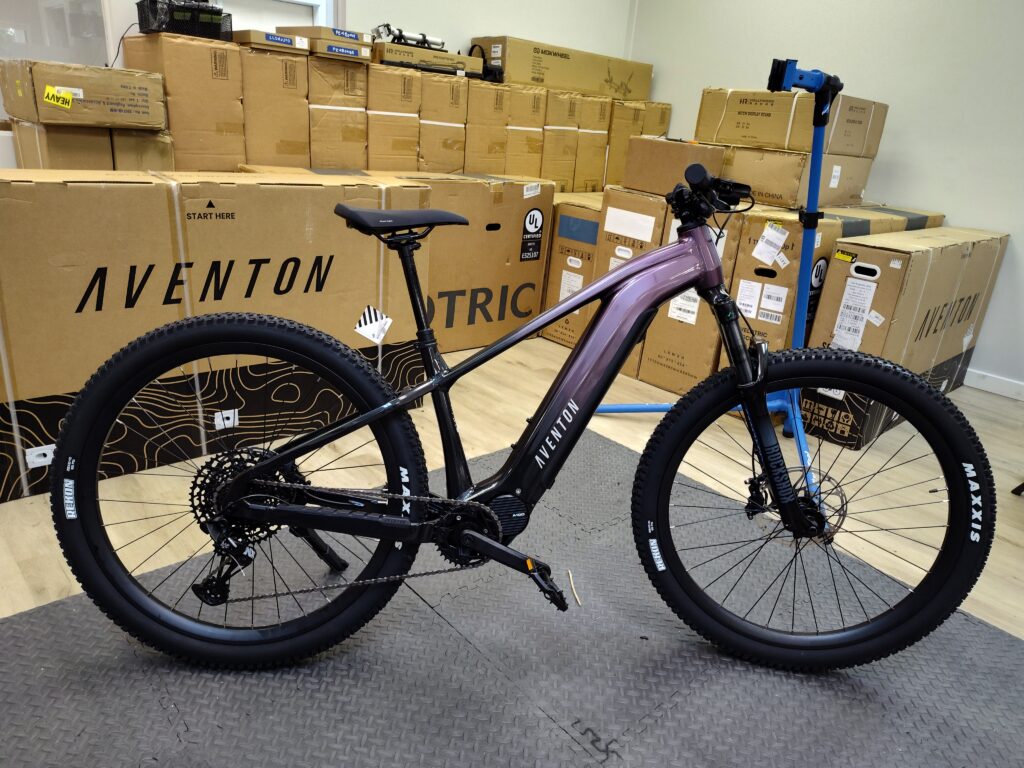
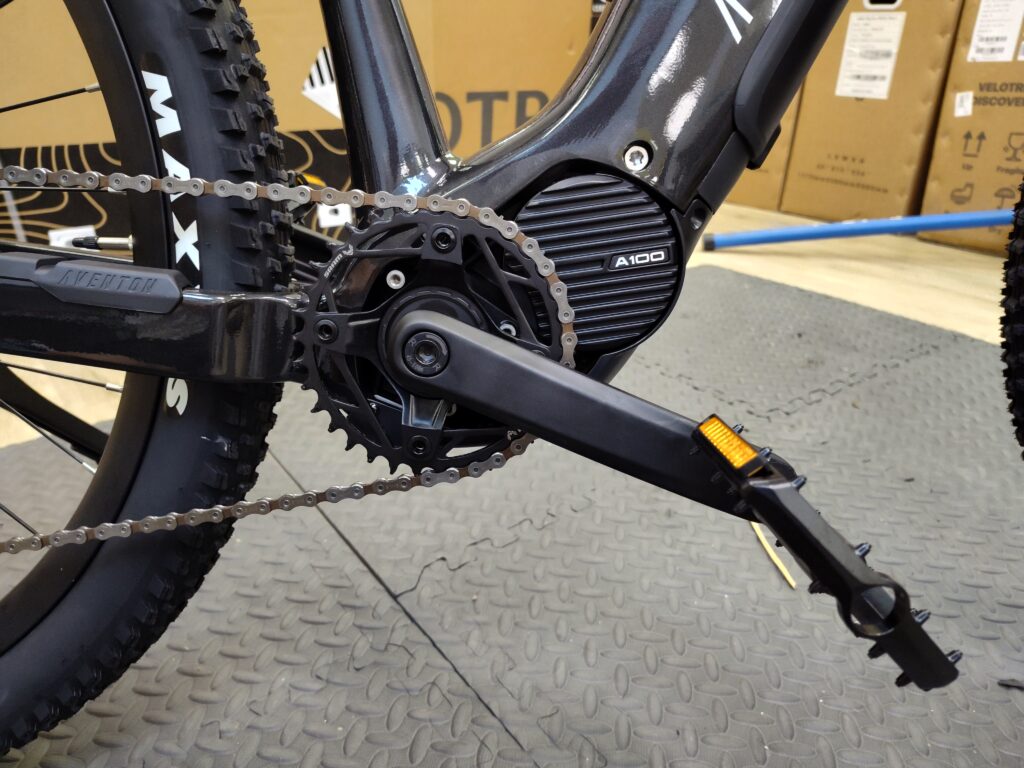
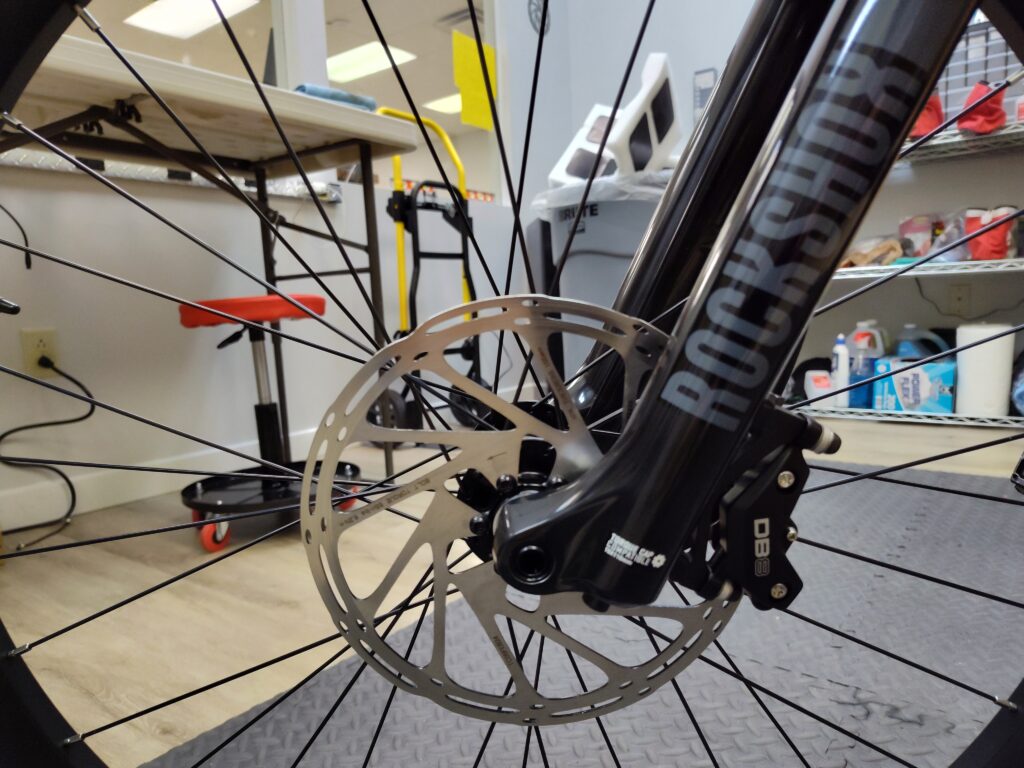
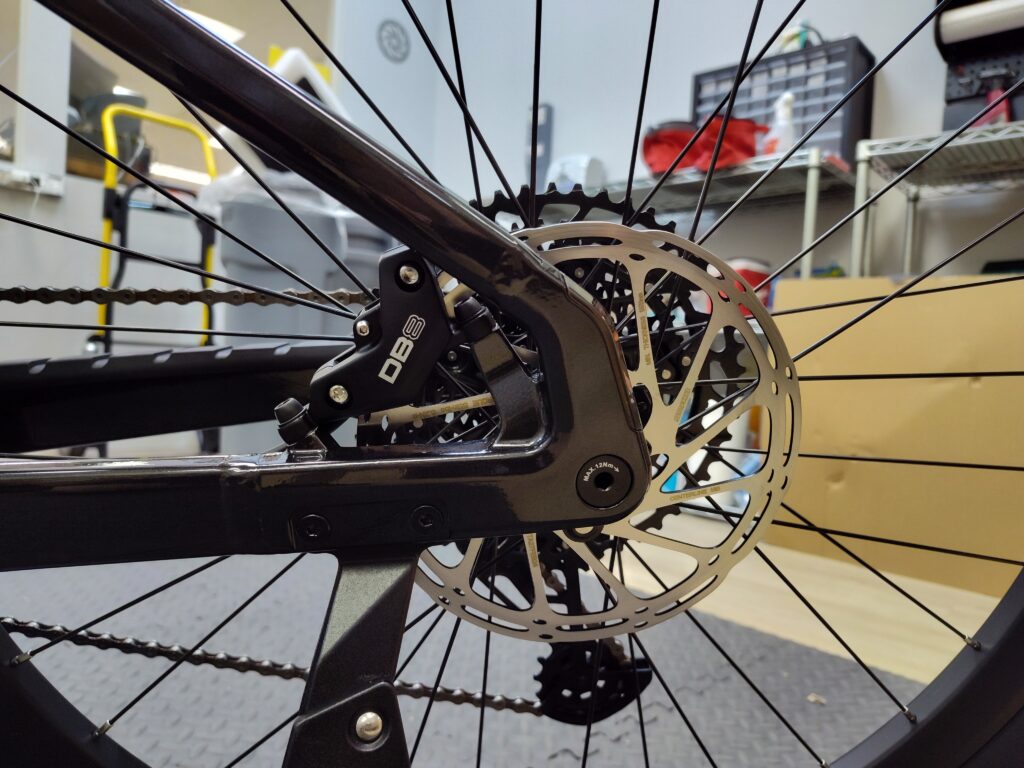
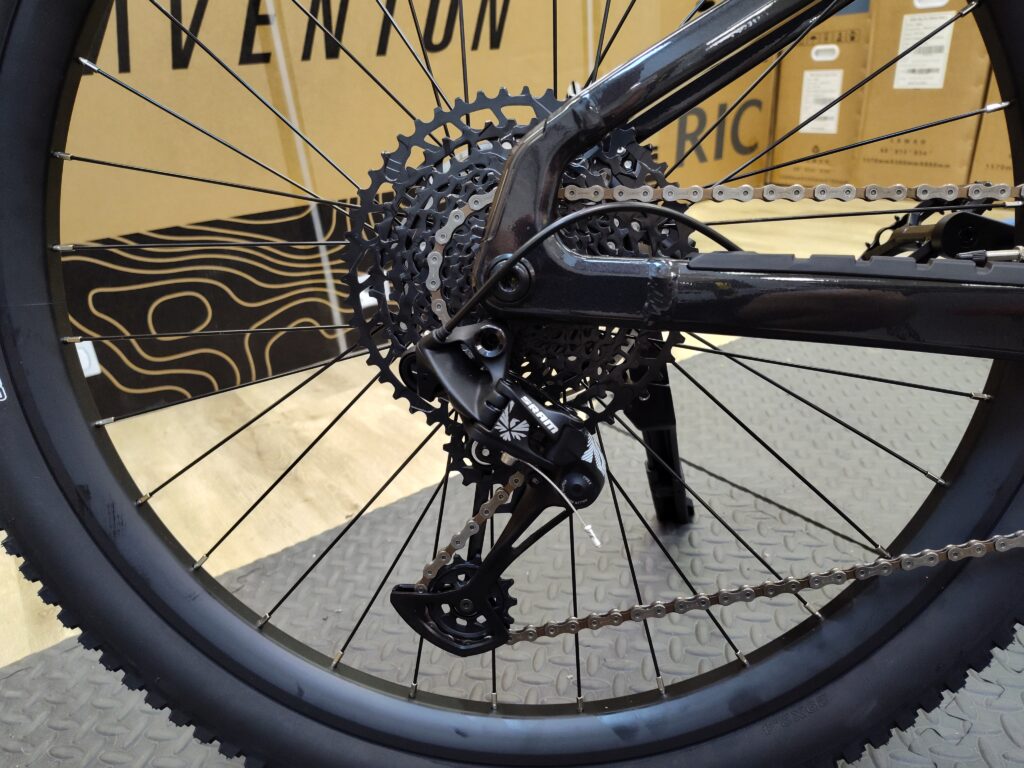
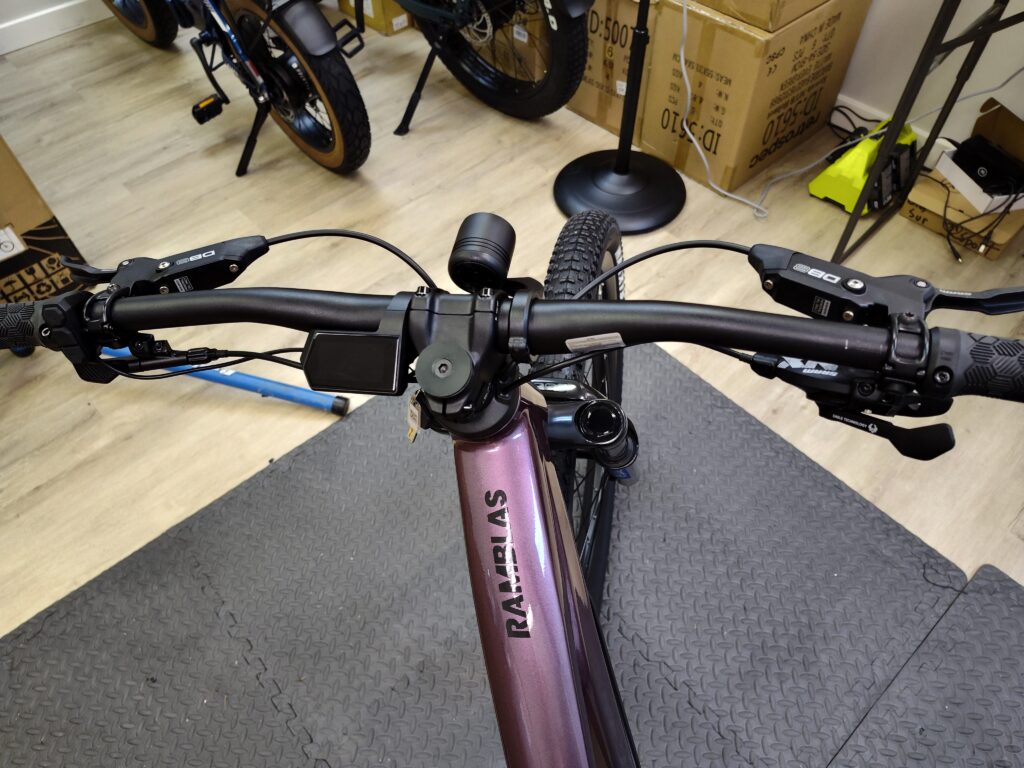
I like a lot of what Aventon has to offer, but their mid-drive Ramblas is eMTB perfection! But before I go on, feast your eyes on this:
Normally, I like to find little imperfections in an ebike build that I can complain about, and usually say that “a bike has good bones, but I would change this and that.” Not so with the Ramblas. Build quality is AMAZING! Components are great. And its design rivals that of much more expensive hard-tail electric mountain bikes. And then there’s the price. $2899 (for all 4 sizes S, M, L, and XL) sounds like a lot (at least it does to me), but considering what you get for the money the Ramblas is a really good value. And here’s what you get (hold on to your bike helmet, there’s a lot!):
Technical Overview
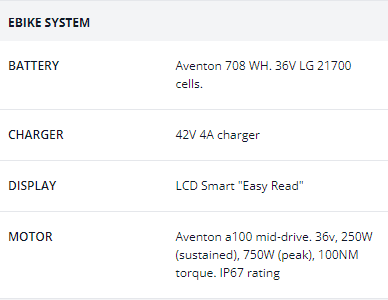
“Ramblas comes out of the box as a Class I ebike, with pedal assist and a top speed of 20 MPH. Aventon’s Ramblas is built to the IP67-rated standard. IP67 rating means it’s protected against the effects of immersion in water to a depth between 15 cm and 1 meter. IP67-rated products are referred to as waterproof vs only water-resistant, so you can cross creeks, and ride in rain and mud without worry.“
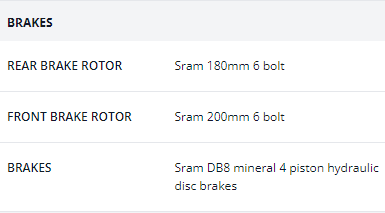
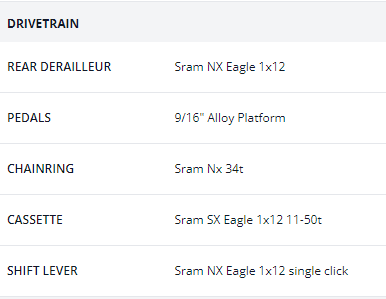
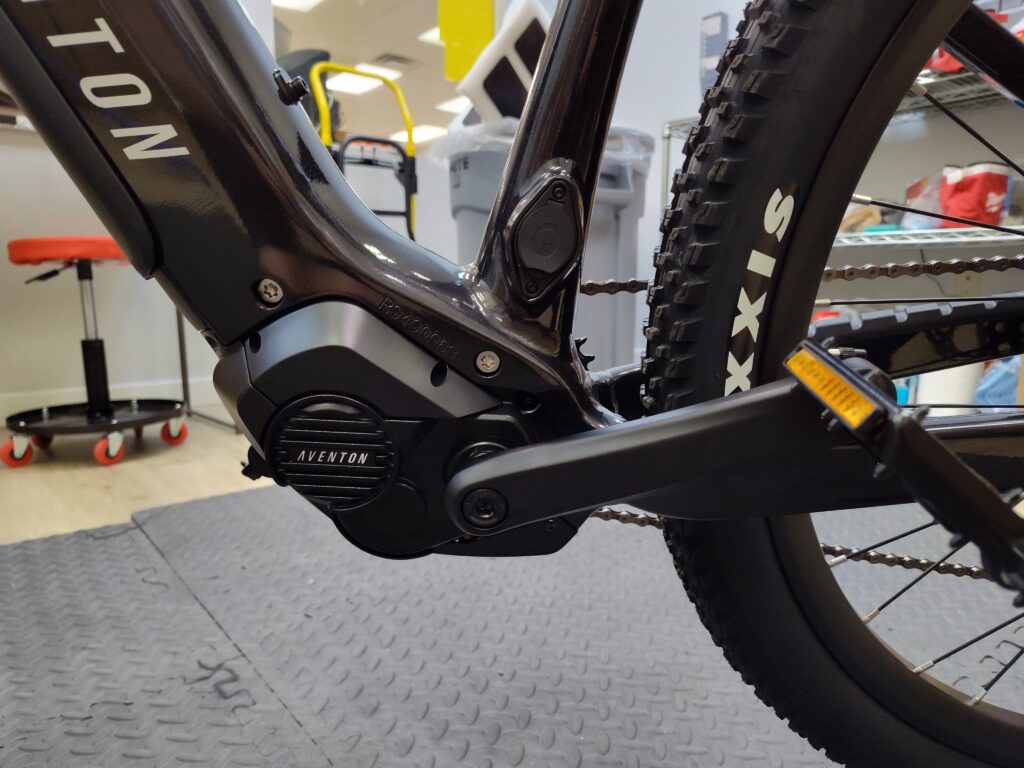
I told you it would be a lot! I especially like that they’re using LG 2170 cells in the battery, that the motor is IP67 rated, that it has 4-piston hydraulic brake calipers with properly size discs (180mm front, 200mm rear), and they’re using a 12-speed cassette (11-50 tooth) sprocket with single click shifter and 34 tooth narrow-wide front chain ring.
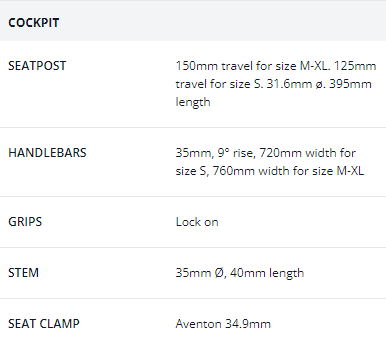
Since I’m 6’2″, I think I would stick with the XL frame, and if handlebar position isn’t quite right, an adjustable handlebar stem might be required. Other than that, I think Aventon has got this Class 1 eMTB completely dialed in. Oh, and of course there’s the mandatory mirror and bell needing to be added.
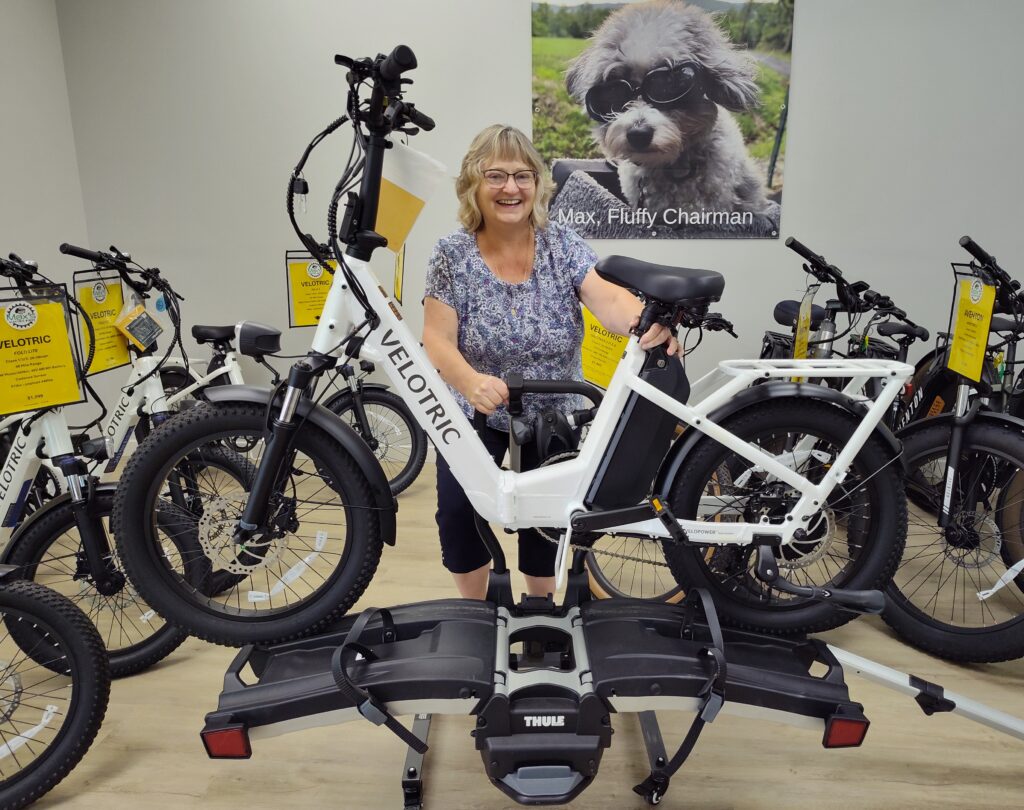
Here are some pictures I took of a Ramblas I assembled this morning at Max’s Electric Bikes in Doylestown, PA. What a bike!
And after all the great things I said about the Ramblas, I do have a complaint, which is with the marketing department, not the bike – so here goes:
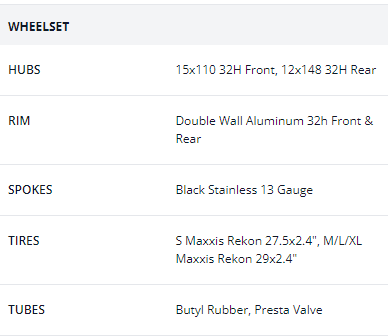
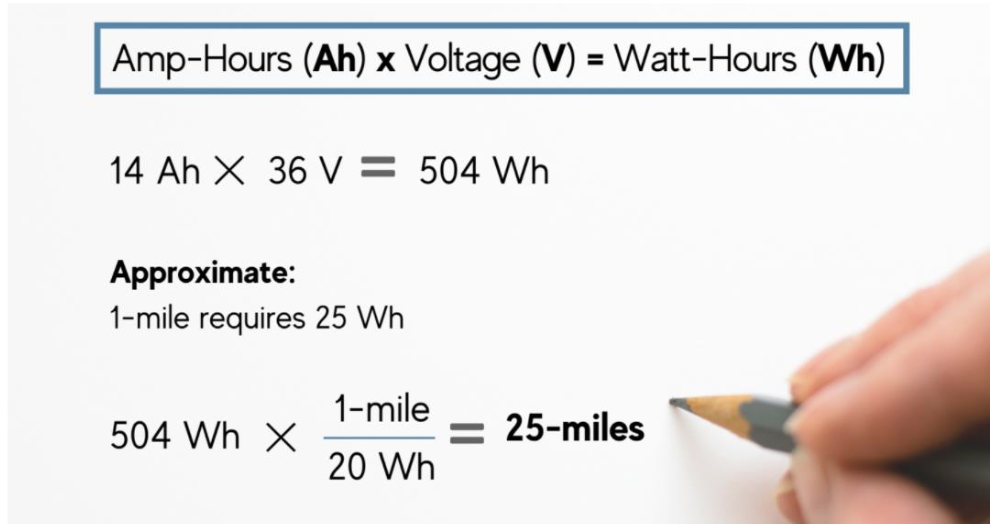
In the ‘General Info’ section, you’ll see ‘Range: Up to 80 Miles‘ – what? Let’s do some quick math (which you can find in one of my recent e-bike presentations here) – example:
For the Ramblas we have a 708Wh 36v battery. 708Wh/36v gives us a 19.67 (round to 20) Ah battery – not bad. But throwing that back into the equation 708Wh/20Wh per mile = 35.4 miles. So that’s what you can expect from your battery power-wise. Now factor in the lack of a throttle, which means you’re always pedaling when the bike is moving forward. So perhaps they’re factoring in an equal amount of rider energy for each watt-hour of battery energy used. That makes some sense, but I still think the 80-mile number is kind of misleading.
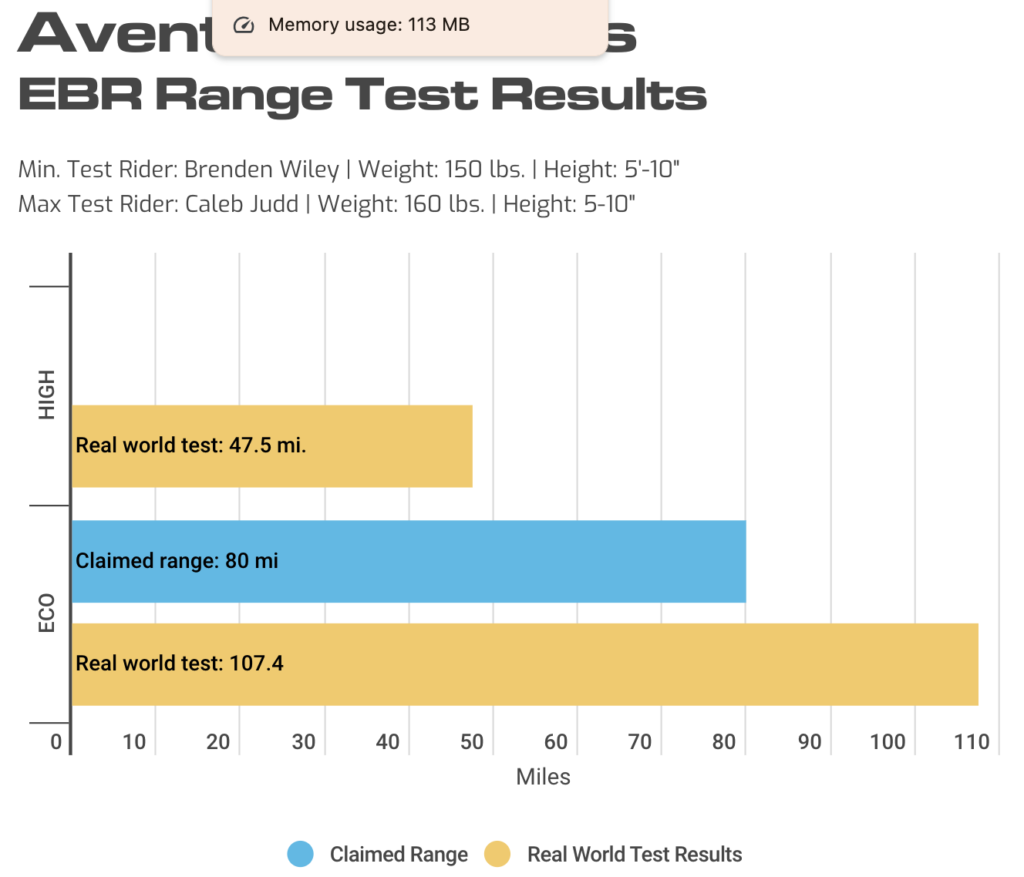
On the other hand, Electric Bike Report did conduct an extensive range test and here are their results:
In conclusion, they wrote, “
“In short, the Aventon Ramblas delivered an impressive performance. Set to Sport, its max PAS setting, we rode an incredible 47.5 mi. at an average speed of 17.5 mph, with roughly 1150 ft. of elevation change.
Set to Eco, its minimum PAS setting, the Ramblas was even more impressive. It rolled along at an average speed of 13 mph for 8:12, for a total mileage of 107.4, with 2224 ft. of climbing.
To put this in perspective, consider this: The Aventon Ramblas is one of only five e-bikes that we’ve tested that gave more than 100 mi. of range. It’s max power test was the fourth longest we’ve ever tested too. Given those results, 80 miles on a single charge of trail riding sounds realistic, and it makes it one of the more impressive eMTBs in terms of range.”
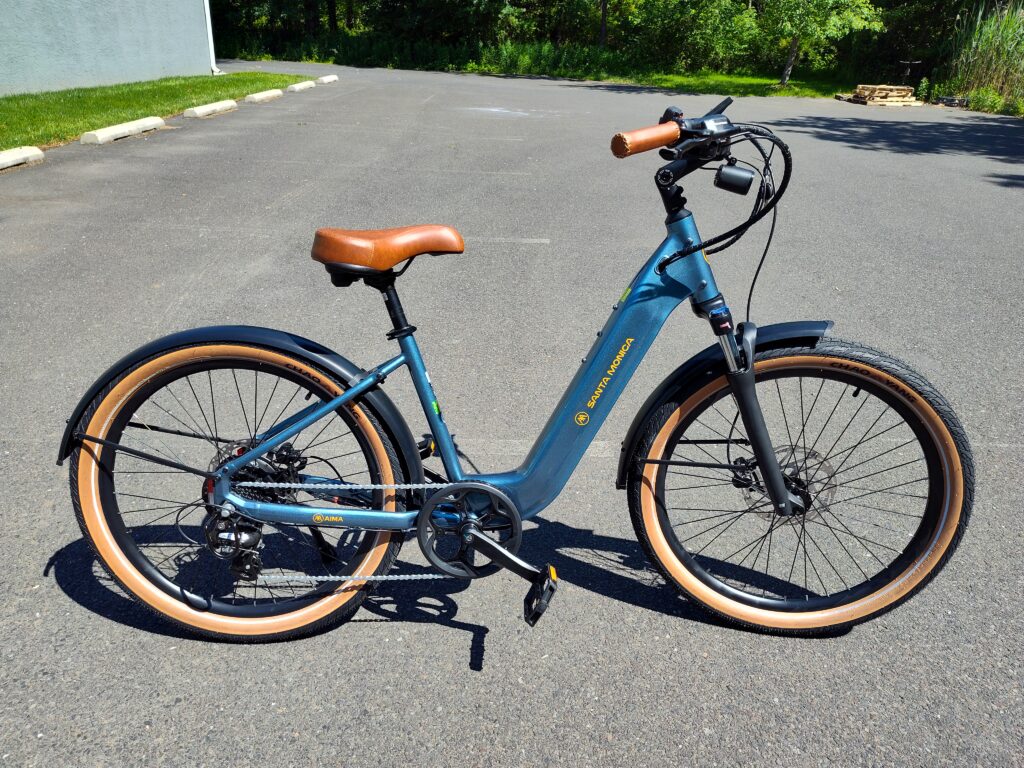
This is the AIMA Santa Monica, and what’s so impressive about this particular e-bike is the quality of the build. Usually, I would spend another 200 to 300 dollars after purchasing an e-bike upgrading substandard parts. Not so with the Santa Monica (or with any of AIMA’s bikes for that matter). Let me explain:
Here’s what you get with this factory build that I think are great features:
27.5″ street tires, not knobbies
Torque sensing pedal assist, not cadence
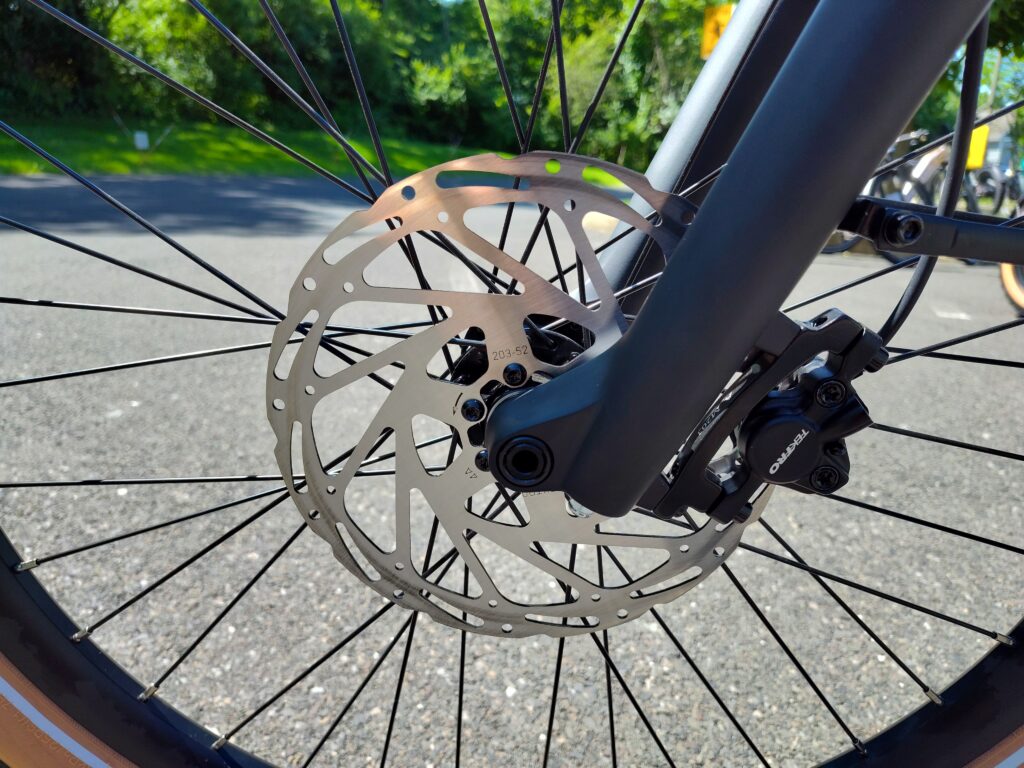
203mm brake rotors AND good quality hydraulic brakes (rotor size matters!)
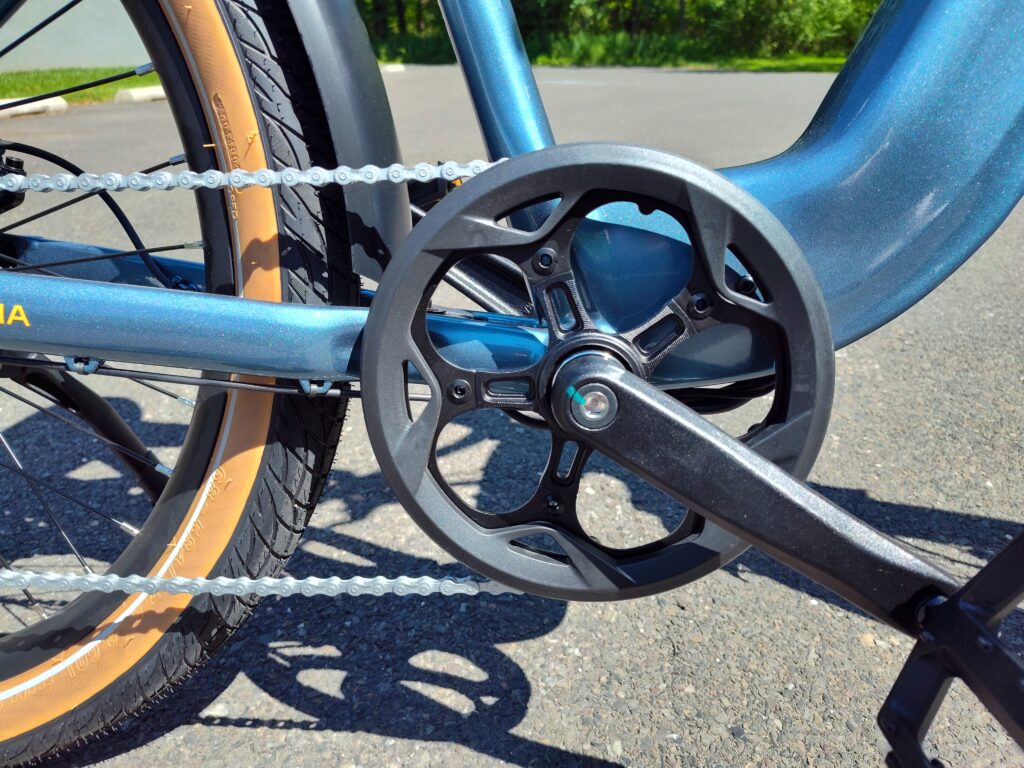
Large (52 tooth) crank set, let’s you keep pedaling at speed
Good quality rear derailleur and gear ratios (11-34 tooth)
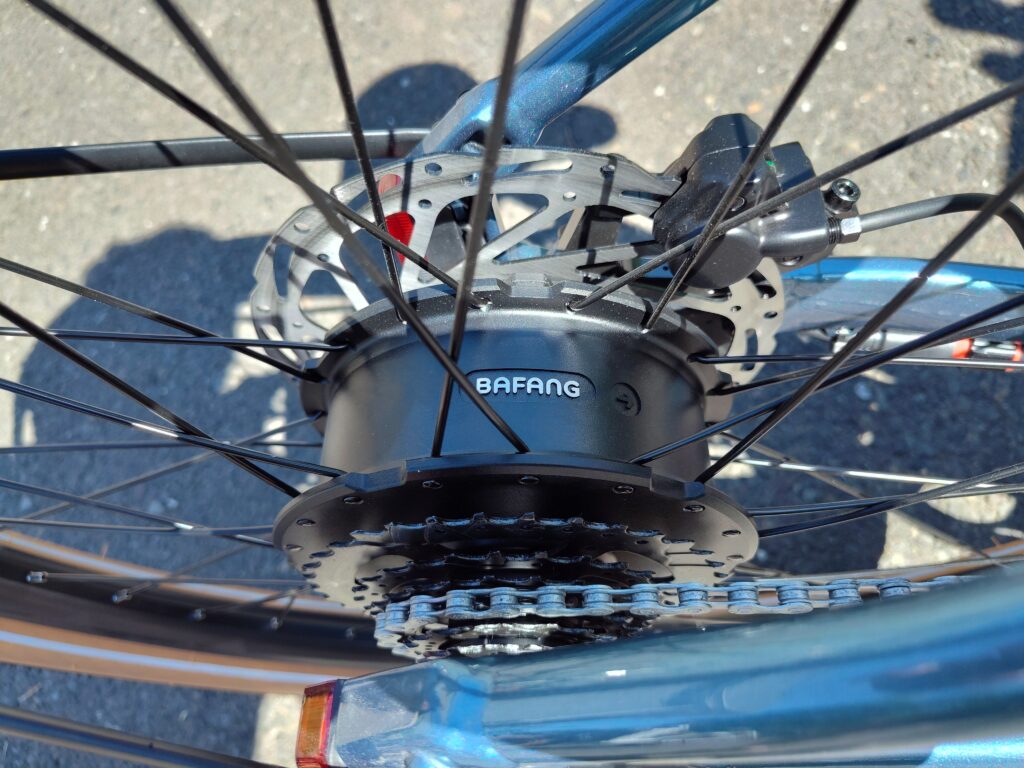
Bafang motor and long range, high quality battery (uses LG cells)
Turn signals, horn, and headlight
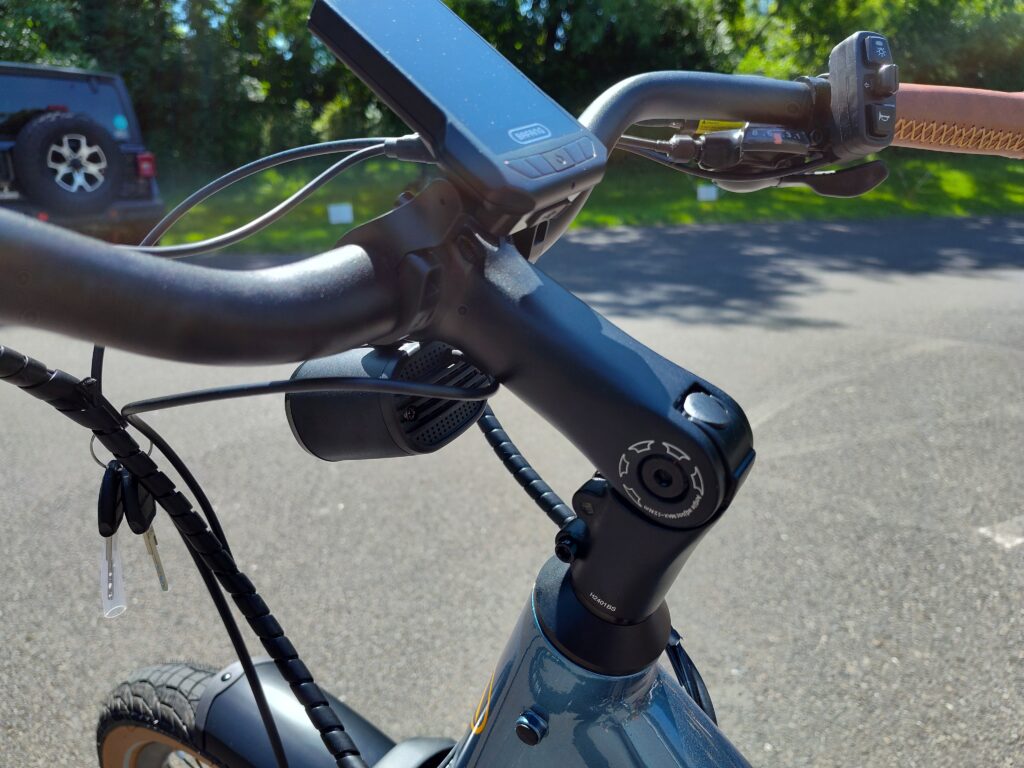
Adjustable handlebar stem (important but hard to find on bikes in this price range)
Fenders included – I do like fenders!
Different frame sizes available for the vertically gifted or challenged (that sounds offensive)
Configurable power settings if Class 2 restrictions aren’t fast enough for you
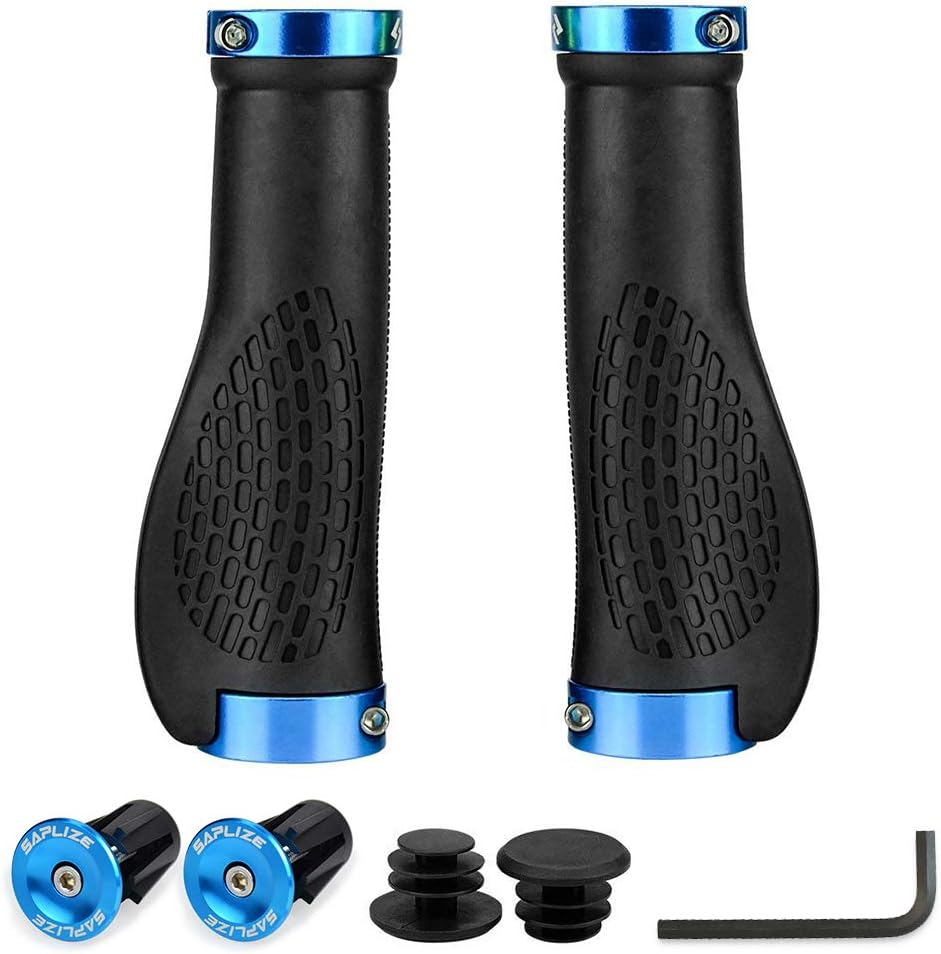
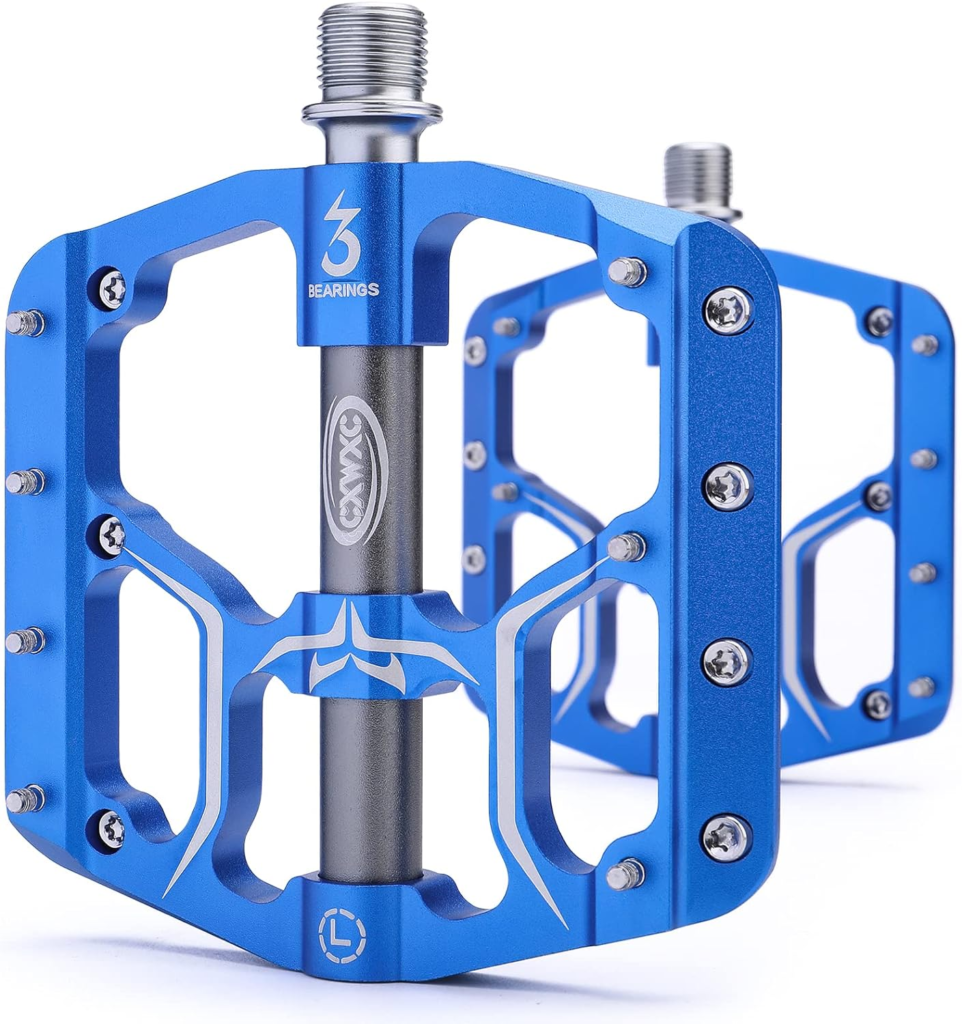
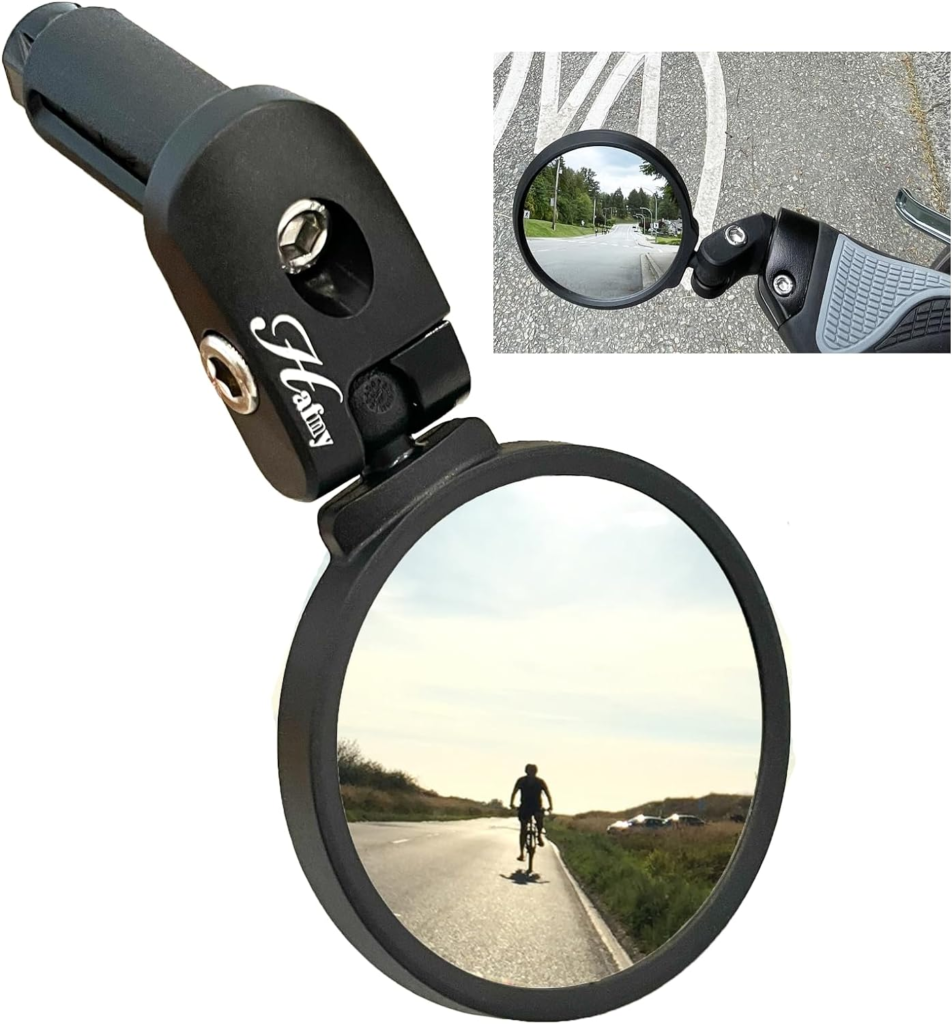
And I could go on. But taking into consideration all the great features of the Santa Monica, I still feel the need to change out 3 things, and ONLY 3 things. First, every e-bike needs a mirror: the Hafny Bar End Mirror is my current favorite for $15. Second, most e-bikes in this price range ship with pedals that I consider to be junk. Here’s the a pedal set I have been buying recently and am very happy with: 3 Bearing 9/16” Aluminum Alloy Bicycle Pedals for $24 and change. Plus they come in various colors to match the color of your e-bike. And my third and final upgrade is handlebar grips. You’re going to need to change out the grips anyway to fit the bar-end mirror, and I swear by Lock-on Knife Shape Mountain Bike Grips, which also come in various colors by the way. These babies will set you back $8 a pair.
When all is said and done, I have spent another $50 transforming my Santa Monica from a great e-bike into a ‘perfect’ e-bike. Having built e-bikes and bought e-bikes, I know that I can buy a good e-bike and for a few hundred dollars turn it into a great e-bike. But when I see an e-bike on the market where the manufacturer has already built a high level of quality and functionality into the bike I’m buying, then that’s bike I would buy, and then I only have to make a few mods. AIMA’s Santa Monica is that e-bike, and I’m very impressed. Job well done AIMA!
Photo Gallery:
203mm brake rotors and good quality hydraulic brake calipers
750W Bafang rear hub motor
52 tooth crankset and quiet-running street tire
Adjustable handlebar stem
And my mods:
Grips
Pedals
Mirror
Posted inUncategorized|Comments Off on An almost perfect step-thru e-bike
This new site has two primary purposes. First, it’s an exercise designed to help others develop their own WordPress websites. And second, it’s to communicate to aspiring DIY e-bike builders my best practices and resources that can help them successfully build an e-bike without spending a fortune.